2017 - Hero (Zero Turn Go Kart)

Status
Not open for further replies.

Functional Artist

Well-known member
Messages
4,403
Reaction score
1,678
Location
Toledo, Ohio
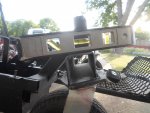
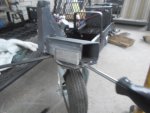
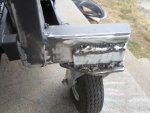
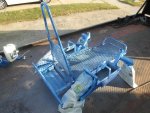
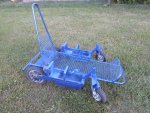
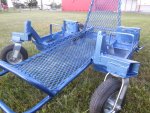
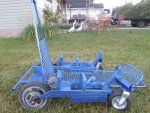
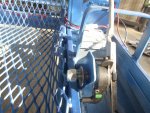
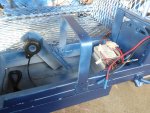
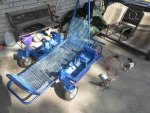
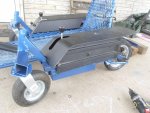
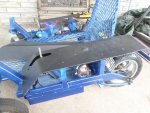
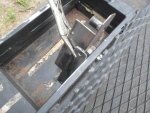
Made up the side covers today.

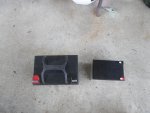
I got out the left over pieces of plastic from the TV back cover that I cut the arm rest out of.

The center section should do nicely. :thumbsup:

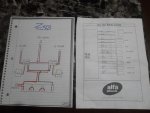
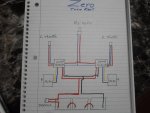
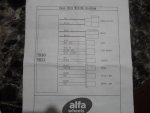
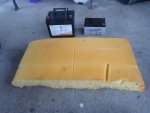
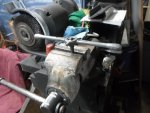
I used a propane torch, old knife, a straight edge & a couple of clamps.

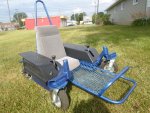
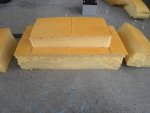
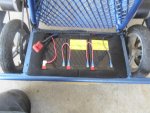
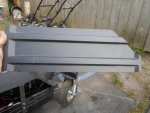
Starting with the right side, I measured the area we needed to cover (6") then marked & cut out two strips.

From the front point to the rear edge was ~18" but we only had ~16" to work with.

So, the side panels ended up being 6" tall x 15" wide.

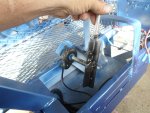
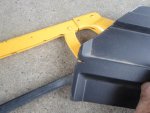
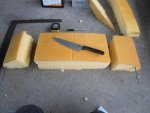
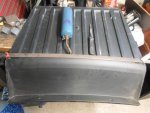
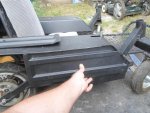
Next marked the contour from the front of the arm rest on the side panel & hot knifed it right off.

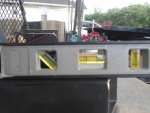
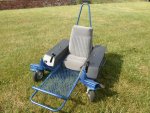
Next, layed the first panel on top of the second panel & marked a matching contour.

Dumb idea! :mad:

They need to be back to back, NOT on top of.

Now I have (2) right panels.

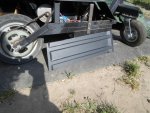
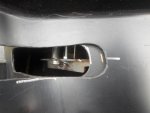
Cut another 6" strip & marked it correctly. :wai:

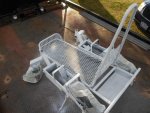
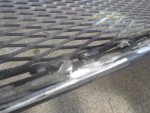
Smoothed up the corners & cleaned up the edges with a table top belt sander. :auto:
 

Attachments

  • SAM_3318.jpg
    SAM_3318.jpg
    242.4 KB · Views: 3
  • SAM_3320.jpg
    SAM_3320.jpg
    453.2 KB · Views: 4
  • SAM_3321.jpg
    SAM_3321.jpg
    284.6 KB · Views: 3
  • SAM_3322.jpg
    SAM_3322.jpg
    338.6 KB · Views: 6

Functional Artist

Well-known member
Messages
4,403
Reaction score
1,678
Location
Toledo, Ohio
Took most everything back apart so I could weld the hand control mounts in place.

They ain't workin' loose no more. :thumbsup:

Next, I need to attach knobs to the hand controls.

The original plan was to use (2) 5" pieces of 7/8' pipe with rubber hand grips but, they made the hand controls too top heavy & affected the spring back action.

So, I'm thinkin' a couple of light weight knobs threaded onto ~2" of 3/8" rod.

Then I noticed that the left arm rest slot was too short.

Layed the two arm rests back to back, marked the left side I

So, I had to notch it back another inch or so. :auto:
 

Attachments

  • SAM_3337.jpg
    SAM_3337.jpg
    234 KB · Views: 2
  • SAM_3335.jpg
    SAM_3335.jpg
    185.1 KB · Views: 2
  • SAM_3332.jpg
    SAM_3332.jpg
    241.2 KB · Views: 2
  • SAM_3331.jpg
    SAM_3331.jpg
    244.4 KB · Views: 2
  • SAM_3328.jpg
    SAM_3328.jpg
    351 KB · Views: 2

Functional Artist

Well-known member
Messages
4,403
Reaction score
1,678
Location
Toledo, Ohio
Next on the list was the steering/castor issue.

Thinkin' about it & lookin' at other castor situations.

The castors on shopping carts, tool boxes & zero turn mowers are mounted horizontally.

When I mounted the castors on this kart,

I figured (wrongly)

that giving the them a bit of a lean (front of top of each castor tilted upward)

...(a) would aid the karts ability transverse/hitting bumps when rollin' down the road &

...(b) help steering by kinda automatically centering the wheels to aid the kart goin' straight.

So, to fix it (I would say) I need to tilt the top/front of each castor down ~1/4".

instead of just choppin' them off & startin' over

...I used our handy dandy cut off tool to cut into the welds on the front side of each castor, pried the castor & mount apart ~1/4", cleaned up the area, added a 1/8" x 1" x 3" piece of flat steel & welded them back up.

Sounds easy but, took like 4 hours.

Started workin' in the back yard but, 1/2 way thru it started raining so I moved the whole operation to the front porch.

Shh don't tell my wife

:censored: she already knows.

But, It's rainin' honey, can't weld in the rain NOT safe (BIG SMILE) :thumbsup:

By the time I got it done it had stopped raining so I did some maneuverability testin'.

Seemed to work better. :wai:

Sittin' back/relaxin' & doin other research :p I realized:

I'm that nutty neighbor cuttin', grindin' & welding on the front porch @ 11 o'clock @ night then walkin' down the road @ midnight pushin' some contraption around corners & round in circles with like 5 HF flashlights magnetized to it.

IDK! :auto:
 

Attachments

  • SAM_3358.jpg
    SAM_3358.jpg
    269.1 KB · Views: 3
  • SAM_3359.jpg
    SAM_3359.jpg
    251.9 KB · Views: 2
  • SAM_3348.jpg
    SAM_3348.jpg
    533.9 KB · Views: 2
  • SAM_3346.jpg
    SAM_3346.jpg
    579.1 KB · Views: 2
  • SAM_3363.jpg
    SAM_3363.jpg
    244.5 KB · Views: 3

Functional Artist

Well-known member
Messages
4,403
Reaction score
1,678
Location
Toledo, Ohio
Now that steering geometry seems better, I welded the braces on better.

Cleaned the welds up a bit & did a lot of smoothin' & roundin',

was sharp edges everywhere.

NOT NO MORE! :thumbsup:

Hand sanded entire kart then gave it a bath in paint thinner.

I used white primer to provide a bright base coat. :2guns:
 

Attachments

  • SAM_3372.jpg
    SAM_3372.jpg
    402.1 KB · Views: 6
  • SAM_3369.jpg
    SAM_3369.jpg
    384.4 KB · Views: 4
  • SAM_3367.jpg
    SAM_3367.jpg
    372.8 KB · Views: 4
  • SAM_3365.jpg
    SAM_3365.jpg
    314.3 KB · Views: 6

Functional Artist

Well-known member
Messages
4,403
Reaction score
1,678
Location
Toledo, Ohio
Dark Blue Metallic, that should go nicely with our light blue seat & black arm rests. :thumbsup:
 

Attachments

  • SAM_3377.jpg
    SAM_3377.jpg
    473.4 KB · Views: 3
  • SAM_3378.jpg
    SAM_3378.jpg
    605.9 KB · Views: 6
  • SAM_3380.jpg
    SAM_3380.jpg
    453.2 KB · Views: 4
  • SAM_3383.jpg
    SAM_3383.jpg
    454 KB · Views: 4

Functional Artist

Well-known member
Messages
4,403
Reaction score
1,678
Location
Toledo, Ohio
Like the manual says, reverse procedure. :thumbsup:

Now, to put it all back together.

Got speed controllers, harness & everything layed out roughly in place on the kart.

Started with left hand controller.

...put on thumb throttle (will adjust later)

...slid in hand control lever, added big washer & secured it with a lock nut.

(just tight enough to not be sloppy but, move freely) :2guns:

Bolted the speed controller in place.

Make sure everything is plugged in.

...throttle to controller

...motor to controller

... power supply to controller (from Batteries)

...& the key switch

Now, Repeat procedure for the right side.
 

Attachments

  • SAM_3395.jpg
    SAM_3395.jpg
    376 KB · Views: 5
  • SAM_3394.jpg
    SAM_3394.jpg
    368.1 KB · Views: 5
  • SAM_3393.jpg
    SAM_3393.jpg
    421.8 KB · Views: 4
  • SAM_3389.jpg
    SAM_3389.jpg
    502.5 KB · Views: 5
  • SAM_3388.jpg
    SAM_3388.jpg
    498.7 KB · Views: 5

Functional Artist

Well-known member
Messages
4,403
Reaction score
1,678
Location
Toledo, Ohio
Here is the wiring diagrams for the Zero Kart.

First one is a diagram of the actual wiring layout on the kart.

Second is the wiring description that came with the speed controllers.

It seems, the bare necessities needed to run these little speed controllers are:

power in (from batteries)
power out (to motor)
a switch (to turn the system On/Off)
Throttle signal (to tell the controller what you want it to do)

:auto:
 

Attachments

  • SAM_3487.jpg
    SAM_3487.jpg
    237 KB · Views: 4
  • SAM_3480.jpg
    SAM_3480.jpg
    237.9 KB · Views: 3
  • SAM_3481.jpg
    SAM_3481.jpg
    210.4 KB · Views: 2
  • SAM_3484.jpg
    SAM_3484.jpg
    224.1 KB · Views: 3

pRoFiT

Can't buy it?, build it!
Messages
1,135
Reaction score
32
Location
California
Looking good so far.

Reminds me of a lawnmower for some reason.
images.jpg

Cant wait to see some driving video! Keep up the good work.
 

Functional Artist

Well-known member
Messages
4,403
Reaction score
1,678
Location
Toledo, Ohio
Now that the guts of this thing are all back in place lets get the arm rests installed. :thumbsup:

Used a couple of pieces of 16g. steel out of the scrap bucket to add a little support under the arm rests.

The arm rests will be held in place with (4) screws so their easily removable.

I didn't want them to be separate pieces (plastic arm rest & steel backing plate)

...so I used red RTV to kinda glue the backing plates to the underside of each arm rest.

...it also kinda acted like a cushioned separator so the plastic & steel were actually touching each other. (creekin' when leaned on or on bumps)

Side panels needed a little notchin' to fit tight.

Added the control knobs. (off riding lawn mowers)

Good grip & springs back nicely.

Yea, that should do it. :2guns:
 

Attachments

  • SAM_3442.jpg
    SAM_3442.jpg
    342.5 KB · Views: 7
  • SAM_3443.jpg
    SAM_3443.jpg
    265.4 KB · Views: 7
  • SAM_3439.jpg
    SAM_3439.jpg
    272.7 KB · Views: 6
  • SAM_3435.jpg
    SAM_3435.jpg
    401.2 KB · Views: 8
  • SAM_3434.jpg
    SAM_3434.jpg
    371.4 KB · Views: 6
  • SAM_3452.jpg
    SAM_3452.jpg
    591.5 KB · Views: 8
  • SAM_3456.jpg
    SAM_3456.jpg
    709.6 KB · Views: 7

Functional Artist

Well-known member
Messages
4,403
Reaction score
1,678
Location
Toledo, Ohio
Lets discuss the batteries, been doin a lot of research (more on that later)

Last fall I designed the battery box on this kart to hold (3) 12V 35AH SLA (sealed lead acid) batteries (~20 lbs. ea.) like I used on the El Dingo Kart.

This spring, when doin' testing, (bench tests, kart up on blocks & test drives) I used (3) 12V 12AH SLA batteries (~9 lbs. ea.) that I already had on a shelf out of a scooter.

Seemed to work well & last a while (like 20 - 30 min) :thumbsup:

So, I was thinkin' (always thinkin')

Why lug around a 60 lbs. fuel tank (3) 12V 35AH batteries?

When a ~30 lbs. fuel tank (3) 12V 12 AH batteries lasts long enough ( ~1/2 hour) to have some fun & get the motor and/or motors good-n-hot.

Conclusion;

Less weight = less stress, on the kart, motors & my build budget.:2guns:

...& less run time , while not as much fun, will actually be better on the motors (give em' time to cool down)

(heat is an electric motors worst enemy) (or wurst if in Germany) :cornut:

So, for now, I'll stick with the 12V 12AH batteries.

That being said, these batteries don't fit the box properly.

Can't have the batteries floppin' around back there.

Solution;

Encase them in foam rubber.

I have some of the foam rubber out of an Oldsmobile that I used to make the seat, left over.

Let's see what we can do with that.

Measured the box, I know the dimensions but, ya know, measure twice/cut once.

Used a sharp kitchen knife (Shh don't tell my wife) to trim up the foam. (~ 1" over each way so I can tuck it in a bit to fit snuggly)

...then carefully cut out the center portion out.

...a little black paint & boom! they ain't goin' no where. :cheers2:

:auto:
 

Attachments

  • SAM_3414.jpg
    SAM_3414.jpg
    252.5 KB · Views: 6
  • SAM_3422.jpg
    SAM_3422.jpg
    344.9 KB · Views: 7
  • SAM_3421.jpg
    SAM_3421.jpg
    333.8 KB · Views: 7
  • SAM_3406.jpg
    SAM_3406.jpg
    427.2 KB · Views: 6
  • SAM_3405.jpg
    SAM_3405.jpg
    372.5 KB · Views: 5
  • SAM_3413.jpg
    SAM_3413.jpg
    376.1 KB · Views: 5
  • SAM_3428.jpg
    SAM_3428.jpg
    276.4 KB · Views: 8

dozerdroid

New member
Messages
2
Reaction score
0
Location
Central Maryland
Hey FA, interesting build I just reviewed from the beginning, I'll be interested to see the finish, I saw where you had difficulty finding #25 roller chain and paid $4 a ft., for future reference I recommend surplus center, I recently bought some for a custom self propelled mower I built (no rider) #25, 10ft chain plus coupling for $14.95, http://www.surpluscenter.com/Power-...25-10-10-BOX-OF-25-ROLLER-CHAIN-1-1163-25.axd, good luck on the build, droid
 

Functional Artist

Well-known member
Messages
4,403
Reaction score
1,678
Location
Toledo, Ohio
I wired both controllers to (1) key switch so we have just a master switch.

& the (3) batteries are in series to provide the required 36 volts & are wired to both controllers.

:auto:

I was thinkin'

maybe the (3) 12V 12AH batteries (36V) I am using, on this kart, are NOT powerful enough to power both of these motors at the same time.

The motors I am using for this kart do not have an amp draw rating on them but, going by other small electric motors, they probably draw like ~15 - 20 amps each.

So, maybe trying to run (2) motors (drawing 30-40 amps @ once) off this (1) small battery pack is NOT a great idea.

It seems to work but, not properly.


During our first test runs the left motor seemed stronger.

I would engage run both motors to start off

but, then would have to back off with the left throttle

& run the right motor full speed to go

& only engage the left throttle (from time to time) for steering correction. (to maintain going straight)


I assumed that maybe (1) of the motors was more worn out or "not as fresh" than the other one.

So, I switched the motors & tested again.

To my amazement, the left side still seemed stronger.


To test this theory we would have to:

...use (2) separate 36V battery packs

...or use bigger batteries.


Mounting (2) separate battery packs would be difficult

but, the kart was actually designed to use (or was built to carry) (3) 12V 35AH batteries

I just continued to use the smaller batteries because they were lighter.

So, lets try a test run with the bigger batteries :thumbsup:

The kart will be ~16 lbs. heavier but, should have more power available to run the (2) separate motors & it should also have a longer run time. :2guns:
 

Functional Artist

Well-known member
Messages
4,403
Reaction score
1,678
Location
Toledo, Ohio
Test drive was kinda successful :cornut:

Stopped & picked up a cool refreshment while I was out

Got pulled over by the police (wanted to check it out)

& made it back home without pushing :thumbsup:


But, the bigger battery test was a complete - failure :ack2:

I still had to run the right motor 100% of the time just to go

https://www.youtube.com/watch?v=Rss3YOJPBFY

& only kicked in left motor for steering correction


So, the 12V 12AH batteries must have been supplying enough power to run both motors @ the same time

...& the bigger batteries did NOT change anything

...I noted a longer run time but, no difference in performance


& when I checked everything after the test run,

...the left motor was quite warm (expected after a ~30 min ride)

...but, the right motor was super hot & emitting a yucky electrical smell

All the other electrical stuff seemed OK
 
Last edited:

Functional Artist

Well-known member
Messages
4,403
Reaction score
1,678
Location
Toledo, Ohio
You ever see an old movie where some foreign painter guy is working on a painting

Makes a weird face

mixes some colors dabs a little here & there

...steps back

...pauses

...grunts

then then suddenly screams "RUBBISH"

...grabs the picture off the easel

...smashes it over a chair (or something)

...& storms out of the room mumbling obscenities in some foreign language

Well, that's about where I am with this one.

I've already designed another kart that should address the short comings of this kart

But, doin' the same thing again doesn't motivate me

As my oldest daughter would say "it's doin' the most" :cornut:
 

itsid

Moderator
Staff member
Messages
11,564
Reaction score
115
Location
Ruhrpott [Germany]
& when I checked everything after the test run,

...the left motor was quite warm (expected after a ~30 min ride)

...but, the right motor was super hot & emitting a yucky electrical smell

All the other electrical stuff seemed OK

check the right brake not being engaged for some reason
and the bearings are in good condition and not locked up by the frame etc.(missing washer?)

easiest: remove the chain and spin the wheel by hand

if it doesn't spin easily the motor has to add a lot more power to do so.
if it does,
reattach chain (make sure it's not too tight) detach the motor from the controller,
spin the wheel by hand again, the motor should turn over nicely and 'freely'-ish (ah heck, you know hoe a motor feels turned by hand ;))
if it's sticky now, the motor bushings (bearings??) might have failed.

if that's also not the cause of trouble... you might have a wiring issue.

'sid
 

Functional Artist

Well-known member
Messages
4,403
Reaction score
1,678
Location
Toledo, Ohio
I appreciate the suggestion :thumbsup:

I put it up on a jack stand & checked/compared the rear wheels

Both wheels seem to spin pretty much equal

The bearings seem fine (wheel & motor)

I notice no rubbing against the frame or anything


Even during manual push tests, earlier in the build,

The kart rolled really well, it just seemed to pull to the right. (probably due to castor mis-alignment)

But, I think the problem is more in the combination of components
that I used:

...the frame is too rigid, it doesn't go with the flow of things

...the motors (350 watt - less than 1/2 HP each) are too weak to motivate a full size kart properly

...the contact patch of rear wheels is too small to use braking on either side as much of a steering aid (would just drag the wheel a few inches)

..the rear brakes were also too small to use, as much of a steering aid either

It does everything it's supposed to do,

...just not very well

https://www.youtube.com/watch?v=G8xW-HoM2As
 
Status
Not open for further replies.
Top