Looking good chancer. Taking the time to make sure things are straight is going to pay off in the end
You are using an out of date browser. It may not display this or other websites correctly.
You should upgrade or use an alternative browser.
You should upgrade or use an alternative browser.
2016 - Beer Crate Racer (winner)
- Thread starter chancer
- Start date
- Status
- Not open for further replies.
chancer
ɔ ɥ ɐ u ɔ ǝ ɹ
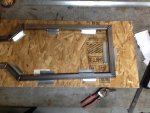
Another little tip i found from a German Website.
On the plywood I will screw in place these L Brackets to hold the frame in Shape as I tack it.
Then I can leave the brackets in place and Flip the whole frame over and tack the other Side.
The Brackets make a sort of poor mans Frame Jig.
Also First I think I will draw a Center line and Even the entire Frame to scale, Directly on the wood. So I can line everthing up correctly as I tack.
Measure once, Grind, allign, measure again, Then Tack and Measure again.
Flip over repeat.
Lather, rinse, repeat.
Attachments
-
 IMG_4466.jpg318 KB · Views: 39
 -
 IMG_4467.jpg391.3 KB · Views: 35
Poboy kartman
Senior Moments Member
Another little tip i found from a German Website.
On the plywood I will screw in place these L Brackets to hold the frame in Shape as I tack it.
Then I can leave the brackets in place and Flip the whole frame over and tack the other Side.
The Brackets make a sort of poor mans Frame Jig.
Also First I think I will draw a Center line and Even the entire Frame to scale, Directly on the wood. So I can line everthing up correctly as I tack.
Measure once, Grind, allign, measure again, Then Tack and Measure again.
Flip over repeat.
Lather, rinse, repeat.
I don't know if you remember or not, but that's what I suggested when the subject of the OSB first came up; (establishing center lines and doing a complete layout to start with.) My recommendation was to do it before cutting the pieces though, so they could be checked immediately.
chancer
ɔ ɥ ɐ u ɔ ǝ ɹ
Clearly I did not remember. Or I would have given Credit.
I almost called it a "Poboy Jig" but that sounded Racist. So I changed it to Poor mans Frame Jig
LOL
I almost called it a "Poboy Jig" but that sounded Racist. So I changed it to Poor mans Frame Jig
LOL

it's really looking good Eric..
if you need a translation or so.. drop me a note
")
'sid
Poboy kartman
Senior Moments Member
I'm fuzzy too, I think it was KartFab that brought up the OSB....
chancer
ɔ ɥ ɐ u ɔ ǝ ɹ
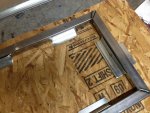
Tonights progress I got the frame all tacked, and I am happy with the results using the frame jig, and everything is square and Flat.
Also I forgot to mention this is all 1 1/8" .120 wall tube. A little heavy but I wanted it to be strong.
and the smaller crossbar is just there now as a place holder. Later it will be a support for the engine mount plate. Today it was just a tool.
Also I forgot to mention this is all 1 1/8" .120 wall tube. A little heavy but I wanted it to be strong.
and the smaller crossbar is just there now as a place holder. Later it will be a support for the engine mount plate. Today it was just a tool.
Attachments
-
 IMG_4468.jpg389.4 KB · Views: 43
 -
 IMG_4469.jpg392.7 KB · Views: 31
chancer
ɔ ɥ ɐ u ɔ ǝ ɹ
Advice and Opinion
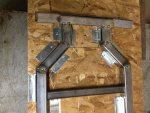
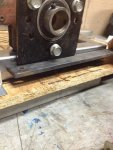
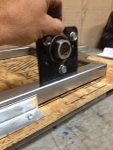
So i have these standard bearing mounts.
I could just weld them flat on top of the frame. (pic1) I did not think this was strong, but Kelly said it works.
Before I asked him, I had another idea.
To mount them on the side of the frame and weld on a support bar under them. (see Pics2and3)
What do you guys think?
Attachments
-
 IMG_4472.jpg375.1 KB · Views: 36
 -
 IMG_4471.jpg338.4 KB · Views: 32
 -
 IMG_4470.jpg317.3 KB · Views: 33
chancer
ɔ ɥ ɐ u ɔ ǝ ɹ
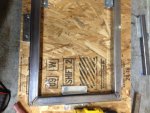
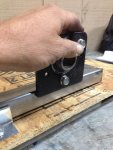
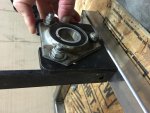
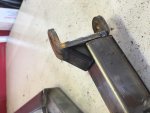
Sorry I forgot this idea too: Duh it is my favorite. Weld a 1" vertical support behind the hangar.
Attachments
-
 IMG_1577.jpg273.2 KB · Views: 34
Poboy kartman
Senior Moments Member
I like the 1" vertical.
Moving along nicely . The vertical support does look good. It should be pretty strong. The only trick will be to get everything straight when welding
. The vertical support does look good. It should be pretty strong. The only trick will be to get everything straight when weldingchancer
ɔ ɥ ɐ u ɔ ǝ ɹ
Moving along nicely
That seems to Always be the case! Especially with these Axle hangars. That was one of my main points to getting the Frame square in the first place. You need a good solid foundation to build anything.
With a square and a tape measure, and using the edge of the frame I think I will be ok. This will be the 4th axle hangars I have mounted. Dilligence paid off on the other 3
Fortunately you can buy self centering bearings. I am not too sure if those that you have are self centering. So even if the hanger is slightly skew, the bearing can center itself with the ale
Desertduler
Active member
- Messages
- 1,736
- Reaction score
- 13
Looking good, I too like the vertical mount, I would use the axle to help jig the two bearings in place and you are using self centering bearings, the upright gussets would keep the bearing flange mounts from flexing during side loads, not telling you how to build your gussets but they can be sliced on an angle if you have the means from wide at the bottom where they will be welded to the top of the frame rail to narrow at the top to where they end flush with the top of the bearing mount hangers, this helps save weight and looks better too.
machinist@large
Active member
Looking good, I too like the vertical mount, I would use the axle to help jig the two bearings in place and you are using self centering bearings, the upright gussets would keep the bearing flange mounts from flexing during side loads, not telling you how to build your gussets but they can be sliced on an angle if you have the means from wide at the bottom where they will be welded to the top of the frame rail to narrow at the top to where they end flush with the top of the bearing mount hangers, this helps save weight and looks better too.
 Brett, I'd claim you were reading my mind, but your post beat me even logging in by about 10 hours or so....
 chancer
ɔ ɥ ɐ u ɔ ǝ ɹ
Thanks guys. Yes Landuse I was just remembering the same thing. They are self centering. I knew I could not have gotten that lucky previously. LOL
and thanks to Poboy, DD and Mac@lg.
I will use the upright supports.
And Brett I love that Idea of narrowing them at the top. I do have the means. Chopsaw and or Grinder.
and thanks to Poboy, DD and Mac@lg.
I will use the upright supports.
And Brett I love that Idea of narrowing them at the top. I do have the means. Chopsaw and or Grinder.
chancer
ɔ ɥ ɐ u ɔ ǝ ɹ
So Something like this:
again thanks for the input.
again thanks for the input.
Attachments
-
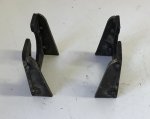 image1.jpg163 KB · Views: 26
 -
 FullSizeRender (4).jpg295.3 KB · Views: 23
Denny
Canned Monster
Is it done yet? How about now? How about now? 
Denny
Denny
Desertduler
Active member
- Messages
- 1,736
- Reaction score
- 13
Those look real nice!So Something like this:
again thanks for the input.
chancer
ɔ ɥ ɐ u ɔ ǝ ɹ
I got the rear bearing mounts tacked to the frame. and test fit the Axle (no pic). Everything came out square.
I also cut the front end off and reset it. Something was off. I had to adjust (Grind) the front frame stubs. It is now square also, and the angles are correct. It is tipped back 22°. This is a little much, but I have calculated the frame Rake to be about 7° so I should end up with a final of 15°.
Also tacked on the Spindle brackets and made some little triangle gussets to box them in.
Attachments
-
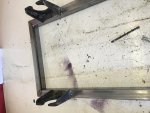 image2.jpg387.7 KB · Views: 38
 -
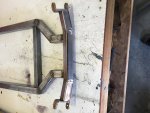 image1 (1).jpg341.3 KB · Views: 45
 -
 IMG_1594.jpg219 KB · Views: 47
- Status
- Not open for further replies.