2015 - DesertDuler

Status
Not open for further replies.

Desertduler

Active member
Messages
1,736
Reaction score
13
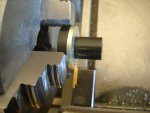
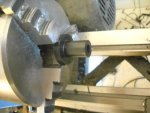
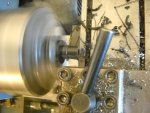
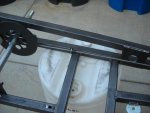
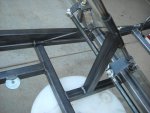
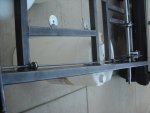
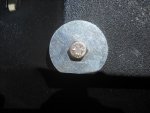
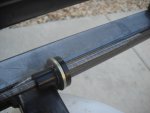
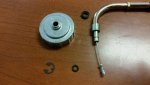
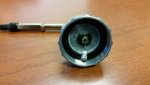
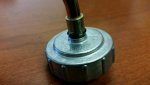
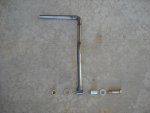
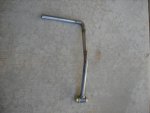
Working on the pedals this morning,here are the components that I am using as pedal mounts and pivots. I have machined some 6061 aluminium post bearings for the pedals and they go on to the grade 8 3/8 bolts that I welded to the inside of the frame right in front of the heel bar.I use flat washers on both sides of the pedal tubing as thrust washers,the aluminium post bearings are machined slightly wider than the tubing so the pedals have a little side clearance.
 

Attachments

  • 004.jpg
    004.jpg
    89 KB · Views: 28
  • 008.jpg
    008.jpg
    101.4 KB · Views: 24
  • 010.jpg
    010.jpg
    91.6 KB · Views: 22
  • 015.jpg
    015.jpg
    101.7 KB · Views: 34

chancer

ɔ ɥ ɐ u ɔ ǝ ɹ
Messages
9,358
Reaction score
93
Location
COMFORT, TEXAS
Looks like you started with a longer bolt and cut it down to get the thread free shank the correct length for your "post bearings". Correct? This is a neat trick for home made spindles and such too.
 

Desertduler

Active member
Messages
1,736
Reaction score
13
Looks like you started with a longer bolt and cut it down to get the thread free shank the correct length for your "post bearings". Correct? This is a neat trick for home made spindles and such too.
You are absolutely correct! good eyes,otherwise when you use threads on a stressed area the bolt will break right off at the threads,notice the length of my spindle bolts I use only the non threaded part of the bolts where my wheel bearings go.
 

Desertduler

Active member
Messages
1,736
Reaction score
13
Here is what I started with tonight, a one inch diameter Delrin rod, 4 flat washers and 4 external snap rings, I proceeded to machine the Delrin as follows and I made 4 control rod bearing guides and mounts.
 

Attachments

  • 034.jpg
    034.jpg
    60.6 KB · Views: 16
  • 028.jpg
    028.jpg
    68.3 KB · Views: 17
  • 022.jpg
    022.jpg
    67 KB · Views: 15
  • 017.jpg
    017.jpg
    88 KB · Views: 15
  • 012.jpg
    012.jpg
    95.3 KB · Views: 16

Desertduler

Active member
Messages
1,736
Reaction score
13
And here is where these bearing guides are going to be used and their location on the frame, I will tack weld the washers to the frame and if I ever have to replace these Delrin guides I can easily.
Notice the special shape of the brake control rod.
 

Attachments

  • 039.jpg
    039.jpg
    60.1 KB · Views: 36
  • 061.jpg
    061.jpg
    66.4 KB · Views: 37
  • 060.jpg
    060.jpg
    84 KB · Views: 49
  • 055.jpg
    055.jpg
    50.2 KB · Views: 32
  • 054.jpg
    054.jpg
    61.8 KB · Views: 33

Desertduler

Active member
Messages
1,736
Reaction score
13
Awesome work again :thumbsup:
Thanks man! I am just having fun building this thing, one can see the big flat washers that I used to mount the seat, I used these in place of flat bar mounting straps to help keep the weight down, I had to trim them with my saw so they would fit the seat frame rails,they are .125 thick.
 

Attachments

  • 015.jpg
    015.jpg
    124.7 KB · Views: 6
  • 014.jpg
    014.jpg
    83.9 KB · Views: 9

Desertduler

Active member
Messages
1,736
Reaction score
13
I like those rod guides, awesome detail work! :thumbsup:
Hey thank you very much! I just thought these up to kind of simplify them and make them easy to replace if need be, on my kart I just made them out of Delrin blocks and I have the control rods up higher and I have reversed this karts brake arm and as you can see have the control rods down low.
 

JMINDY

Member
Messages
254
Reaction score
5
Location
Indianapolis, IN
Hey thank you very much! I just thought these up to kind of simplify them...

No simple would have been just welding a short piece of tube to run the rod through and keep it from drooping down! When I look at show cars, one of the elements I enjoy the most is seeing a cool looking, high quality, custom design piece even though they could of just used a similar item from a rod/speed shop...usually people who go to those extremes, the car is a high end finish... your kart is well on it's way!

As for your seat mounts... have you used this method before? Just wondering how well it will hold up... My two seater kart had a bolt pull through the brace & floor, and that is with a bench seat. With a taller bucket seat, faster kart, etc. the forces are probably greater... just wondering with the washers only welded on one side, if the up and down pulling would be hard on the weld/washer? Of course your welding is a lot better than mine...:surrender:
 

Desertduler

Active member
Messages
1,736
Reaction score
13
Thank you again for the compliment! With this seat set up on this kart I have the seat frame rails tight against the bottom of the seat to help with the shear forces that will be induced from cornering, these washers are large as you can see and 1/8 of an inch thick and indeed I have welded them on both sides, I weigh 245 and I have sat in the seat and shifted my body weight around and stood on the seat and the mounts have not bent or moved and I am confident that they are not going anywhere and this indeed is the first time that I have mounted a kart seat this way and if you look I have only bolted the seat down in four places and I can add two more washers if I need to in the middle of the seat if need be and also this seat is not very heavy and it is hollow.
 

Desertduler

Active member
Messages
1,736
Reaction score
13
And on another note slightly off topic but worth thinking about is, I might try this in the near future, this seat is made of the same material that plastic gas tanks are made out of, (HDPE) a.k.a. Polyethylene and I will be working on a safe way to seal the threaded mount inserts and turn one of these seats into a long range fuel tank.
 

chancer

ɔ ɥ ɐ u ɔ ǝ ɹ
Messages
9,358
Reaction score
93
Location
COMFORT, TEXAS
I dono about that. Sounds like it would work but if it ever failed you are for sure wearing gasoline.
 

Desertduler

Active member
Messages
1,736
Reaction score
13
I dono about that. Sounds like it would work but if it ever failed you are for sure wearing gasoline.
Well I have raced Desert bikes for many years with a plastic tank between my legs, and ATV's. How do you figure I would be wearing gasoline?
 

chancer

ɔ ɥ ɐ u ɔ ǝ ɹ
Messages
9,358
Reaction score
93
Location
COMFORT, TEXAS
I was thinking the high back seat is?/was hollow and one piece or cavity from the butt part all the way up to your shoulders. That is why I said "if it fails" like got a crack up high or in the back part, after or during a roll over and you are under the seat as gas is leaking. I guess the same could happen in a rollover with any tank thou.
 

Desertduler

Active member
Messages
1,736
Reaction score
13
I was thinking the high back seat is?/was hollow and one piece or cavity from the butt part all the way up to your shoulders. That is why I said "if it fails" like got a crack up high or in the back part, after or during a roll over and you are under the seat as gas is leaking. I guess the same could happen in a rollover with any tank thou.
Yes that is possible, and this is something that I just have been thinking about because these seats are a lot thicker than a most fuel tanks,It may not even be worth considering just brainstorming,anyway back to the build.
 

crazykart

Crazy member
Messages
1,167
Reaction score
7
Location
Swartz Creek, Michigan
And on another note slightly off topic but worth thinking about is, I might try this in the near future, this seat is made of the same material that plastic gas tanks are made out of, (HDPE) a.k.a. Polyethylene and I will be working on a safe way to seal the threaded mount inserts and turn one of these seats into a long range fuel tank.

As long as it's not pressurized, have you thought about rtv? I know it's not ideal, but I've sealed a few gas tanks with it, including my van, which has held for over 50k miles, and still going strong.
 

Desertduler

Active member
Messages
1,736
Reaction score
13
As long as it's not pressurized, have you thought about rtv? I know it's not ideal, but I've sealed a few gas tanks with it, including my van, which has held for over 50k miles, and still going strong.
I have a lot of Dow Corning 730 rtv silicone that fuel won't do anything to, really expensive stuff. I will play with this idea at a later time, I am going to drive my kart a long distance for and endurance run and I need extra fuel capacity, this will be done on dirt and gravel roads more than 100 miles because I have some plans for a later date sort of a test for an upcoming event I have in mind.
 

Desertduler

Active member
Messages
1,736
Reaction score
13
I have the brake and throttle controls done and guides welded in place.
 

Attachments

  • 002.jpg
    002.jpg
    91.2 KB · Views: 32
  • 011.jpg
    011.jpg
    55.8 KB · Views: 21

Desertduler

Active member
Messages
1,736
Reaction score
13
For a throttle cable I am using a short snowmobile cable and the throttle slide cap that is used for snowmobile applications is the non threaded type unlike a cap that is threaded and used on a dirt bike or atv etc that have a rubber boot sealing the cable and the cap, therefore I must seal the cap and cable against dirt entry because snowmobiles are not subject to dirt entry and this is how I am doing this for this kart as seen in these photos,I will make a seal for the pull side of the cable also as dirt can enter through the cable housing because there is vacuum at all throttle postions to a degree on the inside of the throttle slide in the carburetor and this cable is short and more likely to pull dust and dirt into it.(This applies to slide type carburetors which the cable goes through the cap and pulls the throttle slide open)
 

Attachments

  • Mikuni 1.jpg
    Mikuni 1.jpg
    65 KB · Views: 4
  • Mikuni 2.jpg
    Mikuni 2.jpg
    61.3 KB · Views: 4
  • Mikuni 3.jpg
    Mikuni 3.jpg
    46 KB · Views: 4
  • Cable 1.jpg
    Cable 1.jpg
    60.1 KB · Views: 3
Status
Not open for further replies.
Top