2015 - DesertDuler

Status
Not open for further replies.

Desertduler

Active member
Messages
1,736
Reaction score
13
Man, that's smooth...:thumbsup:

Nice work, keep it coming!
Hey thanks! I look forward to seeing you and your boys "Little Winged Express" as I would call it when it is done, I love winged sprint cars! nothing like them!:cheers2:
 

Desertduler

Active member
Messages
1,736
Reaction score
13
Here is how I keep the rear axle from shifting under heavy side loads. The inner bearing mount goes up against the angle iron that is welded to the frame rail and the bolts go through the angle iron and frame tubing and also through the aluminium bushings that I have in place inside the frame,the bolts are 7/16 grade 8 bolts with steel locknuts,I have machined a axle spacer for each side that go up against the steel sleeve that is cast inside the wheel and against the inner pillow block bearing race and they are made to an exact size and zero preload in the bearings,the rear axle can't shift sideways inside the wheel bearings with this set up.Here is also a shot of the lightened brake rotor.
 

Attachments

  • 004.jpg
    004.jpg
    61.8 KB · Views: 19
  • 001.jpg
    001.jpg
    59.2 KB · Views: 23
  • 005.jpg
    005.jpg
    66.3 KB · Views: 19
  • 008.jpg
    008.jpg
    57.8 KB · Views: 19
  • 010.jpg
    010.jpg
    68.9 KB · Views: 22

chancer

ɔ ɥ ɐ u ɔ ǝ ɹ
Messages
9,358
Reaction score
93
Location
COMFORT, TEXAS
(quote) DD: "I have machined a axle spacer"
In most cases this is where we use a locking collar. I know your kart is purpose built for high speed salt flat driving. But on a yard kart is just a locking collar sufficient?
 

Desertduler

Active member
Messages
1,736
Reaction score
13
(quote) DD: "I have machined a axle spacer"
In most cases this is where we use a locking collar. I know your kart is purpose built for high speed salt flat driving. But on a yard kart is just a locking collar sufficient?
Those locking collars that you speak of do not hold the axle in place for what I am doing,maybe a yard kart yes but we run these things all day hard and we have not had one axle come loose or shift with this set up,weakness shows up with time and the only thing I ever had fail on my kart was my engine mount because it could not handle the power of my modified Rotax 277.
https://www.youtube.com/watch?v=t6tHHxMzya4
 

Desertduler

Active member
Messages
1,736
Reaction score
13
Here is a mock up of the stainless steel exhaust system that I am going to use and its location. This engine will melt mild steel exhaust tubing and mufflers. The inside diameter of the exhaust is 2'',I will not post the sound of this engine with this exhaust until the kart is done but I can guarantee that this little Rotary all 295cc's of it sounds wicked through this free flowing stainless steel muffler.
 

Attachments

  • 009.jpg
    009.jpg
    85.3 KB · Views: 20
  • 014.jpg
    014.jpg
    84.6 KB · Views: 19

rushking19

Active member
Messages
1,045
Reaction score
2
Location
Richmond Virginia
I can't wait to hear that thing fire up when it's done it's going to sound so good, if I didn't have a twin cylinder rotax 399cc 24hp snowmobile engine, I would have put a rotary on it because Rotarys are my favorite engine, my Dream car the Mazda rx7 has it
 

Desertduler

Active member
Messages
1,736
Reaction score
13
I can't wait to hear that thing fire up when it's done it's going to sound so good, if I didn't have a twin cylinder rotax 399cc 24hp snowmobile engine, I would have put a rotary on it because Rotarys are my favorite engine, my Dream car the Mazda rx7 has it
This little Rotary is as rare hens teeth now days, most certainly in this condition. This one had electric start and I have just removed all of the electric start components to reduce weight.
 

Desertduler

Active member
Messages
1,736
Reaction score
13
I made some steering arms this morning and here is how I set up the Akermann,I use an old shaft out of a weedeater as an alignment tool along with some strong magnets to hold the shaft dead center over the middle of the king pins and the center of the rear axle,then I align the steering arms tie rod mounting holes dead center to the shaft and I hold them in that location with small strong magnets and tack the arms in place,this is the most simple accurate way that I have come up with to do this task (for me anyway).
 

Attachments

  • 025.jpg
    025.jpg
    67.9 KB · Views: 41
  • 017.jpg
    017.jpg
    71 KB · Views: 48
  • 015.jpg
    015.jpg
    88.8 KB · Views: 53
  • 010.jpg
    010.jpg
    82.1 KB · Views: 43
  • 005.jpg
    005.jpg
    97.8 KB · Views: 46

Poboy kartman

Senior Moments Member
Messages
12,461
Reaction score
69
Location
White Settlement Texas
I just have to say....this is the worsted, most cobbled up build , I've ever see'd....I think I puked a little bit in my throat....

You know I'm totally kidding, Brett, you continue to impress....good job!!!!
 

Desertduler

Active member
Messages
1,736
Reaction score
13
I built the steering column and the pitman arm today, I am using 5/8 cold rolled steel as a steering shaft and it goes through bronze bushings that I have pressed into the column tubing and I have 1/4 -28 thread holes that I have tapped into the tubing so I can install zerk fittings there and grease the bushings as needed. Here is my 1 gallon spun aluminium tank that I am going to mount in this location,and also here is the beginning of my brake and gas pedal for the kart.
 

Attachments

  • 023.jpg
    023.jpg
    83.1 KB · Views: 20
  • 020.jpg
    020.jpg
    96.1 KB · Views: 23
  • 016.jpg
    016.jpg
    94.5 KB · Views: 28
  • 013.jpg
    013.jpg
    80.4 KB · Views: 41

Desertduler

Active member
Messages
1,736
Reaction score
13
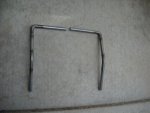
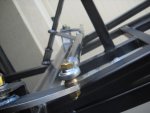
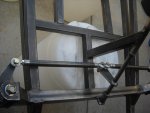
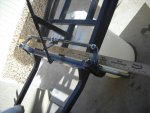
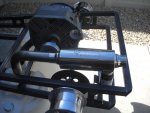
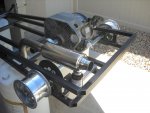
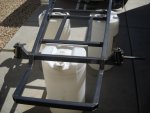
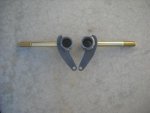
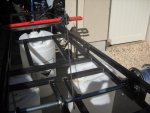
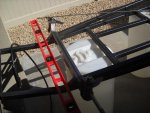
Here is the pitman arm and the inner tie rods Heim ends and the tie rod assembly, and one can see the Ackemann geometry taking place and the jacking angle of the front left wheel in a left hand turn in order to raise the left rear tie off the ground in a corner (Live Axle)
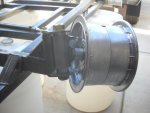
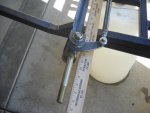
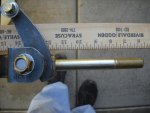
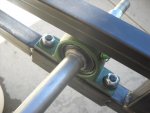
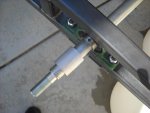
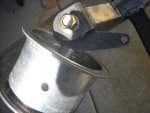
Both tie rods have a left and right hand threaded Heim joint,jam nuts,and bung to ease in toe adjustment,also notice the king pin washer stack which I can adjust by changing washers stacks around in order to raise or lower the spindles for fine tuning the steering.
 

Attachments

  • 028.jpg
    028.jpg
    62.7 KB · Views: 43
  • 032.jpg
    032.jpg
    54.5 KB · Views: 43
  • 034.jpg
    034.jpg
    69.3 KB · Views: 47
  • 038.jpg
    038.jpg
    85.3 KB · Views: 42
  • 042.jpg
    042.jpg
    64 KB · Views: 52

chancer

ɔ ɥ ɐ u ɔ ǝ ɹ
Messages
9,358
Reaction score
93
Location
COMFORT, TEXAS
I understand the washers will raise and lower the spindle, but how or What does that do to "fine tune the steering"? I have done the same thing just to level the kart if my spindles were not welded at exactly the same height L to R.
Again this is still awesome work. Thanks for sharing. So many little things you do, most people would skip or not think of.
 

Desertduler

Active member
Messages
1,736
Reaction score
13
I understand the washers will raise and lower the spindle, but how or What does that do to "fine tune the steering"? I have done the same thing just to level the kart if my spindles were not welded at exactly the same height L to R.
Again this is still awesome work. Thanks for sharing. So many little things you do, most people would skip or not think of.
If I raise the spindles the front axle has more traction in the corners (Oversteer) and if I lower them the front axle has less traction (Understeer) depending on the surface that I am driving on,this adjustment has to do with shifting the center of gravity of the kart fore or aft which is vital for cornering on different surfaces,for instance,I have had my shim stack on my kart a certain way while I have been testing engines out on the lake bed (which is dirt sediment with some alkaline content) in the morning and after many laps around a beaten in course I have had to lean forward slightly in the corners to keep the front end from pushing as I enter a corner at high speed,that is when I raise the spindles to a degree to take that effect out of the front end and the same thing will happen as the front tires start to wear,but on the other hand if I have too much traction on the front end the rear axle breaks loose too much when I exit the corners under power and the kart tends to want to spin out if you are not careful with the throttle so this is how I fine tune the steering on my karts and shift the center of gravity around to achieve different handling characteristics.I like my kart to be neutral and or have a slight oversteer in the corners.
I hope that this explanation sheds some light on this subject and thank you for the compliment.
 

Desertduler

Active member
Messages
1,736
Reaction score
13
When I first designed the front heavy duty service axle for my kart I figured out the dimensions that I needed as so as to align the front end toe adjustment easily and here is what I came up with at the time and I still am using the same dimensions and procedure as in these photos.I use a straight edge or something that is straight and butt it up against the "C" brackets on the front axle and if I want to have zero toe in (like in these photos) all I have to do is center the steering pitman arm in relation to the king pins and turn the tie rods as needed as so a 5/8 shaft or in this case aluminium aircraft tubing and put the 5/8 tubing between the front axle bolts and straight edge so they perfectly line up, sort of like using a large feeler gauge so to speak,this has worked out very well for me and all I have to do to set the toe setting for the front axle is remove the front wheels and set the toe.
 

Attachments

  • 009.jpg
    009.jpg
    68.7 KB · Views: 23
  • 008.jpg
    008.jpg
    90.7 KB · Views: 22
  • 007.jpg
    007.jpg
    64.2 KB · Views: 18
  • 001.jpg
    001.jpg
    75.4 KB · Views: 18

chancer

ɔ ɥ ɐ u ɔ ǝ ɹ
Messages
9,358
Reaction score
93
Location
COMFORT, TEXAS
Thanks for the explanation. That makes perfect sense, I used to work on stock cars at the local track so I totally understand now. Its like weight jacking front to rear.
 

Desertduler

Active member
Messages
1,736
Reaction score
13
Thanks for the explanation. That makes perfect sense, I used to work on stock cars at the local track so I totally understand now. Its like weight jacking front to rear.
Yes,exactly,you know if you have been cranking on the weight jacking bolts on a stock car you get it. :thumbsup:
 

Desertduler

Active member
Messages
1,736
Reaction score
13
Here is the tank mount straps and the location of the fuel outlet bung which is up inside the frame rails for protection,and here is the location of the heel bar in the frame,I had made this cooling fan intake screen so as this engine would not suck up any gravel and ruin the cooling fan because I was using this engine in my kart on some high speed gravel roads and this will be removed for the use in this kart.
 

Attachments

  • 021.jpg
    021.jpg
    65.7 KB · Views: 14
  • 028.jpg
    028.jpg
    72 KB · Views: 29
  • 024.jpg
    024.jpg
    112.8 KB · Views: 17
Status
Not open for further replies.
Top