2013 - pvc buggy

Status
Not open for further replies.

freqster

New member
Messages
68
Reaction score
0
Location
League City, Texas
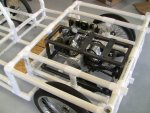
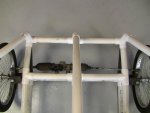
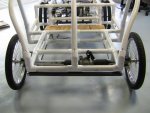
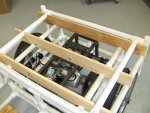
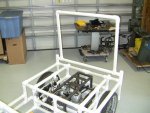
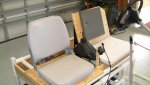
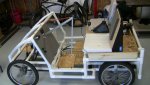
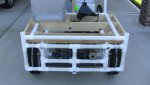
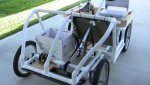
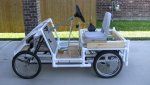
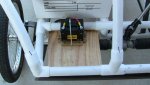
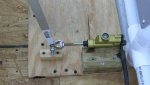
Well, I really dont want Right Hand Driving, so I moved the rack this weekend and swapped the spindles from left to right so the tabs were mounted in front of the front axle. Now I have to modify the tabs because of the reverse ackerman that is going on now.

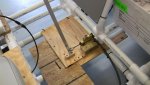
So basically I am rebuilding everything I have done for the steering. What a pain. If only I would have paid more attention to what kind of rack I had in the beginning!
 

freqster

New member
Messages
68
Reaction score
0
Location
League City, Texas
Got a little work done since the last update. Real close to going for a test drive now!

I moved the steering rack, and I had to come up with a new way to mount it. I had to rebuild my spindles, and I mounted the engine and got the jack shaft and chains sorted out.
 

Attachments

  • IMG_2582.JPG
    IMG_2582.JPG
    76.8 KB · Views: 53
  • IMG_2583.JPG
    IMG_2583.JPG
    43.2 KB · Views: 41
  • IMG_2584.JPG
    IMG_2584.JPG
    68.5 KB · Views: 43
  • IMG_2585.JPG
    IMG_2585.JPG
    67.3 KB · Views: 56
  • IMG_2586.JPG
    IMG_2586.JPG
    64.7 KB · Views: 46
  • IMG_2587.jpg
    IMG_2587.jpg
    65.2 KB · Views: 53

machinist@large

Active member
Messages
2,856
Reaction score
2
Location
West Michigan, 49331
Sorry you had to go thru all the extra work on the rack; the fact that you sorted it out without undue melodrama is all good in your favor.

:wai::cheers2:

One question; in pic #4 (lower LH CNR), both of your drive chains are picture perfect; perfectly taut, perfectly strait, perfectly set to fail. You need just a smidgen of slack; ~1/16 to 1/32 of an inch of up/down play in the unloaded side of the strand (lock the engine in gear, grab one of the drive wheels, rotate it F/B and hold it there; one side of the chain needs to have just a little bit of slack. That's where you measure it.) That slack needs to be there to allow any lubrication to work it's way in and do it's job. Properly set up and maintained, that small amount will never bother you.

:thumbsup::cheers2::popcorn:
 

freqster

New member
Messages
68
Reaction score
0
Location
League City, Texas
One question; in pic #4 (lower LH CNR), both of your drive chains are picture perfect; perfectly taut, perfectly strait, perfectly set to fail. You need just a smidgen of slack; ~1/16 to 1/32 of an inch of up/down play in the unloaded side of the strand (lock the engine in gear, grab one of the drive wheels, rotate it F/B and hold it there; one side of the chain needs to have just a little bit of slack. That's where you measure it.) That slack needs to be there to allow any lubrication to work it's way in and do it's job. Properly set up and maintained, that small amount will never bother you.

:thumbsup::cheers2::popcorn:

Thanks for the info! I will definitely take your advice on measuring the slack of the chain and adjust it. Luckily I have about an inch of travel on the motor and on the jack shaft where I can adjust it to where it needs to be. Even thought it is only loosely mounted, I should make sure I get the chain tension correct before I tighten it down!

I have been posting a few videos on YouTube with minor updates. Please check them out.

http://youtu.be/2i5C5yNdHoQ
 

freqster

New member
Messages
68
Reaction score
0
Location
League City, Texas
Well, It moves under its own power...

An update and a test drive!

I got the engine compartment lid finished and ready for a bench seat to mount. I also managed to get the steering column and steering shaft mounted with the uni joints in the steering shaft.

Since the motor was already wired up, I couldn't resist putting on a temporary steering wheel, gas tank, battery, etc, and take it for a test drive! I don't have brakes yet so the test drives have been short and slow, but fun! Here is a video with an update and one of the test drives: http://www.youtube.com/watch?v=FjuGqnswLro&feature=youtu.be
 

Attachments

  • IMG_2592.jpg
    IMG_2592.jpg
    97.6 KB · Views: 15
  • IMG_2591.jpg
    IMG_2591.jpg
    111.2 KB · Views: 17
  • IMG_2590.jpg
    IMG_2590.jpg
    94.9 KB · Views: 16
  • IMG_2589.jpg
    IMG_2589.jpg
    100 KB · Views: 15
  • IMG_2588.jpg
    IMG_2588.jpg
    57.4 KB · Views: 14

mysteryboy28

New member
Messages
1,582
Reaction score
2
Location
Lansing, MI
Very cool! First test drives are always exciting, even when you just throw enough parts on temporarily to just make it GO. Lol.
 

freqster

New member
Messages
68
Reaction score
0
Location
League City, Texas
Did some work on the dash area recently. Technically the buggy is finished by the build off rules, but I still have a lot of stuff I want to finish on it. The next think I really want to work out is rerouting the exhaust. I want to use some electrical conduit and build a new one but I dont have a conduit / pipe bender and most home/diy options just leave the conduit with kinks. I am still working out what to do. If anyone has any suggestions on the exhaust I am all ears...

Our 7 month old son is taking a lot of my time these days so its harder to get out in the shop and work, but here are a few pics.
 

Attachments

  • IMG_0103.jpg
    IMG_0103.jpg
    74.1 KB · Views: 32
  • IMG_0102.jpg
    IMG_0102.jpg
    64.4 KB · Views: 33
  • IMG_0101.jpg
    IMG_0101.jpg
    69.3 KB · Views: 35
  • IMG_0104.jpg
    IMG_0104.jpg
    81.2 KB · Views: 42

OzFab

New member
Messages
15,615
Reaction score
8
Location
Warwick Qld, Australia
Lemme guess, it's too close to the frame & causing heat damage? One thought is a heat shield, just a piece of thin sheet metal will do it.

If it's a clearance issue, that's a matter of reshaping the pipe.

If you have problems with mounting, make 2 loops, one around the exhaust & one around the frame & join them through a rubber block; that'll reduce vibration & heat transfer
 

freqster

New member
Messages
68
Reaction score
0
Location
League City, Texas
Lemme guess, it's too close to the frame & causing heat damage? One thought is a heat shield, just a piece of thin sheet metal will do it.

If it's a clearance issue, that's a matter of reshaping the pipe.

If you have problems with mounting, make 2 loops, one around the exhaust & one around the frame & join them through a rubber block; that'll reduce vibration & heat transfer

No, heat from the engine hasn't been a problem. PVC is pretty good in the fact that it can take a lot of heat up to a certain point, once it reaches that certain temp, about 197 degrees F, it will turn to rubber. I've kept enough clearance in my design to keep the heat away from the PVC.

Mounting or clearance isn't the issue either. My problem is that my exhaust is running out of the top of the frame, and I want it to run out the back of the frame. The exhaust I have is just too cheap and brittle to try to reshape. I was able to heat it up and bend it some, but not enough to where I need it. I really need to start with a fresh exhaust and I was hoping to get some tips on making one.
 

firemanjim

Just kartin' around....
Messages
5,228
Reaction score
1
Location
Houston Texas
Cut off the pipe leaving an inch or so from the mounting plate. Now get some pipe from the hardware store that will slide over the original exhaust pipe and fit good. You'regonna weld that later. Load up the buggy and go to that muffler shop on 518 near hwy 3 and get them to bend the pipe how you want it and then weld on the mount plate. They might charge you like $10-15 ..... Good guys over there....
Thats a nice lookin rig you got there.... As stated earlier, maybe you should look into building/selling kits.... It looks nice enough......
 

scott_shot

New member
Messages
184
Reaction score
0
Location
UK
Looks very nice mate, The youtube vids are very well done and imformative :thumbsup:

If it was my design and build I would be proud as punch as my old gran would say lol, Your neighbors with there golf carts should be jealous! look forward to seeing it finished.
 

freqster

New member
Messages
68
Reaction score
0
Location
League City, Texas
Cut off the pipe leaving an inch or so from the mounting plate. Now get some pipe from the hardware store that will slide over the original exhaust pipe and fit good. You'regonna weld that later. Load up the buggy and go to that muffler shop on 518 near hwy 3 and get them to bend the pipe how you want it and then weld on the mount plate. They might charge you like $10-15 ..... Good guys over there....
Thats a nice lookin rig you got there.... As stated earlier, maybe you should look into building/selling kits.... It looks nice enough......

Thanks for the info about that muffler shop. I am not 100% happy with my exhaust so I may take your advice and have them make me something.

Man, I have had more then a few people tell me to make this a kit. I am seriously thinking about it. I would have to change a few parts to something a little more common so there isn't so much custom fab work, but it is a possibility!
 

freqster

New member
Messages
68
Reaction score
0
Location
League City, Texas
A fun little ride..

Talk about last minute. I just got back home from a long trip last night and was reminded that the build off ends today! I had a lot to do today but I did manage to get some pics of the buggy. It has been complete according to the build off rules for some time now, but it still has a few things I want to add.

Here is a walk around video showing some of the details of the build.
http://www.youtube.com/watch?v=K7KWLDMH1uA

Here is the test drive video I made some time ago: http://www.youtube.com/watch?v=FjuGqnswLro

I have a few videos of the build progress if you would like to check them out on my YouTube channel here:

http://www.youtube.com/user/freqster
 

Attachments

  • IMG_0108.jpg
    IMG_0108.jpg
    62.6 KB · Views: 13
  • IMG_0101.jpg
    IMG_0101.jpg
    69.3 KB · Views: 13
  • IMG_0109.jpg
    IMG_0109.jpg
    89.4 KB · Views: 13
  • IMG_0107.jpg
    IMG_0107.jpg
    83.9 KB · Views: 14
  • IMG_0106.jpg
    IMG_0106.jpg
    90.2 KB · Views: 21
  • IMG_0110.jpg
    IMG_0110.jpg
    73.5 KB · Views: 12
  • IMG_0111.jpg
    IMG_0111.jpg
    74.3 KB · Views: 11
  • IMG_0112.jpg
    IMG_0112.jpg
    64.2 KB · Views: 12
  • IMG_0113.jpg
    IMG_0113.jpg
    71.9 KB · Views: 13
  • IMG_0114.jpg
    IMG_0114.jpg
    96.3 KB · Views: 16
Status
Not open for further replies.
Top