2013 - pvc buggy

Status
Not open for further replies.

freqster

New member
Messages
68
Reaction score
0
Location
League City, Texas
http://i87.photobucket.com/albums/k142/freqser/PVC Buggy/IMG_2509_zps1ead846b.jpg

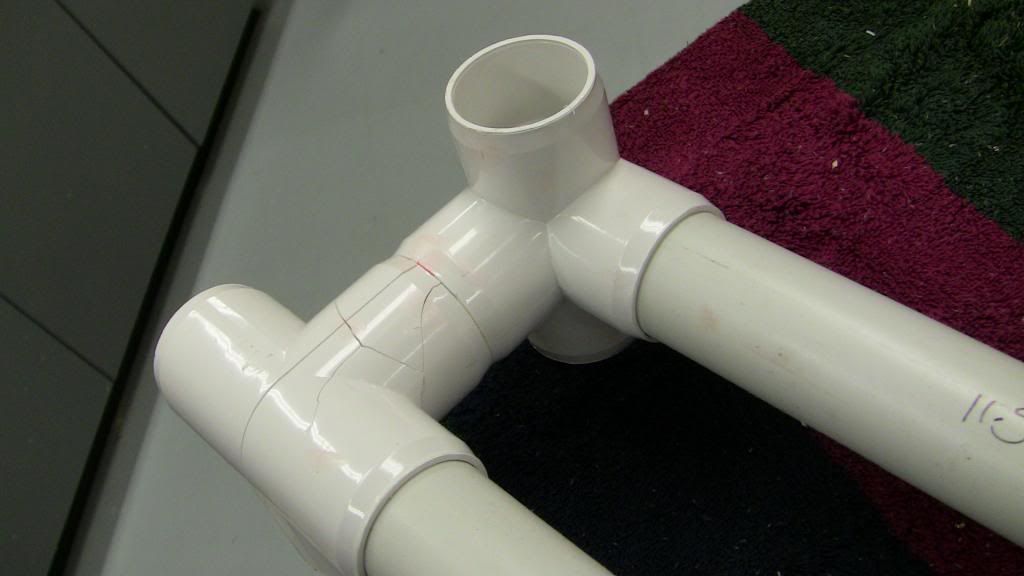
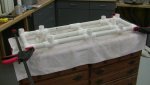
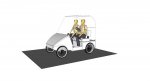
Here is my build off entry. It's a "Neighborhood Cruiser" made from PVC. I got the idea from http://www.americanspeedster.com/ I bought a set of the plans and was really disappointed in them. The plans were a few pages of mostly text, with a few pictures made using a word program. I mean, I could have hand drawn better pictures!!

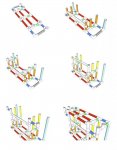
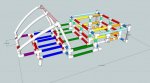
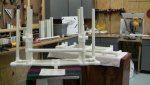
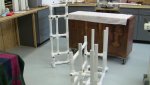
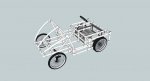
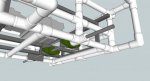
So I came up with my own design borrowing some of the ideas from the americanspeedster design. I love Google SketchUp so I spent a lot of hours drawing up my design. It's not the typical "Made from Steel" go kart but I hope it still qualifies. Here are some 2D exports...

http://i87.photobucket.com/albums/k142/freqser/PVC Buggy/MainView_zps0548a3dd.jpg

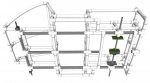
http://i87.photobucket.com/albums/k142/freqser/PVC Buggy/FrameWheelsEngine_zps7ed53f35.jpg

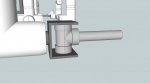
http://i87.photobucket.com/albums/k142/freqser/PVC Buggy/Engineandsteering_zps2bba16f9.jpg

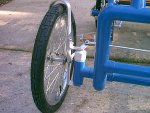
http://i87.photobucket.com/albums/k142/freqser/PVC Buggy/RearAxelBearings_zps20ef6c6f.jpg

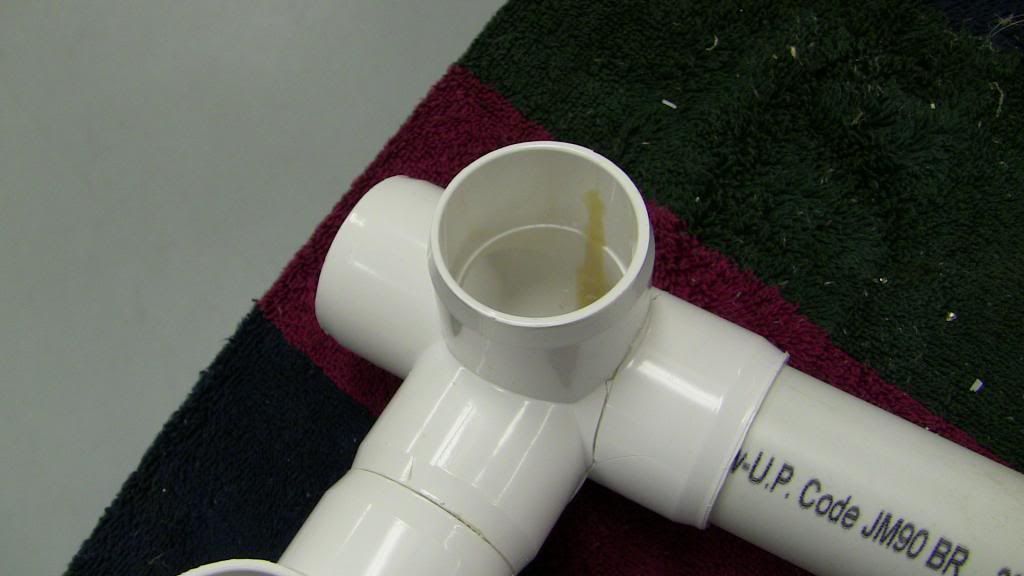
http://i87.photobucket.com/albums/k142/freqser/PVC Buggy/RearAxeltroughPVC_zpsb0f26a4a.jpg

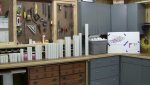
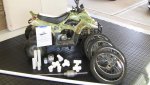
I have tons of ideas for it, and tons of questions on how I will do certain things. I picked up a 110cc Chinese Quad on Craigslist for $100.00 It had a dirty Carb. I took it off, cleaned it, charged the battery and it fired right up. Runs great. I used to run it around the neighborhood until someone flipped it and knocked the rear end out of alignment. But the engine and electrical and hydraulic brakes are OK, and that is all I want.
 

Attachments

  • IMG_2509_zps1ead846b.jpg
    IMG_2509_zps1ead846b.jpg
    99.4 KB · Views: 81
  • MainView_zps0548a3dd.jpg
    MainView_zps0548a3dd.jpg
    24 KB · Views: 69
  • FrameWheelsEngine_zps7ed53f35.jpg
    FrameWheelsEngine_zps7ed53f35.jpg
    36.1 KB · Views: 92
  • Engineandsteering_zps2bba16f9.jpg
    Engineandsteering_zps2bba16f9.jpg
    22.4 KB · Views: 56
  • RearAxelBearings_zps20ef6c6f.jpg
    RearAxelBearings_zps20ef6c6f.jpg
    29.5 KB · Views: 59
  • RearAxeltroughPVC_zpsb0f26a4a.jpg
    RearAxeltroughPVC_zpsb0f26a4a.jpg
    48.9 KB · Views: 70
Last edited by a moderator:

OzFab

New member
Messages
15,615
Reaction score
8
Location
Warwick Qld, Australia
I wish you lots of luck with this build. The concept has een thrown around here a few times & basically put down to a bad idea because the PVC can't handle the type of stresses that will be exerted on it but, it can't hurt to have a go...

IIWM, I'd gear it super low...
 

Doc Sprocket

*********
Messages
15,677
Reaction score
10
Location
Ontario, Canada
There's NO rule that says it has to be steel!

This oughta be interesting. I look forward not only to your build, but the results of your long-term testing to see if the plastic holds up. Good luck, and avoid the glue fumes!:ack2:
 

B man

Tecumseh FTW!
Messages
2,490
Reaction score
0
Location
Oliver springs,Tn
I see what your doing here. Your plans are great. building with very few long sections PVC is smart. In short pieces PVC can be pretty dang sturdy. i believe this could work nicely.

Also bike tires really arent up to the task. Id try something like Dirt bike tires with a wide tread.
 

fowler

New member
Messages
5,463
Reaction score
0
Location
Bullsbrook West Aus
Well it won't be a speed machine but good luck to u

I'll be watching this with intrest
It's a differant method to use steel for the big components mounted in a PVC space frame

PVC is very strong and quite flexible just doesn't like shock loading

All I can really say is I'd rekomend u use a steel front axle
 

freqster

New member
Messages
68
Reaction score
0
Location
League City, Texas
Hello everyone,

I will address a few of the comments before I give an update.

I am using Bike tires simply because I have tons of them. I really wanted to use dirt bike wheels for more strength, but I simply cant find 4 matching dirt bike tires for the right price. I am doing my best to keep this a low budget build. But I will always be on the look out for stronger wheels.

The frame is 1 1/4" PVC Schedule 40. The reason for that size is because I can use the top rail for chain link fence as an internal support. I got the idea from the americanspeedster plans. The top rail fits inside the 1 1/4" PVC very well. I will have 3 lengths of it along the buggy to help support. The PVC is strong, but I agree, that it wont stand up to the shock loads. I am hoping that the internal steel pipe will help out with that. In the picture below, I have made some of the PVC transparent so you can see where the steel pipe is.

http://i87.photobucket.com/albums/k142/freqser/PVC Buggy/Steelsupporlocations_zpsbce4e8d2.jpg

As for the front axle, I agree with fowler about using a steel front axle. I had originaly planned on using the americanspeedster design and doing something like this but after thinking about it some, I don't think that the joint will be strong enough:

http://i87.photobucket.com/albums/k142/freqser/PVC Buggy/ASspindle_zpsfcce56e4.jpg

I really like the "No Weld Spindles" that steve_lord posted. So I borrowed the design and came up with this. I dont exactly know how I will connect my steering yet but I will get to it.

http://i87.photobucket.com/albums/k142/freqser/PVC Buggy/SpindleIdea_zps6d21df68.jpg

http://i87.photobucket.com/albums/k142/freqser/PVC Buggy/Steelfrontaxle_zpsc0d834b1.jpg
 

Attachments

  • Steelfrontaxle_zpsc0d834b1.jpg
    Steelfrontaxle_zpsc0d834b1.jpg
    56.7 KB · Views: 40
  • SpindleIdea_zps6d21df68.jpg
    SpindleIdea_zps6d21df68.jpg
    25.2 KB · Views: 43
  • ASspindle_zpsfcce56e4.jpg
    ASspindle_zpsfcce56e4.jpg
    76.3 KB · Views: 67
  • Steelsupporlocations_zpsbce4e8d2.jpg
    Steelsupporlocations_zpsbce4e8d2.jpg
    53 KB · Views: 42
Last edited by a moderator:

freqster

New member
Messages
68
Reaction score
0
Location
League City, Texas
Started the build

Well I have started the build. Here are a few pics so far. (Pic 1 & 2)

http://i87.photobucket.com/albums/k142/freqser/PVC Buggy/IMG_2487_zpsf0473e81.jpg

http://i87.photobucket.com/albums/k142/freqser/PVC Buggy/IMG_2488_zpsfed95e16.jpg

The PVC fittings I am using are furniture grade PVC fittings. This lets me use fittings that would be pretty much useless for plumbing but great for building things from. I got the fittings from http://www.usplastic.com/

I didn't draw all of the fittings in Google SketchUp. When I was shopping for the fittings, I found this website: http://www.formufit.com/
On this website, I found where you could download all of their pvc fittings into Google SketchUp so you can make your own design. After I finished the design, I counted up the fittings, and ordered them from US Plastics because their prices were a little better.

I have to keep track of all the different sizes of PVC, so I came up with a color chart for the different sizes. (Pics 3-4)

http://i87.photobucket.com/albums/k142/freqser/PVC Buggy/Pipeframewithcolors_zpsc663a499.jpg

http://i87.photobucket.com/albums/k142/freqser/PVC Buggy/CutList_zpsace76f0e.jpg

Because of the number of joints in the PVC, I have to really think about how I am going to put this together. As a lot of you might know, when you glue PVC joints, you don't have much time before the PVC glue will set the joints. So I have to make sure that I have more work time with the PVC, and I have to make sure I know what order to put the pieces together. I did some research on getting PVC glue with more work time and the best solution I found is to use a glue designed for PVC trim. It is called AZEK. It is a little on the expensive side, but IMO it will be better then messing up the fittings and starting over. I wont use it for every joint, only when I have more then 2 or 3 joints to assemble at the same time. I also made a build order sheet to guide me in putting it together. (Pic 5-6)

http://i87.photobucket.com/albums/k142/freqser/PVC Buggy/IMG_2493_zps07556d96.jpg

http://i87.photobucket.com/albums/k142/freqser/PVC Buggy/assembleorder_zps6125ff49.jpg

So i started building it in layers: (Pics 7-9)

http://i87.photobucket.com/albums/k142/freqser/PVC Buggy/IMG_2491_zps141c1a9b.jpg

http://i87.photobucket.com/albums/k142/freqser/PVC Buggy/IMG_2492_zpsb354ee87.jpg

http://i87.photobucket.com/albums/k142/freqser/PVC Buggy/IMG_2495_zps692e3cfd.jpg

Here is a shot of the steel pipes that will hopefully add some support to the buggy and it won't break in half! They are one solid piece that runs from the front to the back of the buggy. (Pic 10)

http://i87.photobucket.com/albums/k142/freqser/PVC Buggy/IMG_2496_zps2a8bf486.jpg

No matter how much you plan, there are bound to be mistakes. I got in a hurry and put one of the last layers together wrong and I didn't realize it until about 10 minutes after I glued the joints. I thought I would try to save some of the fittings thinking that the AZEK glue would give me some time to pull the fittings apart but I was wrong. The joint was so strong that I could not get it apart with a hammer. I ended up cracking the fittings when I was beating on it with a mallet trying to get it to separate.


Luckily, I purchased some extra fittings just in case and I was able to finish the last layer before I move on to the curved PVC pieces.


Attachments

  • assembleorder_zps6125ff49.jpg
    assembleorder_zps6125ff49.jpg
    63.8 KB · Views: 28
  • IMG_2493_zps07556d96.jpg
    IMG_2493_zps07556d96.jpg
    73.6 KB · Views: 21
  • CutList_zpsace76f0e.jpg
    CutList_zpsace76f0e.jpg
    65.4 KB · Views: 37
  • Pipeframewithcolors_zpsc663a499.jpg
    Pipeframewithcolors_zpsc663a499.jpg
    51.5 KB · Views: 32
  • IMG_2488_zpsfed95e16.jpg
    IMG_2488_zpsfed95e16.jpg
    40.2 KB · Views: 25
  • IMG_2487_zpsf0473e81.jpg
    IMG_2487_zpsf0473e81.jpg
    73.7 KB · Views: 26
  • IMG_2491_zps141c1a9b.jpg
    IMG_2491_zps141c1a9b.jpg
    56.6 KB · Views: 23
  • IMG_2492_zpsb354ee87.jpg
    IMG_2492_zpsb354ee87.jpg
    71.7 KB · Views: 18
  • IMG_2495_zps692e3cfd.jpg
    IMG_2495_zps692e3cfd.jpg
    58.2 KB · Views: 20
  • IMG_2496_zps2a8bf486.jpg
    IMG_2496_zps2a8bf486.jpg
    69.3 KB · Views: 36
Last edited by a moderator:

freqster

New member
Messages
68
Reaction score
0
Location
League City, Texas
Holy guacamole... What's the cost of this? Surely, a steel frame would be cheaper. However- I like the proof-of-concept idea.

The PVC pipe, fittings and glue cost me about $270.00

The engine from the Chinese quad cost me $100.00

So the total so far is somewhere between $350 - $400

And I still have to get the steel for the "engine cage", front axle, rear axle, sproket for the rear axle, ect.

So yes, you are right, steel would have probably been the better choice, but I had to do PVC. I had been talking about it with friends and It will be so cool to drive around my neighborhood which is full of golf karts! Besides, I dont have a welder yet. I am about to pull the plug and buy one because I am getting close to the point where I will need it.
 

Doc Sprocket

*********
Messages
15,677
Reaction score
10
Location
Ontario, Canada
Well- let's face it. The cheapest option is not always the one we desire. In the same vein, we don't always do the most "practical" thing. Sometimes it's about "because I can", and that's cool too!
 

landuse

Moderator
Staff member
Messages
18,626
Reaction score
220
Location
Pietermaritzburg, South Africa
This is going to be a great build!! I love the fact that you are doing it in PVC. It has been discussed so many times on the forum, so it will be great to actually see one be build (to prove or disprove if it can be done). I look forward to seeing how this turns out :thumbsup:
 
Status
Not open for further replies.
Top