Manco 813 rear axle rebuild

Possom Point

Well-known member
Messages
247
Reaction score
360
Location
Virginia
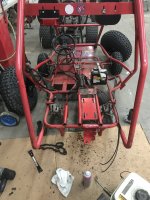
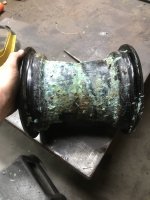
So I picked up this kart back in October, little did I know how much damage and parts it actually needed, as with any build or rebuild. Manco Dingo 813 2 seater. Red High Performance model. GX390 engine with 40 series Torque Converter. So this model and the 810 came with the differential style axle I would say similar to a lawnmower axle but still a bit different. Anyway, as with most all Manco go kart parts, most all of them are obsolete or have to buy a parts kart or another complete kart. Go Power Sports has definitely grown with there selection of parts and all other things that they sell, BMI and other vendors.

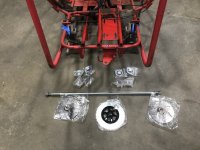
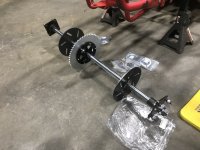
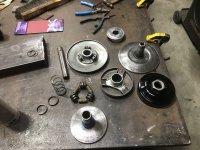
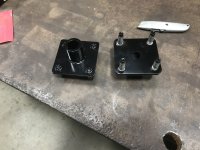
Parts initially needed : Seat, front wheels, rear tires, battery and put the TAV back together and ride. Ended up getting new front wheels and bearings, tires all the way around, sandblasted all the wheels and powder coated them in semi gloss black, seat is TBD as of now, frame with need to be spot sandblasted and repainted. and a whole new rear axle set-up.

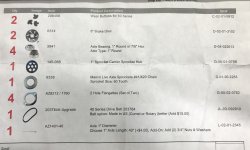
Also This is my list of parts I ordered from Go Power Sports, with the parts numbers and the quantities I needed.


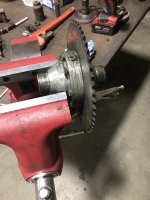
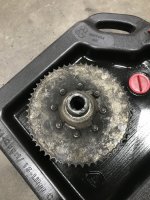
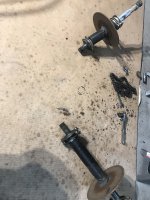
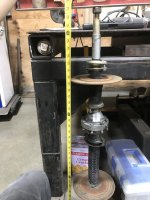
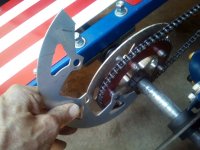
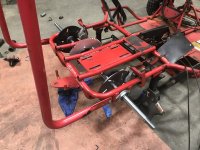
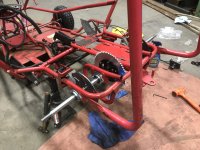
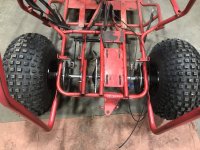
Here are a few pics of the kart before the tear down
 

Attachments

  • B512A918-979D-4DB4-A61D-D8F10E5AE6F5.jpeg
    B512A918-979D-4DB4-A61D-D8F10E5AE6F5.jpeg
    3.3 MB · Views: 20
  • C512541B-C2E1-4D00-87B1-75EA0A03B3C1.jpeg
    C512541B-C2E1-4D00-87B1-75EA0A03B3C1.jpeg
    2.7 MB · Views: 21
  • 2E80A64D-B032-44DA-83B8-1FFB9D2AE0BC.jpeg
    2E80A64D-B032-44DA-83B8-1FFB9D2AE0BC.jpeg
    1.2 MB · Views: 21
Last edited:

Possom Point

Well-known member
Messages
247
Reaction score
360
Location
Virginia
As with the rear end on this kart, i haven’t seen anyone do a complete axle swap, as mentioned you can’t get exact parts anymore, a member ( forgot your name,sorry) said to just get a blank sprocket and drill new holes for the mounting holes. That idea is very good and I probably should have gone that route, but I didn’t like the fact of busting the rear apart just to change out sprockets and potentially mess up a new sprocket by miss drilling holes.
 

Attachments

  • 64E3F670-4F19-4706-99E4-EA3391436842.jpeg
    64E3F670-4F19-4706-99E4-EA3391436842.jpeg
    1.3 MB · Views: 17
  • ECF1728B-F815-4C33-890C-CDDD4880913D.jpeg
    ECF1728B-F815-4C33-890C-CDDD4880913D.jpeg
    2.4 MB · Views: 15
  • 406B949B-018E-41BD-91AF-D98DB86A1E39.jpeg
    406B949B-018E-41BD-91AF-D98DB86A1E39.jpeg
    1.3 MB · Views: 16
  • AA391196-9BA8-4EDA-9E56-8A31EA57A33A.jpeg
    AA391196-9BA8-4EDA-9E56-8A31EA57A33A.jpeg
    1.4 MB · Views: 18

Possom Point

Well-known member
Messages
247
Reaction score
360
Location
Virginia
Rear with new parts, 1” round deluxe flex proof axle. 4 new bearings. 4 sets of Bearing hangers, 2 8” brake rotors, 60 tooth sprocket and hub. Unfortunately both brake rotors on the old axle had been bent/warped in there past life. I think this kart was wrecked pretty hard on the passenger side, most everything from the front to back was off .........visually and physically.
 

Attachments

  • E9332A67-F488-449A-AED6-27C0E13F3687.jpeg
    E9332A67-F488-449A-AED6-27C0E13F3687.jpeg
    3.1 MB · Views: 25
  • 5152B3AA-BDB0-49E0-BB88-4782E99931F8.jpeg
    5152B3AA-BDB0-49E0-BB88-4782E99931F8.jpeg
    2.6 MB · Views: 28

Possom Point

Well-known member
Messages
247
Reaction score
360
Location
Virginia
Btw. When a seller says they slimed the tires........
 

Attachments

  • F621E5F0-F45B-48B2-8576-9948B2D3BD2D.jpeg
    F621E5F0-F45B-48B2-8576-9948B2D3BD2D.jpeg
    1.6 MB · Views: 7
  • FC8B3B21-48B9-4DD3-A37A-62F141D9D5CC.jpeg
    FC8B3B21-48B9-4DD3-A37A-62F141D9D5CC.jpeg
    1.5 MB · Views: 6

madprofessor

"Loose Cannon Creations"
Messages
2,899
Reaction score
958
Location
Jacksonville, Florida
You definitely got the right sprocket hub for that rear end, even if the sprocket itself wasn't quite the perfect choice. You never have to get another sprocket with its own built-in hub again, much less have to R&R half the stuff on the axle just to change your gear ratio.
If you do ever make a ratio change with that sprocket, then after you've R&R'ed a wheel, brake disc, and maybe a hub and some bearings, go back on with a split sprocket instead of another solid one. Never R&R another part on the axle for drive train components.
Split sprocket changeout with that standard 5.25" bolt circle takes about 5 minutes.
#35 Split Sprocket | 6335** | BMI Karts And Parts
Azusa #41 Chain Sprocket (Split) | AZT5314S-** | AZT5314S-** | BMI Karts And Parts
 

Possom Point

Well-known member
Messages
247
Reaction score
360
Location
Virginia
You definitely got the right sprocket hub for that rear end, even if the sprocket itself wasn't quite the perfect choice. You never have to get another sprocket with its own built-in hub again, much less have to R&R half the stuff on the axle just to change your gear ratio.
If you do ever make a ratio change with that sprocket, then after you've R&R'ed a wheel, brake disc, and maybe a hub and some bearings, go back on with a split sprocket instead of another solid one. Never R&R another part on the axle for drive train components.
Split sprocket changeout with that standard 5.25" bolt circle takes about 5 minutes.
#35 Split Sprocket | 6335** | BMI Karts And Parts
Azusa #41 Chain Sprocket (Split) | AZT5314S-** | AZT5314S-** | BMI Karts And Parts
Will a #35 chain hold up to the HP and Torque from this engine? Most karts I have are the 40/41/420 chain. Haven’t used an Aluminum sprocket before, do they hold up well to around the house riding?
 

madprofessor

"Loose Cannon Creations"
Messages
2,899
Reaction score
958
Location
Jacksonville, Florida
Many folks here say #35 is okay for 420cc engines, but I'm too OCD to go that way. I would have #41 or #420 chain for that, the reason I included a link above for the Asuza #41 split sprocket. Didn't bother to look at the price because I know how Asuza is............ You have to throw your wallet in through the front door and ask permission to come in behind it.
EDIT: That aluminum #35 above is what I have right now, and the 4-piece sprocket guard I got for it came apart, while the teeth on the sprocket are just as sharp and straight as the day it got installed. Even after the original setup was flexing under load and causing the chain to skip badly.
 

Attachments

  • IMG_20210501_152755.jpg
    IMG_20210501_152755.jpg
    2 MB · Views: 7
Last edited:

Possom Point

Well-known member
Messages
247
Reaction score
360
Location
Virginia
I see..... I do like the ability to change the ratios for the sprockets for different application, and yes that price......... jeez that’s a lil expensive for a 72T
 

madprofessor

"Loose Cannon Creations"
Messages
2,899
Reaction score
958
Location
Jacksonville, Florida

Possom Point

Well-known member
Messages
247
Reaction score
360
Location
Virginia

Possom Point

Well-known member
Messages
247
Reaction score
360
Location
Virginia
Little bit of stuff done tonight, installed axle, bearings, brake rotors and sprocket. Cleaned and sanded the brake pads while I had them out, well..... when they fell out.
 

Attachments

  • 7F94EAC2-A7CD-4F9B-8858-BEF311431F6E.jpeg
    7F94EAC2-A7CD-4F9B-8858-BEF311431F6E.jpeg
    2.6 MB · Views: 18
  • 01EF7D18-903A-4425-B6B4-00CAC2F8F813.jpeg
    01EF7D18-903A-4425-B6B4-00CAC2F8F813.jpeg
    2.6 MB · Views: 19

Possom Point

Well-known member
Messages
247
Reaction score
360
Location
Virginia
Worked on the clutch and driven assembly today, both pieces were really rusty on the outside, luckily the internal sections and parts weren’t bad. I still can’t wrap my head around how much rust and corrosion was on these parts giving the kart looked in good shape. I had to put the clutch parts on my lathe and take a grinder to where the belt contacts to sheaves, using a flap disc I went back and forth across the surface to re-smooth and try to clean them up best I could, they were corroded bad enough they had pits in them. I painted the outer shell of the clutch housing in high temp black. I will put Teflon spray on the internal parts later on to have everything run smooth. Wire wheeled the other parts and cleaned them up to. Also sandblasted and powder coated the hubs.
 

Attachments

  • F11C482C-FCFB-4B03-B475-E138544ABB0E.jpeg
    F11C482C-FCFB-4B03-B475-E138544ABB0E.jpeg
    3.6 MB · Views: 8
  • 5AF85A0D-5011-44D9-A4F1-978A96E55FBE.jpeg
    5AF85A0D-5011-44D9-A4F1-978A96E55FBE.jpeg
    2.8 MB · Views: 7

madprofessor

"Loose Cannon Creations"
Messages
2,899
Reaction score
958
Location
Jacksonville, Florida
I painted the outer shell of the clutch housing in high temp black.
I used rattlecan high temp ceramic flat black header paint (VHT) on my exhaust header pipe and tailpipe, the fiberglass exhaust wrap on the silencer box, and some other hot parts, but couldn't follow the mfr. recommendations for setting and curing it. Did what I could with our commercial convection oven right after application, but that's not really hot enough for the recommended heat/cooldown/heat process to set it properly.
Looks like you used gloss black on your clutch, what did you do for the curing to set it?
 

Possom Point

Well-known member
Messages
247
Reaction score
360
Location
Virginia
I just shot it with gloss black high temp BBQ paint. I’ll check it to see if it cured. I know clutches get hot from friction, I figured the heat from that would cure it. Maybe I should have read the label first......😰😰

I wonder if a propane torch would cure it? Kinda feather the heat evenly over the clutch, but not enough to distort or warp it ..... if it’s not cured I may try this.
 
Top