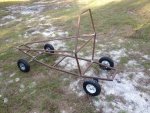
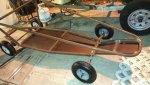
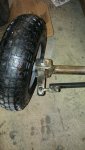
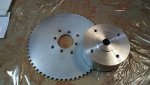
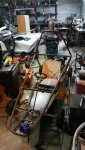
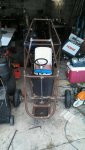
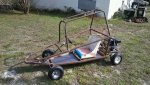
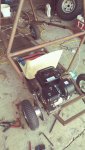
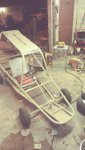
New build, made parts today in shop

Status
Not open for further replies.

thinwater

New member
Messages
67
Reaction score
2
Location
Florida
Its a roller now

I am really going to have to get rid of the tires once this is running.

I used some of the Barracuda frame parts that I made a couple of years ago. I will add several more of roll cage parts. It will never be a Barracuda, but it can look a little more like one.
 

Attachments

  • frame 2.jpg
    frame 2.jpg
    475.2 KB · Views: 12

thinwater

New member
Messages
67
Reaction score
2
Location
Florida
I bent a tight "U" shaped piece of 1" tube for the steering wheel support tonight. It got dark before I could weld it on and take pictures.

I still need to change dies on my bender to make the steering wheel parts that I designed. It is the classic "Butterfly" design with the center plate made on the plasma cutter. I don't want to cut the center part before I make the tube parts so I can make sure they will fit up well.

I am going to order a sprocket and chain set tonight. I was tempted to make the sprockets but it is just not worth it for this beater build when they are fairly cheap.

I put the seat in it tonight. There is plenty of room for my 6' 06" to fit in in this buggy and I plan on making a body for it.
 

chancer

ɔ ɥ ɐ u ɔ ǝ ɹ
Messages
9,358
Reaction score
94
Location
COMFORT, TEXAS
If you smoke those wheels make for a Good ashtray!
Otherwise they are only good For a light duty hand truck or a kids Tricycle.
If you don't like the kid.
 

thinwater

New member
Messages
67
Reaction score
2
Location
Florida
I made some floor pans today and tacked them in place. I made a bunch of holes in them so they wont hold water if it gets rained on. I used 16 GA plate for this so it will be strong but not to heavy. I will use 20 GA for the sides and any other body parts that I make for it.

I ordered the chain, clutch and sprockets last night, they have shipped but wont be in until Monday of next week.
 

Attachments

  • floor pans sm.jpg
    floor pans sm.jpg
    434.8 KB · Views: 7

thinwater

New member
Messages
67
Reaction score
2
Location
Florida
These wheels suck so bad the ball bearings are starting to fall out of the front wheels just from rolling it around the shop.

I found a pair of golf car wheels that I will make a set of rear hubs for. I need to find some cool front wheels still.

I welded on the pitman arms tonight and took measurements for the steering linkage. I will make it tomorrow at the shop if I have time. The sprockets are still several days out and I would like to have it ride ready (but not finished) by the time they arrive.

Did I mention that these wheels suck? They do.
 

thinwater

New member
Messages
67
Reaction score
2
Location
Florida
I made the tie rods out of some flat bar with thumb screws with 3 nuts welded on the flat bar. No one has proper hiem joints in this city so this will have to do for now.
 

Attachments

  • my tie rod.jpg
    my tie rod.jpg
    99.6 KB · Views: 15

thinwater

New member
Messages
67
Reaction score
2
Location
Florida
I got the steering wheel hub made and the sprockets came in the mail. I will make the sprocket hub tomorrow. I still have to figure out brakes and throttle linkage.
 

chancer

ɔ ɥ ɐ u ɔ ǝ ɹ
Messages
9,358
Reaction score
94
Location
COMFORT, TEXAS
I made the tie rods out of some flat bar with thumb screws with 3 nuts welded on the flat bar. No one has proper hiem joints in this city so this will have to do for now.

Please read this thread and reconsider your tie rod ends.
http://www.diygokarts.com/vb/showthread.php?t=35270

Those are temporary, Right? Thumb Screws? Like just for moving it around the shop.
I cant imagine you are serious, after seeing some of the Really Nice parts you have made.
 

thinwater

New member
Messages
67
Reaction score
2
Location
Florida
Please read this thread and reconsider your tie rod ends.
http://www.diygokarts.com/vb/showthread.php?t=35270

Those are temporary, Right? Thumb Screws? Like just for moving it around the shop.
I cant imagine you are serious, after seeing some of the Really Nice parts you have made.

That is why is says they will have to do for now. I am ordering some proper joints tonight. I am sure the thumb screws would break the first time out, and probably next to a tree!

Thanks for keeping this on the right path, I have never made a go Kart before and never owned a running one.
 

Tom Knight

Metal fabricator/welder
Messages
112
Reaction score
3
Location
Sunny Las Vegas, NV
Do you have an Ace hardware nearby ? They have hiem joints & little ball joints for tie rod ends, least they do out west, way out west.....old dog
 

thinwater

New member
Messages
67
Reaction score
2
Location
Florida
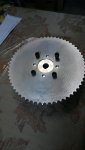
I made the sprocket hub today. it is 5" OD and 2 1/4" thick. I made the boss a tight fit into the sprocket so it is "Hub centric"

I was a little surprised about how big the sprocket is. I may put it very close to a wheel to keep it and the chain more protected.

The keyway is 3/16" and the holes are 3/8"-16 TPI. I "Guessed" at the bolt hole pattern using a pair of calipers. I am sure it is a few thou off but seems to work fine.

I made the hub on my manual lathe then put it in the CNC mill for the bolt hole pattern. They are perfectly centered around the center hole. I use a Renishaw digital probe to keep everything centered and set up the work coordinates.
 

Attachments

  • hub sm.jpg
    hub sm.jpg
    424.1 KB · Views: 5
  • my sprocket.jpg
    my sprocket.jpg
    372.6 KB · Views: 4

thinwater

New member
Messages
67
Reaction score
2
Location
Florida
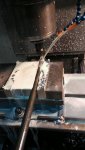
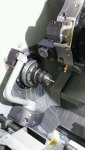
I finished the axle and steering shaft today by milling the 3/16" keyway in each end of the axle and one end of the steering shaft.

I finished some Harley derby covers in my small mill today for a custom bike builder and threw the shafts in the vice. I probed each side of the shaft to find center, touched the tool off on the top of the shaft, then dropped it down .094" . I used a 3/16" end mill and ran each slot twice. The key has to be pressed in with good force to get it in the slot so there is no slop at all.

My local Ace hardware failed me on having the hiem joints. They did not even know what they were and still could not figure it out after I explained to them what they were.

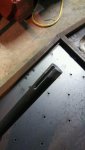
Here is a picture of the steering shaft in the mill and the finished slot.
 

Attachments

  • milling.jpg
    milling.jpg
    102.5 KB · Views: 6
  • slot.jpg
    slot.jpg
    84.4 KB · Views: 5

thinwater

New member
Messages
67
Reaction score
2
Location
Florida
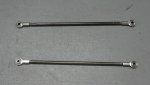
My Heim joints came in a few days ago. They are 7/16 x 24 internal threads. I made two tie rods on my lathe out of some 3/8" round. I turned down each end 1.1" to 7/16 then threaded them.

The original holes in the Pittman arms were made on the CNC plasma cutter for 1/4" bolts. I had to drill them out to 7/16". This really sucked because I used AR300 hard plate left over from some target manufacturing. It cant be drilled with a hand drill and I could not put it in the mill since it was welded onto the cart. Five broken bits later it is done.

See the assembled tie rods below (Minus lock nuts), the tie rod in the lathe and the assembly on the kart.
 

Attachments

  • my tie rods.jpg
    my tie rods.jpg
    39.3 KB · Views: 3
  • steering on my kart.jpg
    steering on my kart.jpg
    141.3 KB · Views: 5
  • lathe with tie rod.jpg
    lathe with tie rod.jpg
    44.7 KB · Views: 5

thinwater

New member
Messages
67
Reaction score
2
Location
Florida
I added the front two rail sections and the cross member. It is ready for a seat mount and some real tires/wheels.

I am going to make a new rear axle for it to mount the new hubs I will have to make for the tires. I may go with golf cart tires I since they are available around here due to all of the "Lifted" Golf carts being done.
 

Attachments

  • my rails.jpg
    my rails.jpg
    253 KB · Views: 8

thinwater

New member
Messages
67
Reaction score
2
Location
Florida
I got 4 ATV tires on wheels today and will use 2 of them for the rear of the kart. They are much taller than the hand truck tires so I will have to make a jack shaft to gear it down and make hubs for them.

This thing may turn into a beast at this rate.
 

thinwater

New member
Messages
67
Reaction score
2
Location
Florida
First ride

I decided to run a throttle cable to it and give it a shot to see how it runs. I did not replace the tires yet so I run the Tractor Supply store junk. It started on the first pull and I had to back out the screw that limits the throttle so the RPM would go high enough for the clutch to work. It is surprisingly fast considering I am 6 05 and 220 lbs.

The new steering works great. The no brakes and no kill switch limited me to a ride down the dirt road I live on and back home. I will add a kill switch next then add a windshield and a couple of body panels. One on top should add some much needed shade from the hot FL sun. It is into the 80's today and humid for "winter".
 

Attachments

  • kert linkage.jpg
    kert linkage.jpg
    263 KB · Views: 3

thinwater

New member
Messages
67
Reaction score
2
Location
Florida
I cut the top on the CNC plasma cutter out a piece of scrap 20 gauge steel. I cut DIYGOKARTS.COM into the metal to dedicate to this site. When it is done and I post pictures the site will always be seen.

I am considering cutting off the rear section with the motor and adding a hinge assembly with a coil over shock to make a real suspension like the Anaconda type Kart does.

I will add the hood and windshield next then do some riding before cutting it in 1/2 :)

The picture uploader is not working, I will keep trying to post it.
 

Attachments

  • my top sm.jpg
    my top sm.jpg
    126.9 KB · Views: 4
Status
Not open for further replies.
Top