chancer
ɔ ɥ ɐ u ɔ ǝ ɹ
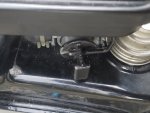
Yep just extend that wire to a toggle switch and a wire from the other end of the switch to the block or any ground to kill the engine.
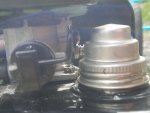
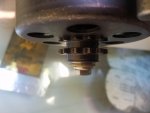
Look again...he's talking about the brown electrical wire.
If I see what I think I see..it's a kill switch wire..and used to be hooked to the throttle plate so it made contact when the throttle was all the way closed....you can hook up a switch and hook it to ground for w kill switch.
Oh hahah..... I see it now....... I was on the phone, just got up and replied.......
It looked like he was refering to the screen.....
Yep just extend that wire to a toggle switch and a wire from the other end of the switch to the block or any ground to kill the engine.
I absolutely love this sort of build, hope to see this working great in the future.

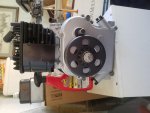
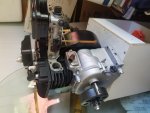
Sry guys idk why those pics are all in odd directions but they're all in the correct orientation in my phone? I'll try to sort it out on my computer when I get home and re-upload them
Sounds like she's running lean because of some kind of fuel restriction. Is the diaphragm new? Or it could be a vacuum leak.
The mixture screw is set at about 1.25 turns out from gently seated as a starting point. The engine should run off-choke.... Since it doesn't, I suspect your carb is dirty.
For a running or roughly running engine I would advance the speed control for full speed. Then, slowly turn the mixture screw counterclockwise (out), and the engine should run even more roughly. This confirms that it's getting a rich mixture (too much fuel), and this is good. Note the position of the screw.
Now, slowly turn the screw clockwise. The engine note should clean up, and sound healthy. Continuing on, the engine will begin to sound breathy and begin to stumble, this time it's lean. Any further and it'll quit. Note the position of the screw.
Now set the screw slightly to the rich side of halfway between the rich and lean points. Should be real nice and smooth here.
If the engine shows signs of quitting under load (reasonable load), richen the mixture slightly. If it blows black smoke under load, lean it slightly.
 So... what now? Normally I'd just assume turning the mixture screw out would fix this but I've learned (via all my recent tinkering with this darn thing) that you can only back that screw out so much before it begins to affect the carbs ability to pull fuel from the bowl. Or if it is still pulling fuel, the needle is too far out of the jet to properly atomize it? Either way I think I need an even larger jet? But Idk? So I need some feedback...plz? If anyone's familiar with this plz comment... my patience with this thing is waning.

Glad to hear you got it semi-sorted out. You might need to richen the mixture a bit--the engine should like it.
Did you break it in properly yet and change the oil?
There's several guides around the interwebz for what constitutes a proper break-in procedure...

 The torque's just not there... there could be a bunch of variable at play in that though, most notably the fact that the rings aren't completely seated yet.
I like it. Cant wait for more pics!