wiring diagram for 150cc go kart

Status
Not open for further replies.

Seanieb123

New member
Messages
9
Reaction score
0
looking for wiring diagram for 150cc go kart

trying to fix it for a while. i think its a chinese engine. all the diagrams i found just don't match the buggy. i can't even get it to tick over. i'm really stuck.
 
Last edited:

itsid

Moderator
Staff member
Messages
11,563
Reaction score
251
Location
Ruhrpott [Germany]
And from what info you 'gave' you'd think
we would be able to find the correct one for you?

if you cannot post make and model (which would be the ideal way really)
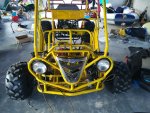
you might at least be able to post a PIC of your kart (frankly, I smell buggy here)
so that we at least have the slimmest of all chances to help you with that.

Without, there's nothing we can do.

'sid
 

Karttekk

Well-known member
Messages
2,021
Reaction score
729
Location
Elizabeth, PA
If you can identify what brand and model your kart is, I would suggest buying a complete factory wiring harness and installing it with (hopefully) supplied instructions. Once someone starts modifying something, it's anyone's guess what they did or mangled.

Thanks
 

anderkart

Moderator
Messages
6,428
Reaction score
383
Location
Surprise Arizona USA
i can't even get it to tick over.

Do you mean: the electric starter wont work,
and you can't even hear a faint clicking sound when trying?


If so, I probably don't even need a wiring diagram to help you diagnose & repair that particular problem.

___________________________

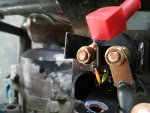
You could help me to help you, by locating your starter relay, and posting a pic of it here on your thread.

Then I'll be able to correctly explain how you could test each of its (3 or 4) wires with a multi-meter, or any other type of volt-meter, that will measure 12-volt DC.

Or you could even use an inexpensive 12-volt test-light to diagnose this problem, but only if your absolutely sure your battery is fully charged, and that it will pass a load test. (because even some brand new battery's are defective... :thumbsup:

PS:
Most all of the Starter Relays on Chinese buggies like yours have 2 larger-sized battery cables, but I'm just trying to 100% confirm if your starter relay also has just 1, or 2 additional smaller-sized wires?
 

Karttekk

Well-known member
Messages
2,021
Reaction score
729
Location
Elizabeth, PA
This was taken from a Manco Helix service manual. I would also remove the starter and bench test it with a 12 volt battery to see if it spins. Follow the battery leads back to where the relay is, more than likely it's in the electrical box mounted above the engine. This may or not apply to your kart but the procedure should be similar.

STARTER RELAY INSPECTION
Attempt to start the engine with the key switch and listen of there is a “click” sound. If there is, it is normal. If there isn’t, follow the below procedures to inspect.
Inspect to see if the brake switch is conductive. At this time, turn the main switch
ON and hold the brake lever.
The battery voltage should be at 12 volts.
Measure the voltage between the inlet line (the green/yellow wire), starting relay, and the ground wire of the body. The voltmeter reading should be close to the magnitude of voltage between the two ends of the battery. If not, then the brake switch, wire or the wire connector is bad.
Inspect if the key switch is conductive; remove the starting relay inlet line (the green/yellow wire).
Connect the yellow/red wire with the ground wire, and turn the key switch to START. It should be conductive between the yellow/red wire and the ground wire, or the key switch, its wire, or the wire connector is not good. Inspect if the working condition of the starting relay. At this time, remove the starting relay. Connect the C and D end of the starting relay with the battery, and the A and B end with the multimeter. The battery voltage should be at 12 volts.
At this time the multimeter should indicate a conductive condition, or the starting relay is not good.
 

Seanieb123

New member
Messages
9
Reaction score
0
Sorry for late reply.
15338360231342131126539.jpg

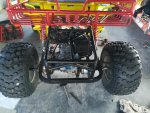
I can't hear a ticking noise. Also the starter motor is brand new so it should work. I put a pliers on either pole of the soliniod and it turned over. I'm just unsure of where the two leads leading out from the soliniod go. And unsure of where the two leads coming from the kill switch go. Really appreciate the help
 

anderkart

Moderator
Messages
6,428
Reaction score
383
Location
Surprise Arizona USA
I'm just unsure of where the two leads leading out from the soliniod go.

One of those small wires needs to be receiving (+) 12-volt power from your starter button, (or from your Ignition switch if you don't have a separate starter button).

______________________

And then the other small wire, also needs to be receiving (-) ground for your Starter Solenoid to work.

On most buggies like yours, the purpose of this ground terminal is to serve as the final part of the Neutral Safety switch circuit. Buggies will typically have a switch that's activated when the transmission is shifted into neutral, or sometimes just by pressing the brake pedal, (or sometimes both) that will send this ground-signal along to the Starter Solenoid.

If you were to decide that you didn't need/want a functioning neutral safety circuit, you could simply disconnect that original ground wire, and replace it with a brand new wire that permanently grounded that terminal of your Starter Solenoid.

________________________

So now you know how to test those 2 small wires with a Multimeter, or any type of DC-volt meter, or an inexpensive 12-volt test light; to diagnose if your Starter Solenoid is simply defective, or if there's a problem somewhere in the wiring or switches. ~ Or both. It's not unheard of; to have multiple-problems in the same circuit...

PS: If you decide to use a 12-volt test light: you can use it to test for ground, by simply connecting its ground-clip to (+) 12-volt power, instead of ground... :thumbsup:
 

Seanieb123

New member
Messages
9
Reaction score
0
I have no brake switch connected. Will this prevent the soliniod from working? Also I have 3 wires leading from my the ignition. One red and yellow which I assume goes to the starter soliniod. And a green one, does this go to ground? And then one white and green, I haven't a clue where this one leads.
PS. The two leads leading out of the kill switch, one red and blue where does this go? And the other yellow and black, I've been told this goes to the cdi is that correct?

[EDIT]

Update. I have it turning over now but it won't start. Fuel is getting into the carb and the spark plug is sparking. But, for some reason the air intake feels pretty weak. Could this be a problem with a piston in the engine itself or can the air to fuel ratio be tuned in the carb.
 
Last edited by a moderator:

Karttekk

Well-known member
Messages
2,021
Reaction score
729
Location
Elizabeth, PA
For now, bypass any kill switches. Eliminate anything that could be contributing to the problem. The air/fuel mixture shouldn't have anything to do with it not initially starting. Pull the spark plug, shoot a small blast of starting fluid into the cylinder, install the spark plug & see what happens. You're getting close. If you have spark, fuel and compression you should get some response from the engine. Check your valve adjustment too.
 

anderkart

Moderator
Messages
6,428
Reaction score
383
Location
Surprise Arizona USA
I agree wit Karttekk, except i'd probably try priming with a teaspoon of gasoline instead of starting fluid.

Another potential Issue causing your "air intake feels pretty weak"; might be that all of the oil on your cylender walls might have washed-down, keeping the piston rings from making a good seal. I've seen this happen before from a flooding carburetor or over priming with gasoline. ~ ~ ~ That condition can be easily corrected by simply pouring a teaspoon or so of motor oil down through the spark plug hole and turning the engine over to re-coat the whole cylender wall with oil, before re-installing the spark plug.
 

Seanieb123

New member
Messages
9
Reaction score
0
Another issue has been discovered. The threads in the fitting that the spark plug goes into are pretty much gone. Is there any tool that can fix this. I poured a teaspoon of petrol down the spark plug hole then it started although really fast. I'm about to check the valves now. Thanks
 

anderkart

Moderator
Messages
6,428
Reaction score
383
Location
Surprise Arizona USA
You might save time by trying the second half of my last post, before 'checking your valves'. But your low-compression issue is probably just being caused from your stripped spark plug threads anyway, so...


Check out this video regarding your spark plug threads:

(I'd recommend using a Keensert kit: -> https://www.google.com/search?ei=s5...0....0...1..64.psy-ab..0.0.0....0.UZAf3vDhNWk
But there's more than just one thread-type & size of spark plugs, so make absolutely sure you buy the correct kit; no matter what brand... :thumbsup:


Seanieb123

New member
Messages
9
Reaction score
0
I believe I can buy a reverse action spark plug thread tool to save me from taking the engine apart. My spark plug is 10mm wide but they only seem to come in 12mm. Would it still work. Thanks
 

anderkart

Moderator
Messages
6,428
Reaction score
383
Location
Surprise Arizona USA
I believe I can buy a reverse action spark plug thread tool to save me from taking the engine apart. My spark plug is 10mm wide but they only seem to come in 12mm. Would it still work. Thanks

I've never used the reverse action method, but it sounds like a good plan when not removing the head.

But something else that might help:
Is to thoroughly drain the engines oil first, then remove the engine and position it upside down; before drilling/tapping. This would allow gravity to help keep even more of those metal shavings out of the combustion chamber...

And then before you started drilling, I'd spray/clean out the whole inside of the combustion chamber with the straw on a can of Brake cleaner. Sprayed in, and allowed to drain back out through the spark plug hole...

Then let it all completely dry out inside for an hour or so before drilling.

That way, you'll be removing the sticky oil from the surfaces of your combustion chamber; and will be able to use an air-blow-gun to hopefully remove more of the metal shavings from your combustion chamber after your all done drilling/tapping.

At that point, you'll definitely want to pour a teaspoon of motor oil down through your spark plug hole, and rotate the engine around & over; to pre-oil the entire cylender wall, before attempting to start the engine...

Oh yeah, and don't forget to purchase a brand new spark plug, and refill the engine with fresh oil too... ;)

PS:
Also, pick up a small tube of Never-Seize from any auto parts store; and smear/coat a very small amount all over the threads of any new spark plugs you ever install. That'll help insure that you'll never-ever have to go through all this again... :thumbsup:
 
Status
Not open for further replies.
Top