What am I doing wrong? Update in post 16

Cartinfun

Active member
Messages
112
Reaction score
94
See post 8 for updates

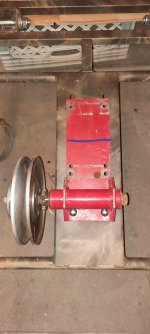
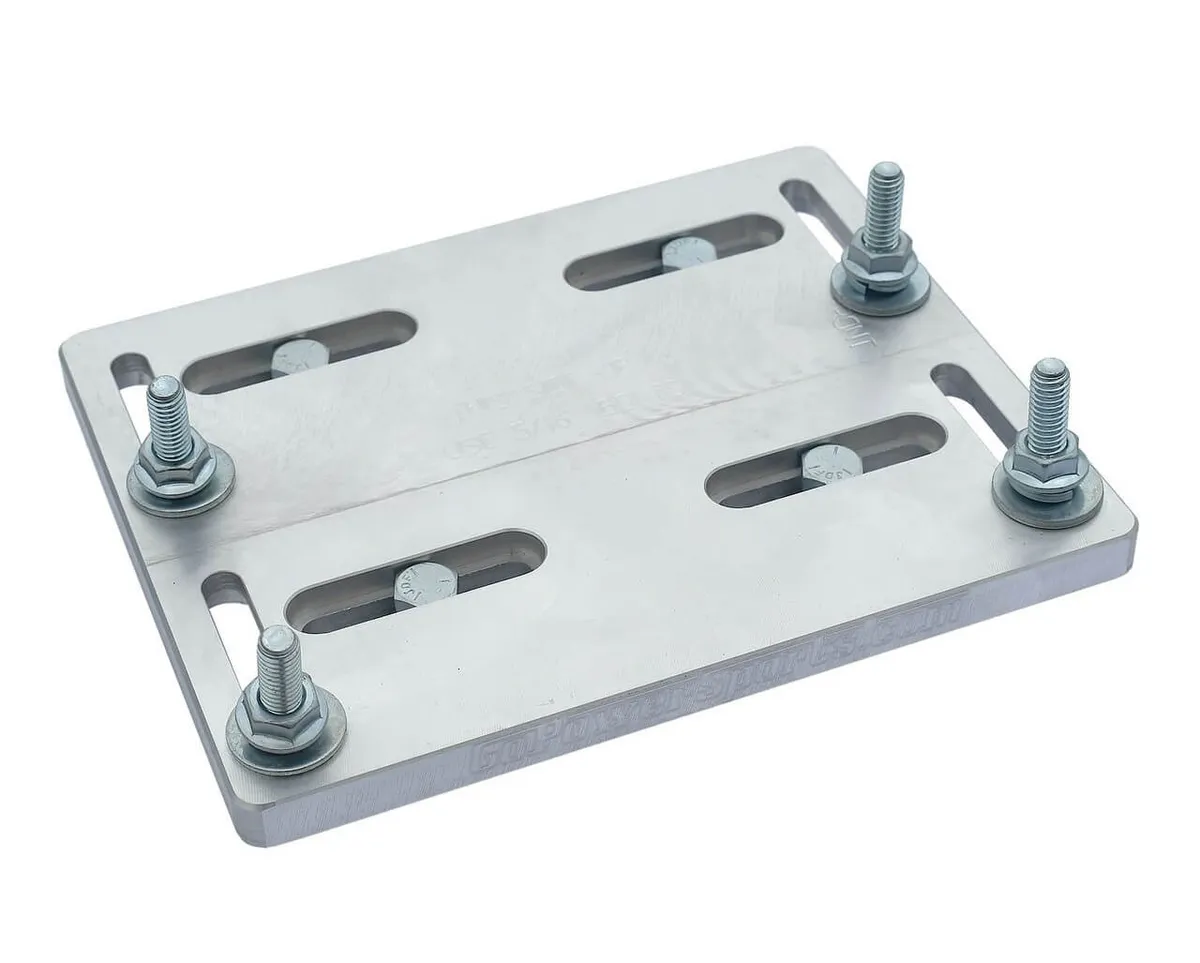
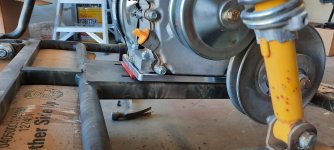
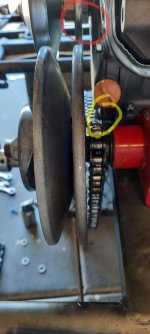
From what I can tell this is the original torque converter that came on the Yerf Dog 3202. I bought the kart with the new 212 on it but it had never been used, started or even have a belt on it since the engine was installed. The driver pulley was missing. I bought a new driver pulley assembly and put it on and it doesn't line up with the torque converter pulley. What am I doing wrong? I have it set up the way this diagram shows. Do I have to get rid of the original Yerf Dog torque converter and get a new one that bolts onto the engine using the mounting plate? Or do I have to move either the TC or engine over? If that's what I have to do I think it would be better to get the new TC that mounts to the engine, right?
 

Attachments

  • 20230218_190219.jpg
    20230218_190219.jpg
    1 MB · Views: 21
  • 203814.gif
    203814.gif
    30.9 KB · Views: 21
Last edited:

Cartinfun

Active member
Messages
112
Reaction score
94
So this guy had the same situation and it looks like he just scrapped the original Yerf Dog TC and got a TC mounting plate that attaches to the engine. I'm gonna take it apart tomorrow and take some more pictures and I'm thinking about cutting my TC mounting plate and drilling some new holes. I'll be back with more pics, ideas and looking for suggestions.


It's such a weird set up. I'm fairly certain this is why it wasn't running when I bought it. The kid I bought it from couldn't figure it out when he bought the new engine. He just had the fixed sheave. He probably was having a tough time figuring out how to line it up and ended up losing the rest of the parts.
 

panchothedog

Well-known member
Messages
2,789
Reaction score
3,744
I'm going to jump in here and say that the crank shaft on the predator isn't going to be long enough to move the driver clutch over that much. It will fall off
the end before you get there. Two ways to fix. You have already come up with one, buy the plate system and then hope the converter sprocket lines up with your axle sprocket. The other and Better way is to buy thick aluminum plate many suppliers sell that allow movement side to side ( a bunch ) and for and aft. HERE is why ( I feel ) it is better. 1st the plate is cheaper roughly $45 as compared to $60 for the plate. 2nd and most important is most Yerf-Dog karts
came with a 7" driven clutch as compared to the standard 6" . From your photos it looks like you have the 7" . Both of the YD karts I have owned had them. What this does is gives you a lower gear ratio when you leave from a stop, yet gets into as equal high gear ratio as the 6" once you get going. You end up with a broader spread of drive ratios. I have even purchased a 7" separate to put on a kart that had 20" tall rear tires . It helped with acceleration.
I have the aluminum alignment plates on two of my karts to fix the very problem you are experiencing. They work like a champ.
 

panchothedog

Well-known member
Messages
2,789
Reaction score
3,744
Cartinfun. The plate I am describing bolts down onto your existing engine plate.
Then you bolt your engine to the plate. Yes it has 8 bolts. Four pointed down and four pointed up. If your existing plate is wide enough you might be able to
redrill it, but to have movement for and aft needed to tighten the chain you will have to cut slots, not just drill holes. Of the two I have, I am pretty sure the one
I got from Go Power Sports came with the needed square headed bolts. That way they stick in the milled slots and you aren't fighting with bolts falling or having to hold the other end while tightening. Very well thought out piece.
 

Cartinfun

Active member
Messages
112
Reaction score
94
I'm going to jump in here and say that the crank shaft on the predator isn't going to be long enough to move the driver clutch over that much. It will fall off
the end before you get there. Two ways to fix. You have already come up with one, buy the plate system and then hope the converter sprocket lines up with your axle sprocket. The other and Better way is to buy thick aluminum plate many suppliers sell that allow movement side to side ( a bunch ) and for and aft. HERE is why ( I feel ) it is better. 1st the plate is cheaper roughly $45 as compared to $60 for the plate. 2nd and most important is most Yerf-Dog karts
came with a 7" driven clutch as compared to the standard 6" . From your photos it looks like you have the 7" . Both of the YD karts I have owned had them. What this does is gives you a lower gear ratio when you leave from a stop, yet gets into as equal high gear ratio as the 6" once you get going. You end up with a broader spread of drive ratios. I have even purchased a 7" separate to put on a kart that had 20" tall rear tires . It helped with acceleration.
I have the aluminum alignment plates on two of my karts to fix the very problem you are experiencing. They work like a champ.

Yes, after looking at it again the engine shaft is not long enough for a spacer to align with the driven pulley from the TC. The spline hub for the driver pulley would only be half on the shaft.

I dont think the aluminum alignment plate will work in this scenario due to this set up. You are correct, the driven pulley is 7in, I just measured it. So that's a good thing that I want to keep?

As you can see in the pictures the mounting plate for the TC is long and goes under the engine. The four bolts that mount the engine also go through the TC mounting plate. So there is no way to slide the engine or TC over one way or the other, without modification.

Here is what I am thinking to be able to use this TC
- Cut the mounting plate for the TC between the front set of engine mounting holes and back set (purple line in pic 1).
- Drill new holes in my engine mounting plate on the swing arm to move the engine to left (driver's side) (yellow dots on pic 2).
- Drill new holes in the TC mounting plate for the engine bolts to go through (brown dot in pic 1).
- Use some of the TC plate, cut and drill a spacer so it's the exact thickness needed for the left rear hole of the engine.
- Use the front piece of mounting plate I cut off to use as a spacer for the front two engine mounting holes so the engine is on a flat plane instead of angled.

It seems like the TC mounting plate needs more than two holes and to be sandwiched between the engine and engine mounting plate to keep the TC in place. I dont think the TC will stay in place with just the back two holes.

I was previously thinking about moving the TC over to the right, but that will put the sprocket/chain too close to the engine mounting plate. I had to order a new axle and large sprocket so I should be able to align that with no problem. Just need to make sure it doesn't hit the engine mounting plate.

Thoughts, suggestions? Thanks for your input.
 

Attachments

  • 20230219_192004.jpg
    20230219_192004.jpg
    2.3 MB · Views: 7
  • 20230219_201640.jpg
    20230219_201640.jpg
    2 MB · Views: 7

Cartinfun

Active member
Messages
112
Reaction score
94
Cartinfun. The plate I am describing bolts down onto your existing engine plate.
Then you bolt your engine to the plate. Yes it has 8 bolts. Four pointed down and four pointed up. If your existing plate is wide enough you might be able to
redrill it, but to have movement for and aft needed to tighten the chain you will have to cut slots, not just drill holes. Of the two I have, I am pretty sure the one
I got from Go Power Sports came with the needed square headed bolts. That way they stick in the milled slots and you aren't fighting with bolts falling or having to hold the other end while tightening. Very well thought out piece.

Is this it? Hmm that might work, so I would bolt it through the TC plate and then bolt the engine to it. Right?
 

panchothedog

Well-known member
Messages
2,789
Reaction score
3,744
Yes that is it. Put the TC plate on the existing motor plate in its normal position. Bolt the new aluminum plate through the TC plate and your existing engine plate into the slotted holes ( where the engine has always been sitting ). Now bolt your engine onto the plate to the bolts that are in the slots that are parallel to the axle. You can turn 180 depending on how much side movement is needed. Between the slots in your existing engine plate and the slots in the aluminum plate you will end up with about 3 to 4" of for to aft adjustability . Seeing how you are replacing the axle sprocket position should not be an issue.
 

Cartinfun

Active member
Messages
112
Reaction score
94
Yes that is it. Put the TC plate on the existing motor plate in its normal position. Bolt the new aluminum plate through the TC plate and your existing engine plate into the slotted holes ( where the engine has always been sitting ). Now bolt your engine onto the plate to the bolts that are in the slots that are parallel to the axle. You can turn 180 depending on how much side movement is needed. Between the slots in your existing engine plate and the slots in the aluminum plate you will end up with about 3 to 4" of for to aft adjustability . Seeing how you are replacing the axle sprocket position should not be an issue.

Hmm. That MIGHT work. I will have to call GPS tomorrow to get the dimensions of it. It's tough because the engine pretty much touches the mounting tabs that the shaft is mounted through.
 

MWKarter

Member
Messages
54
Reaction score
26
Location
Madison, WI
Cartinfun, Did you get this dialed in? If not, I have a model 3203, with the Predator 212 and 7” driven clutch, that I recently cleaned up for my son. Taking it to him in a few months. Went together pretty good. Let me know if you need pics.
And yes, I also ground down some of the tabs for a better fitup of the Predator.
 

Cartinfun

Active member
Messages
112
Reaction score
94
Cartinfun, Did you get this dialed in? If not, I have a model 3203, with the Predator 212 and 7” driven clutch, that I recently cleaned up for my son. Taking it to him in a few months. Went together pretty good. Let me know if you need pics.
And yes, I also ground down some of the tabs for a better fitup of the Predator.
I think I got it. Using the part that Pancho suggested. It's lined up pretty good. I did drill two holes in the TC plate and engine plate to get this other part to mount correctly.

You can see the plate sandwiched between the TC plate and engine.

Thanks for the help Panchothedog
 

Attachments

  • 16778744347225107636575138638336.jpg
    16778744347225107636575138638336.jpg
    1 MB · Views: 8
  • 16778745196615971074466934936336.jpg
    16778745196615971074466934936336.jpg
    1.9 MB · Views: 8

panchothedog

Well-known member
Messages
2,789
Reaction score
3,744
Glad to hear it helped you out. They are very useful in certain situations. I have
two of them on different karts.
 

Cartinfun

Active member
Messages
112
Reaction score
94
Well, I thought I had it all figured out, until I put the chain on. The chain hits a bolt head on the engine when it goes around the two sprockets (circled with yellow)

I dont get it, the two pulleys line up well. You can barely see the driver pulley on the engine circled in red and the TC pulley in the forefront of the picture. Can I just not use this TC set up with this engine and Kart?
 

Attachments

  • 20230304_123219.jpg
    20230304_123219.jpg
    1.7 MB · Views: 6

Karttekk

Well-known member
Messages
2,009
Reaction score
709
Location
Elizabeth, PA
I'm sure you don't want to keep throwing money at a solution but maybe this engine mounting plate that is compatible with Yerf-Dog karts will work. It's possible the holes in this plate will line up better. BMI Karts stocks the same plate without a jackshaft.


Cartinfun

Active member
Messages
112
Reaction score
94
I'm sure you don't want to keep throwing money at a solution but maybe this engine mounting plate that is compatible with Yerf-Dog karts will work. It's possible the holes in this plate will line up better. BMI Karts stocks the same plate without a jackshaft.


That looks like the exact same thing I have.
I'm thinking I should just get a new TC with mounting plate that mounts to the engine. That way I know it will line up.

I was trying to re-use this one since panchothedog was talking about the 7in driven pulley being better than the replacement 6in driven pulley.

At this point I've sent $40 on that plate from BMI that I probably can't return. So I don't know that I want to bother with anything else that MIGHT work.

Am I wrong?
 

MWKarter

Member
Messages
54
Reaction score
26
Location
Madison, WI
I believe that there is supposed to be a spacer washer between the jackshaft mount and the gear which I am not seeing. I could be wrong, so wait until someone more familiar / knowledgeable chimes in. And I have the old Yerf Dog jackshaft plate that I can measure for you if it helps.
 

panchothedog

Well-known member
Messages
2,789
Reaction score
3,744
Just put a shim ( washer ) on the inside of the small drive sprocket. You will in turn need to shim the driver the same amount as it will move the driven clutch sideways the amount of the thickness of the shim. How much do you need to move it over. Also just a thought, I once had a similar problem. I discovered I was using a #40 chain, which is wider than a #420 chain. Not a lot but it was enough to make the difference. If you are getting into thousandth of a inch, and I bet you are, you could even grind down the bolt head. If it has a washer behind it remove it. How about a Allen head bolt. That could ground down much lower than a standard hex head and still be able to engage a standard key to tighten or remove. This is something I 'm sure you will be able to overcome.
 
Top