Viper Offroad with full suspension project log.

Status
Not open for further replies.

xoltri

New member
Messages
75
Reaction score
0
Looks good much better.

I have a strap of 1x1/8" and cut 1x1" pieces then roughly shape on the bench grinder, weld and regrind if needed.

Thanks theo, I will do that.

I've looked at some of the pictures of your karts and they are awesome. I'd be interested to know if you design them yourself and what type of setup you have for bending tube.
 

theo

New member
Messages
872
Reaction score
1
I design all my buggies, and base them on simplicity, and economy. As for bending, I cheat and when tight bends are needed I use pipe, with a cheap old pipe bender.
 

xoltri

New member
Messages
75
Reaction score
0
I did more work today. I closed up a bunch of the tube ends (thanks for the tip!). I added a basket to carry tools, extra gas and spare parts for when I take this thing out to the lake.

Finally, someone else (maybe it was you Theo) recommended that I add braces to the suspension upright so I did that as well.

All that's left for welding is to close up a few more tube ends. Then I will strip the frame of parts and paint it. Getting close!

I also have to redo the gasket on the engine as it has been leaking oil since I took the governor out. But that shouldn't be too hard.
 

Attachments

  • IMG_5952.jpg
    IMG_5952.jpg
    55.4 KB · Views: 65
  • IMG_5953.jpg
    IMG_5953.jpg
    75.8 KB · Views: 67
  • IMG_5954.jpg
    IMG_5954.jpg
    101.4 KB · Views: 77

xoltri

New member
Messages
75
Reaction score
0
Big update.

I have finished the paint job and got it back together. It was too late to drive it so that will have to wait until tomorrow.

I painted it 'safety blue' and black. I also used a reflective paint clear coat that will make it super visible should I choose to drive it at night. You can see the glow in some of the photos where I used the flash.

I moved the throttle cable holder over so it is in line with the carb; this should allow it to get full travel. I also added adjustable pedal stops. Should any younger drivers want to drive it I can limit the throttle to half, and it will prevent anyone from over extending the pedals.

Last but not least is the super bright LED flashlight for a headlight. Not sure how much night driving I will do but it's there in case I need it.

I'm pretty happy how it turned out. I'm sure I'll have some tweaks to do once I run it tomorrow but I'm hoping it's finished after that.
 

Attachments

  • IMG_6047.jpg
    IMG_6047.jpg
    102.8 KB · Views: 146
  • IMG_6046.jpg
    IMG_6046.jpg
    64.8 KB · Views: 127
  • IMG_6044.jpg
    IMG_6044.jpg
    63.8 KB · Views: 115
  • IMG_6043.jpg
    IMG_6043.jpg
    90.7 KB · Views: 128
  • IMG_6042.jpg
    IMG_6042.jpg
    92.8 KB · Views: 131
  • IMG_6048.jpg
    IMG_6048.jpg
    74.4 KB · Views: 113
  • IMG_6049.jpg
    IMG_6049.jpg
    84.4 KB · Views: 140
  • IMG_6053.jpg
    IMG_6053.jpg
    105.8 KB · Views: 109

squat251

New member
Messages
156
Reaction score
1
love the little carry basket idea, that's very clever. very nice design and looks like it handles really well. good build!
 

xoltri

New member
Messages
75
Reaction score
0
love the little carry basket idea, that's very clever. very nice design and looks like it handles really well. good build!

Hey thanks! My wife (and friends) make fun of the basket, but it fits extra gas and some tools so it has a purpose.
 

redsox985

Active member
Messages
4,092
Reaction score
11
Location
PA
I'm glad it helped, but this thread hasn't been touched by its owner, or anyone for a decent span of time. Please don't "bump" threads just to say thank you. If you do have a helpful contribution, please chip in. Otherwise, welcome to the forum.
 

xoltri

New member
Messages
75
Reaction score
0
I have some updates. I have a bunch of different hobbies I tend to cycle through (RC, wine making, guitar...) and I haven't worked on this for a while until recently.

A while back I discovered some problems with the Briggs engine I used. Specifically the carburetor. Briggs designed this carb so it pretty much could not successfully be used on a moving vehicle. The problem is that it has no external overflow vent. The vent for the bowl feeds into the intake of the carb. So if you hit a bump it vents extra gas into the intake and floods the engine. It works great on smooth ground, but as soon as you go on bumps it bogs down and sometimes stalls. Not good for an off road go kart.

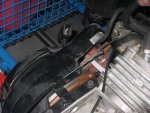
To solve this issue I bought an XR50 clone carb and air filter on Ebay. It's a 22mm slide carb which is larger than the stock carb, so maybe it'll even have a bit more power. But I'm not changing the exhaust so maybe not.

I had to do a bunch of modifications to make the carb fit and I'll post some pictures later. Luckily the intake port on the head is large enough, but there is a plastic spacer I had to bore out to 22mm to match the new carb. Also the old carb bolted from the front and this one is designed to bolt on from behind, which is impossible without an adapter. So instead I used permanent thread locker to put bolts on the engine, and then I had to drill out the carb bolt holes slightly closer together and larger so they would line up. I also had to modify the carb by using a dremel so I could fit nuts on the flange to fasten it to the engine.

After all of this I've fired it up and it actually runs! It seems to run really well, idle is solid but I haven't had time to take it for a spin yet. I'm just happy that it fired up because I figured I'd have to change jets on the carb which I have no experience with. I still have to do plug readings to make sure it's not running too rich or lean but I'm pretty sure I can adjust this carb to work well. Luckily there is a guide online on tuning a similar carb that I can work from.
 

xoltri

New member
Messages
75
Reaction score
0
Sweet! It's winter now so no driving for me. But the kart turned out good and it runs great. Good luck on your project!
 
Status
Not open for further replies.
Top