Vintage 1950's Briggs #14.

Status
Not open for further replies.

mckutzy

Well-known member
Messages
8,353
Reaction score
108
Location
bc, canada
I was out going to a couple of scrap yards with a buddy yesterday. We also went down to his his friend that does alot of salvage and scrap aswell...
The guy has all sorts of stuff in his yard, he's a hoarder... anyways.. He got this old log choper and rebuilt it, but took off the old motor.

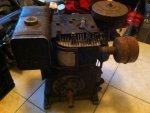
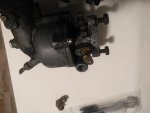
When we got there, he was just cleaning up of the last of the crap from that and had this old briggs....

He said it ran not too long ago, but was all complete and relatively clean(not really left out in the elements, must have been covered).
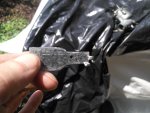
The name tag has no printing on it, only the stampings.
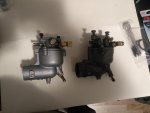
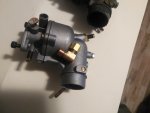
Checking out some others like it, found out its a model 14, 20ci(327cc)9hp(?)
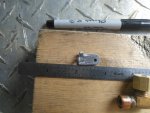
Cast iron block, 1" shaft, pull, no recoil start...
Old school for sure.....

I got it for $65, he was just looking to get rid of it if he could or add it to the steel pile.

What a cool find. Not too sure what it'll be on, might be the other chopper I have and set aside my new 208.... dont know..... or i might have to build another.. true minibike. decisions decisions....
 

minibikegi

Banned
Messages
31
Reaction score
0
im feelin old , I had one but had a kik start for wash machine. it was a slanted cyl briggs 4 stroke. make a working water pump or sumthin with yours? nice find though
 

mckutzy

Well-known member
Messages
8,353
Reaction score
108
Location
bc, canada
I have looked up alot of the old kick start briggs..... really cool ideas... even for a washing machine.....

I have taken a good look at the motor and.... its confusing.... I still dont know how much HP it is(think its a 8-10HP???), I did find out how to stop it when I get it started....

Im thinking Im going to go the Bronda rout. Im familiar with the clone carbs... and I can get parts for them....
this I dont know where to begin..... The air filter looks like a balled up ring of horsehair with an oil bath.....
I just need to make an intake.
 

itsid

Moderator
Staff member
Messages
11,563
Reaction score
243
Location
Ruhrpott [Germany]
it could have had a lever on top to ground the spark plug wire
as a killswitch
that's a much smaller engine but basically the same idea..
full-2772-10726-bs_60102_kill_switch.jpg

'sid
 

mckutzy

Well-known member
Messages
8,353
Reaction score
108
Location
bc, canada
No on mine... Ill have to get a better pic later...
On the side of the block there is a little tin box, with a wire and a button. Apparently there is a points ignition system on this, So the kill is a button....
But when I attempt to start it for the first time ill rig up a kill just like that..
 

Russ2251

AZUSA:Powered by LAWN-BOY
Messages
6,622
Reaction score
43
Location
Huntington Station, Long Island, NY
it could have had a lever on top to ground the spark plug wire
as a killswitch
No.
Kill switch is located under exhaust port. Rectangular box with red plastic button on top left corner.
Model 23, 19, 14, and model 9 had the same setup.
Mag is under flywheel.
I haven't had one cross my workbench in at least 20 years.
 

mckutzy

Well-known member
Messages
8,353
Reaction score
108
Location
bc, canada
Well I bought it for the LCF (look cool factor), being old and different...
I knew it'll be a bit hard to get anything for it other than oil and gas.
... There is a few guys out there that like this stuff, and I have always liked the look of it, but the carbs as I better understand them now I don't like the "look"... Hence the switch to a clone variant.
 

mckutzy

Well-known member
Messages
8,353
Reaction score
108
Location
bc, canada
Thanks sid...

Finally after a long time of not having anything to tinker with... I decided to crack into the ol' gin...and see whats happening with it...
I found out its a 6hp... plain end bearing,
The gas tank is absolutely clean..... not a tinge of rust it in at all... carb is pretty clean aswell...

Tried to take the carb apart, and its a little different than most... the main jet/E tube bisects the two carb halves.. You have to unscrew it then the halves can come apart....
Now after many a year while dried out, the remaining moisture/fuel gummed and corroded the e-tube in place... sadly after a bit of working on it.... I did stop and not ruin it completely...
The e-tube was seized a bit in its threaded bore, and I needed a modified screwdriver to extract it with out damaging the threads....I kinda messed the treads....I found this out afterwards...

So I did get another carb off of the amazon.... and just like any other china product..... ITS CHINESE and METRIC....Not that I care... its just that the briggs isnt....
So I get new bolts that fit the flange...
I attempt to remove the fuel line hose barb attached to the carb, I used some heat to loosen the "threaded barb", to change it to a compression fitting as per the engine...

Well the barb was just pressed in held fast with epoxy.... no threads..... just glue.
Not only that, its way too thin to thread with pipe threads, or any for that mater...
Sooooo... after fiddling around I made an adapter to fit the bore and will glue in place...
This morning attempting to get a start on it... and this thead... I was getting stuff to set up to glue...
The epoxy I had... is dead....siezed up.....it was old.....
OK...
It gets better.....

After reeling about after dead glue....I noticed the butterfly vane connecting lever is backwards on the china carb....
FRICKEN CRIKEY... can they get anything correct.....Ahhhh naaa... that would be too easy...

SO..... a bit of anticlimactic start/possible finish... Im not much ahead, and a bit further behind...
 

Attachments

  • IMG_20190618_091626.jpg
    IMG_20190618_091626.jpg
    146.9 KB · Views: 4
  • IMG_20190618_091535.jpg
    IMG_20190618_091535.jpg
    142.7 KB · Views: 3
  • IMG_20190618_092801.jpg
    IMG_20190618_092801.jpg
    166.2 KB · Views: 4
  • IMG_20190618_092729.jpg
    IMG_20190618_092729.jpg
    161.4 KB · Views: 4

mckutzy

Well-known member
Messages
8,353
Reaction score
108
Location
bc, canada
Sorry for the odd shot angles, I was getting bad shadows and I didnt have a desk lamp in that area for better illumination......

So the top 1 shows the adapter and the un-threaded boss of the china carb. I made the adapter with a compression elbow and a copper pipe connector(as a shim of sorts). Using the pipe threaded end, I filed down a bit to accept the connector, soldered in place, trimming a bit off then filed to fit the bore of the carb just snug...

The second pic shows in place of the comp fitting in relation to the briggs carb....
At this point I found out the epoxy is dead....
Also note the lever of the butterfly valve... It like 180* out from each other...

What a headache this is.....I might be able to reverse the lever carefully prying it off and changing it, or solder a new piece right way around.... I dont know....

This was supposed to be a quick fix and try to getter running, while I get the old carb working again.....BUT NOOOOO.........
 

Hellion

Moderator
Messages
8,604
Reaction score
3,685
I demand better pics. And better lighting too!
Just kidding (well no, I’m not). :)

Can’t wait til you get this one running. These flatheads and old cast iron engines have a very satisfying mechanical rhythm and can be made to idle ever so slowly, to just barely ticking over.
 

mckutzy

Well-known member
Messages
8,353
Reaction score
108
Location
bc, canada
Hehehe... Let me guess > your just here for the GUZZOLINE.......and the Pics..


Some of the vids out there ive seen.. kinda sound like a Hit-and-miss engine....
Just enough pow to cycle it.... kinda cool..... Put______Put______put......

Its big though.... ultimately Id like to re-purpose it on my Square chop.... but itll need redesign to fit...
 

Hellion

Moderator
Messages
8,604
Reaction score
3,685
Yep, thump---thump---thump. A lot of those Youtuber guys have just the engine mounted on a wooden sled type of mount.
Kinda sad because the engine isn't doing anything useful.


GUZZOLINE! I don't know those images though. More like this:


mckutzy

Well-known member
Messages
8,353
Reaction score
108
Location
bc, canada
Ahhhh classic Road warrior VS new school Fury Road .....
Hard to tell whats better... equally very good....
Thats a good gif... lookin like he's just given'er and they're following...

Ya I know... alot of those antique collector dudes Just letter idle.... putting about....
Its cool to see an antique restored... but do something with it.....

I hope to at least get it mounted to a bike... might have to make a new one... but with Funds/job the way they should be....itll be a while...
In the mean time ill tinker.... Or ill have to do some more scrounging......
 

mckutzy

Well-known member
Messages
8,353
Reaction score
108
Location
bc, canada
I did some more work today....
Ive been figuring on how to correct the arm situation of being 180* opposite....
A lever cover...
I have room, so I figured Id make a cover, that will have the same center offset for the pivot, as the stock version.....
Ill place the lever cover, with the referencing from the current pivot hole, as kinda an alignment pin. The cover has a tab to align to center of the valve pivot rod, it looks off but its right on the center...

Im going to get some 5min epoxy, and Ill glue it in place. Ill use this as itll be "semi-permanent", till I need it to be undone for what ever reason later, if need be. A light pass with the torch will loosen the glue....
Originally I was going to solder it in place, but noticing the arrangement of pins and small screws holding the throttle valve in place.... I dont want to mess with those and risk more damage than already....
So epoxy will do....
 

Attachments

  • IMG_20190621_142101.jpg
    IMG_20190621_142101.jpg
    184.9 KB · Views: 2
  • IMG_20190621_143206.jpg
    IMG_20190621_143206.jpg
    395.6 KB · Views: 2
  • IMG_20190621_143251_BURST001_COVER.jpg
    IMG_20190621_143251_BURST001_COVER.jpg
    348.2 KB · Views: 3
  • IMG_20190621_143935.jpg
    IMG_20190621_143935.jpg
    350.8 KB · Views: 3

JTSpeedDemon

2019 Build Off Winner!
Messages
4,026
Reaction score
162
Location
Texas
Hey, just stumbled upon this thread.
You actually don't have to remove the emulsion tube to get these Flo-Jets apart.
Just unscrew the lower body mounting bolts and carefully wiggle them apart.
And do the reverse for reassembly.
There's lots of info on Flo Jet repairs here: http://outdoorpowerinfo.com/repairs/
I could've told you that model 14 meant 6 HP, certainly not 9, but I'm late, so you already know.
Make sure the idle circuit is spick and span, it's a kinda awkward l-shape, so make sure it's not gummed up.
Mine basically had what I could probably call an 'Ethanol Booger" in it! :lolgoku:
I hope you tried to start it before you tore it apart!
 

mckutzy

Well-known member
Messages
8,353
Reaction score
108
Location
bc, canada
Ya...a bit late to the game.... and Ive been looking for the HP for years now...not exactly all that simple to find...
I recently found some reference to a #14 from some thread, A guy had one that was a couple 100 off of my number with all the paperwork from back in the day...

Ya I found out later... It bisects the carb... after I watched a ton of vids , like I explained in your thread(??, I think?). I however didnt F-it, stopped when I saw things going awry...

Ive got the new one. So ill run that one first when I get it glued up and installed.........
 

65ShelbyClone

Active member
Messages
670
Reaction score
167
Location
SoCal
The "14" means 14 cubic inch displacement. It's 5 or 6hp AFAIK. It has a 2.625" bore and stroke, points actuated by the cam, magneto separate from the flywheel, connecting rod a mile long, solid wrist pin, etc.

I have one too...

 
Status
Not open for further replies.
Top