Nice! That's a pretty involved project to take on as your first. I'm going to build this one next so I can have one too! Although it's not going to happen anytime soon, the costs to build these is suprisingly expensive if you don't have any old parts laying around- nothing is outrageously pricey on it's own but they all add up.
You are using an out of date browser. It may not display this or other websites correctly.
You should upgrade or use an alternative browser.
You should upgrade or use an alternative browser.
Tarantula in Albuquerque
- Thread starter SDCoston
- Start date
- Status
- Not open for further replies.
SDCoston
New member
Back on the steering thing: Is there any reason you can't reverse the steering setup so your tie rods run just in front of the column uprights? That would make things a lot easier
I'll look at that. With the caster and KPI built in to my spindle brackets, I think my frame may get in the way. I may be able to cut the brackets off and reattach in a way that that is possible. I DO like the idea of moving the tie rods behind the column and just in front of the uprights -- it would give us more room for our feet!
I can see why having the bracket side attached to the stub axle and a fixed king pin cylinder would be better for setting all of this stuff up.
SDCoston
New member
So I got my front end completely built and my live axle build out. I usesome more aluminum locking rings because my wheel hubs (which are supposed to lock onto the axle with tightening of an allen bolt) weren't staying fixed.
I realized I had a rolling chassis!
My boys really wanted to take it out for a roll even before my brakes and engine were ready to go.
They complained to me that the kart was too difficult to turn to the left compared to the right... so after some analysis, I realized my frame was all square, but my spindle brackets were not symmetrically welded on. I had more caster on the left than the right, and possibly more KPI as well. Also, and probably most significant, the right spindle bracket was 1/2" higher than the left.
Not sure how I got all that wrong, but I decided to cut the spindle brackets off, and start over - building the spindle brackets with their 10° KPI, 10° caster, & 0° camber all over again ... but this time with some additional measures to ensure bilateral symmetry with some homemade wooden jigs.
I took the opportunity to also build in the proper Ackerman configuration, which required me to cut the stub axles completely off my spindles then re-weld them back on after everything else waswelded in proper place.
This sounds like a lot of work, but really just 2-3 hrs, and I'm glad I did it -- steers like a dream now.
Fabroman - I was unable to move my steering arms to behind the column. For some reason, with the KPI and the caster, they were binding back there and severely limiting my steering range. I did get the Ackerman all set up like you said though. I used a laser level line to get the kingpin, steering arm, and center point of the rear axle all lined up.
Attachments
-
 2012-08-14 19.38.55.jpg155.7 KB · Views: 74
 -
 2012-08-17 18.52.00.jpg88.7 KB · Views: 57
 -
 2012-08-17 20.13.37(2).jpg66.5 KB · Views: 49
 -
 2012-08-17 20.17.31.jpg71.5 KB · Views: 51
 -
 2012-08-17 20.30.33.jpg70.9 KB · Views: 50
SDCoston
New member
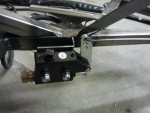
another pic, and a question about hydraulic brakes
The next thing I plan to address is charging my hydraulic brakes. The set up I got from BMI karts didn't come with enough high pressure nylon tubing (annoying) so I ordered some more from an aircraft supply online store and it arrived in 2 days! $5.60 for 20 ft of the stuff. I think I've got enough now.
Can anyone point me to a step-by-step set of instructions for initial set up and bleeding of the hydraulic brakes?
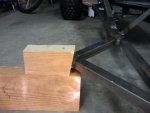
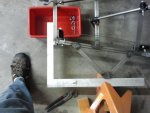
(the first picture is of my new, completely symmetric spindle brackets . The second one is my master cylinder to help out someone who knows how to prep these identify what I'm dealing with.)
Thanks,
Sean
The next thing I plan to address is charging my hydraulic brakes. The set up I got from BMI karts didn't come with enough high pressure nylon tubing (annoying) so I ordered some more from an aircraft supply online store and it arrived in 2 days! $5.60 for 20 ft of the stuff. I think I've got enough now.
Can anyone point me to a step-by-step set of instructions for initial set up and bleeding of the hydraulic brakes?
(the first picture is of my new, completely symmetric spindle brackets
Thanks,
Sean
Attachments
-
 2012-08-17 20.55.02.jpg80.6 KB · Views: 53
 -
 2012-08-17 21.09.25.jpg69.5 KB · Views: 45
OzFab
Well-known member
Fabroman - I was unable to move my steering arms to behind the column. For some reason, with the KPI and the caster, they were binding back there and severely limiting my steering range. I did get the Ackerman all set up like you said though. I used a laser level line to get the kingpin, steering arm, and center point of the rear axle all lined up.
Well, it was worth a mention. Probably would've been a simple matter of adjusting the angle on the steering arms but, now that you have the ackermann set up for front facing arms...
(the first picture is of my new, completely symmetric spindle brackets
Is your master sitting below the bottom of your frame or is it just a camera trick?
SDCoston
New member
Is your master sitting below the bottom of your frame or is it just a camera trick?
Yes,it is hanging slightly below. Is that a problem?
OzFab
Well-known member
Yes,it is hanging slightly below. Is that a problem?
It will be if the kart bottoms out & tears the master off.

Best to move it up so the bottom of the master is at least level with the bottom of the frame... or a bit higher
souperman000
New member
for being your first kart, it is defintely coming along nicely. Glad you got the steering figured out pretty easily. Remember ~ Measure twice, cut once! 
SDCoston
New member
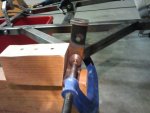
So this weekend was productive. I was able to get my brakes lined up and bled. Amazingly, the bleeding of the brakes has been the most frustrating part of this entire build for me. After the extra tubing arrived Saturday, I installed the two lines between my master and the calibers, bringing them through a small eye bolt that I attached to the underside of frame beneath the motor. (How heat tolerant is that nylon tubing anyway?) I tried getting my 12 y/o son to help with pedal pushing and filling the reservoir while I opened and closed the bleed ports on the calipers, but something always didn't work right and we'd always end up sucking air into the system from somewhere. Eventually, a friend of the family came over and having two adults who completely understood the process doing it ... we were successful.
I left the master hanging slightly below the lower main frame. I may build a small "skid plate" for it if it looks like it will be a problem.
My friend and I then mounted the motor and found the chain was too loose, and if we removed an inner and an outer link then it was too tight. So off with the motor and I elongated the motor mount holes to allow the motor to slide into the right position. Live and learn, I guess.
We got the kart up on jack stands and started the motor up! It was freaking sweet to see the motor drive the live axle for the first time.
The only thing I have left to do before we're tooling around on the kart is to link the front right pedal to the motor throttle. I bought a throttle linkage kit from BMI that arrived without instructions, but I think I can figure it out.
I'll post pics and maybe a video soon. Does anyone know if one can post pics from and iPad? I can't figure out how to work that.
SDC
Your kart is looking awsome. Your kids are going to love it. I look forward to the vid. I am not too sure about posting from an ipad, but I will try find out
Edit: OK...here a a few links regarding posting from an ipad
http://badgerandblade.com/vb/showthread.php/286296-Uploading-photos-from-ipad
http://www.vbulletin.org/forum/showthread.php?t=267177
http://forum.woodenboat.com/showthread.php?150340-Posting-pictures-from-an-iPad
Hope this helps a bit
Edit: OK...here a a few links regarding posting from an ipad
http://badgerandblade.com/vb/showthread.php/286296-Uploading-photos-from-ipad
http://www.vbulletin.org/forum/showthread.php?t=267177
http://forum.woodenboat.com/showthread.php?150340-Posting-pictures-from-an-iPad
Hope this helps a bit
SDCoston
New member
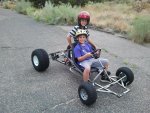
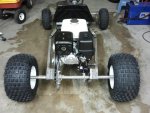
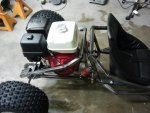
test picture upload from Flickr -- wow that worked great! from my android phone to Flickr to the forum in a snap!
Thanks landuse!
Thanks landuse!
Attachments
-
 7838574388_95e24a45a8_k.jpg95.6 KB · Views: 62
 -
 7838569120_7a285ab5d2_k.jpg91.1 KB · Views: 57
OzFab
Well-known member
Man, give yourself a pat on the back, that looks fantastic, especially considering it's a first project; be proud
Man, give yourself a pat on the back, that looks fantastic, especially considering it's a first project; be proud
I agree. That is bad *** looking!
kendelrk
redneck engineer
do i see a comet 30 or china TAV? theyre only made to withstand up to around 8hp, so you may fry belts quite fast, but it does like quite awesome for a first build.
No problem. That is a great looking kart
SDCoston
New member
do i see a comet 30 or china TAV? theyre only made to withstand up to around 8hp, so you may fry belts quite fast, but it does like quite awesome for a first build.
The GTC website says the 1004 GTC TC2 is rated for 8-13hp engines. Hopefully it will be ok.
http://gtcmanufacturing.com/GTC-Gokart-Torque-Converter-1.aspx
I'm wondering if my gearing is right though. 13 hp engine 10 teeth on the CVT jackshaft and 60 on the live axle with 18" wheels. with the motor and no rider, the cart is about 140-150 lbs - would be my guess.
SDCoston
New member
Thanks guys! I appreciate all the good feedback. It's been a fun project.
Joey (my 12 yr old) has been quite distraught by my having gotten as far as I had this weekend only to put it all on hold for the last two days (late days at work). He wants to get on that thing and haul a-- so badly ... he's losing sleep over it!
Speaking of which ... what do you all think about the need for a cage or roll bar. I mean will this thing flip? its center of gravity is very low.
Thanks, Sean
souperman000
New member
if the CG is low then it is not as prone to flipping as a kart with a high CG.
I doubt you need a roll bar for this. If you do decide to include a roll bar, then you need to nake a seatbelt as well.
I doubt you need a roll bar for this. If you do decide to include a roll bar, then you need to nake a seatbelt as well.
- Status
- Not open for further replies.