You are using an out of date browser. It may not display this or other websites correctly.
You should upgrade or use an alternative browser.
You should upgrade or use an alternative browser.
Streaker Build: Start to Finish
- Thread starter Kentucky Boy
- Start date
- Status
- Not open for further replies.
Kentucky Boy
Member
Tearing up the yard.
http://youtu.be/5c5O4ASjUjg
NR Racing breather kit is on the way. I've been running it wide open with no problems but I think I'll give this kit a try.
http://youtu.be/5c5O4ASjUjg
NR Racing breather kit is on the way. I've been running it wide open with no problems but I think I'll give this kit a try.
Attachments
-
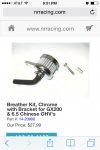 image.jpg88.3 KB · Views: 9
Last edited by a moderator:
Kentucky Boy
Member
NR Racing Breather kit arrived today. Over all impression is it is a good quality kit. Nice and solid, nice chrome work. Very heavy material, well made. I think the size of the filter is overkill for this application but it looks very cool. Here's a pic of the valve cover vent as I have been running it...open.
And here are a couple of the kit installed. I think it looks very cool.
Last one.
And here are a couple of the kit installed. I think it looks very cool.
Last one.
Attachments
-
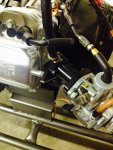 image.jpg376.1 KB · Views: 18
 -
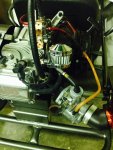 image.jpg361.2 KB · Views: 28
 -
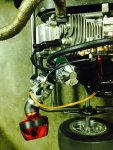 image.jpg386.7 KB · Views: 27
Last edited by a moderator:
chancer
ɔ ɥ ɐ u ɔ ǝ ɹ
Cool
Kentucky Boy
Member
How often should I check my valve lash? I've been running my Streaker for a while now. Just wondering if this is something that needs to be checked and adjusted on intervals.
Took my kart out for a few quick runs yesterday to help circulate some Stable through the fuel lines. Wound up breaking my chain. I noticed the chain was very dry and was catching in a lot of places. I guess I failed to ever oil it.
Took my kart out for a few quick runs yesterday to help circulate some Stable through the fuel lines. Wound up breaking my chain. I noticed the chain was very dry and was catching in a lot of places. I guess I failed to ever oil it.
Attachments
-
 image.jpg346.5 KB · Views: 22
Last edited by a moderator:
chancer
ɔ ɥ ɐ u ɔ ǝ ɹ
I boil mine in Candle wax. Oil traps dirt.
Or get good Motorcross chain oil. I think it is call PJ1.
Or get good Motorcross chain oil. I think it is call PJ1.
Kentucky Boy
Member
I usually clean them with kerosene then soak in motor oil and wipe off.
chancer
ɔ ɥ ɐ u ɔ ǝ ɹ
That works, I see your videos on the street, here we are driving in a dusty hard packed dirt yard.
So the fine dirt sticks if I use oil on the chain.
So the fine dirt sticks if I use oil on the chain.
Kentucky Boy
Member
I've been driving this thing for a while. It's running great. I'm going to do a few more things to it. Gonna remove the baffle in the screw on muffler, change the weights and springs in the torque converter driver. Change the head gasket to the thin 0.010 one for more compression, and upgrade the spark plug and index it. Possibly port the head some, but it already looks good from the factory. Here's a pic of the equipment I bought to do it with.
First new mod will be to remove the baffle from the screw on muffler. I've had problems with these mufflers coming apart from vibration. After I remove the baffle I will rivet the halves together to prevent them from coming apart and rattling again.
Here is a pic of the baffle inside the muffler. I am going to use an extension for my drill with a titanium stepped hole bit to drill the baffle out.
I realized that it's impossible to get all the metal shavings out of the muffler so I used my dremel to cut the two halves apart to clean it out after the baffle was drilled out. Looking good so far.
Baffle is gone. Very little left to restrict the exhaust flow now. I cleaned out all of the metal shavings and now it's ready to reassemble and rivet together.
I drilled six 5/32 holes around the perimeter of the muffler, cleaned out the shavings again then reassembled and inserted the rivets.
Attachments
-
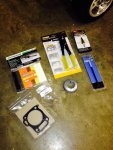 image.jpg394.3 KB · Views: 14
 -
 image.jpg337.5 KB · Views: 10
 -
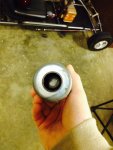 image.jpg354.9 KB · Views: 9
 -
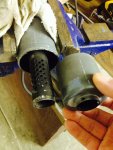 image.jpg388.3 KB · Views: 13
 -
 image.jpg235.4 KB · Views: 11
 -
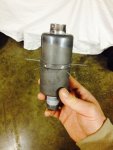 image.jpg295.2 KB · Views: 12
Last edited by a moderator:
Flyinhillbilly
The great cornholio
Why so much work to get the shavings out of the exhaust?
Kentucky Boy
Member
Muffler reinstalled. Stronger than the original design. Has a nice race like sound and you can definately hear the cam better. Havnt ridden it yet to test but it's much louder than before but not as obnoxious as an open pipe.
And I have discovered it also shoots fire out of the pipe now.
The muffler sits higher than the exhaust port. I didn't want any chance of the shavings finding their way into the head. Plus I was going to rivet it together anyway to keep it from becoming loose and rattling again. This is my 3rd muffler. They can't handle this motor to well.
I just got done checking my valve to piston clearance and installed a 0.010 head gasket, replacing the original 0.045 gasket. That project went very well and the motor runs a little stronger than before.
I had a problem with my driven unit flying apart a couple months ago. I replaced that. Then I discovered my driver spring was stretched out way to far and the weights were very worn.
New one is in.
New high speed run after mods and thinner head gasket. Opened baffle muffler.
https://youtu.be/0E6x2Ic29bw
And I have discovered it also shoots fire out of the pipe now.
Why so much work to get the shavings out of the exhaust?
The muffler sits higher than the exhaust port. I didn't want any chance of the shavings finding their way into the head. Plus I was going to rivet it together anyway to keep it from becoming loose and rattling again. This is my 3rd muffler. They can't handle this motor to well.
I just got done checking my valve to piston clearance and installed a 0.010 head gasket, replacing the original 0.045 gasket. That project went very well and the motor runs a little stronger than before.
I had a problem with my driven unit flying apart a couple months ago. I replaced that. Then I discovered my driver spring was stretched out way to far and the weights were very worn.
New one is in.
New high speed run after mods and thinner head gasket. Opened baffle muffler.
https://youtu.be/0E6x2Ic29bw
Attachments
-
 image.jpg201.6 KB · Views: 10
 -
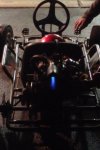 image.jpg112.2 KB · Views: 22
 -
 image.jpg323.7 KB · Views: 16
 -
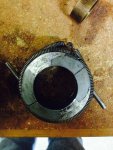 image.jpg442 KB · Views: 10
 -
 image.jpg384.8 KB · Views: 9
Last edited by a moderator:
chancer
ɔ ɥ ɐ u ɔ ǝ ɹ
Kentucky Boy
Member
Thanks man. I don't know how to do that to the video.
chancer
ɔ ɥ ɐ u ɔ ǝ ɹ
Highlight the bar. Just like posting a link.
Kentucky Boy
Member
Does this spark plug look a little lean?
Another shot of it.
Another shot of it.
Attachments
-
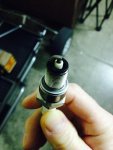 image.jpg273 KB · Views: 9
 -
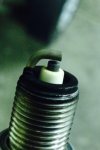 image.jpg123.9 KB · Views: 9
Last edited by a moderator:
Hellion
Moderator
- Messages
- 8,457
- Reaction score
- 3,577
And I have discovered it also shoots fire out of the pipe now.
I would suspect that the former baffle in the muffler acted as a spark arrestor more than anything else.
Great sequence of mods on this kart of yours. You are never truly done--that's commendable.

Kentucky Boy
Member
The baffle channeled the exhaust through the internals of the muffler, also the flames. Between removing it and changing the head gasket to .010 it really added a very noticeable difference to the performance... In a good way. I think I need a bigger jet in my Mikuni. Just don't know which one to replace yet. I think my plug is reading lean.
I finally replaced my original Comet driven unit. It flew off a couple months back and I never found all of it. I have slowly replace almost every part of this torque converter. It was old and almost wore out when I got the kart. Here is a pic of the new Comet 6" driven. I didn't want any chance of this bad boy flying off so I added a castle nut and drilled the driven shaft for a cotter pin. I safety wired it until I get the proper size pin for it.
Another.
Finally, new seat is on it's way. Time to retire the lawnmower seat!
Got my new seat today. It looks awesome. I've got to modify the mounting brackets and weld them to the frame to mount the seat.
Here's another.
One more.
Here's a side by side comparison of the old and new seat. Gonna have to remove the old seat and cut off the seat mounts from the frame.
The current seat is bolted to a thick steel plate and mounted to the frame on seat mounts. I'm going to remove the seat and cut the mounts off of the frame, they will not be used for the new seat. The new seat will sit about 3" lower.
Here are the mounts. I used a 4.5" cutting disc in my grinder to remove them.
And here it is after the work.
Attachments
-
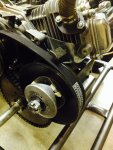 image.jpg369.5 KB · Views: 27
 -
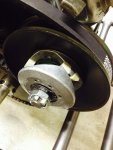 image.jpg320.1 KB · Views: 19
 -
 image.jpg98.8 KB · Views: 12
 -
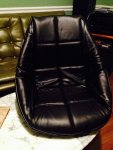 image.jpg271.3 KB · Views: 11
 -
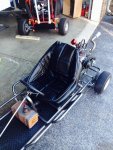 image.jpg478.4 KB · Views: 14
 -
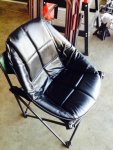 image.jpg329 KB · Views: 10
 -
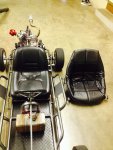 image.jpg370.7 KB · Views: 14
 -
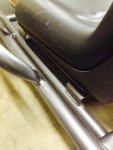 image.jpg370.8 KB · Views: 10
 -
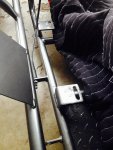 image.jpg330.5 KB · Views: 11
 -
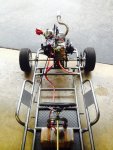 image.jpg339 KB · Views: 24
Last edited by a moderator:
Kentucky Boy
Member
Tomorrow I'm going to modify the new seat mounts to weld to the bottom side of the frame to mount the seat as low as possible in the frame.
These are the mounting brackets that came with the seat kit. I will be removing the parts that loop over the frame tubing. I will be welding the modified mounts under the frame on the bottom to get the seat as low in the frame as possible. Plus it will look much cleaner.
So here's where I'm at on my seat. Got the brackets cut. Still have to fit them to the frame.
It was so nice outside today I got sidetracked from installing my seat. I hated the rabbit ear looking gas tank mounts. I've always wanted to cut them off.
So I rolled the kart outside and cut them off. Used a cutting disc on my grinder and dremel tool. Then sanded and smoothed with some very small files.
Here's another pic. Really cleaned up the front of the motor.
You can't really even tell they were there.
Attachments
-
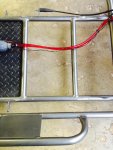 image.jpg416.8 KB · Views: 10
 -
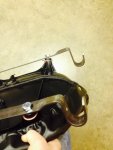 image.jpg302 KB · Views: 9
 -
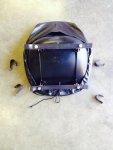 image.jpg260.4 KB · Views: 11
 -
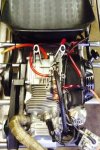 image.jpg226.5 KB · Views: 14
 -
 image.jpg408.2 KB · Views: 24
 -
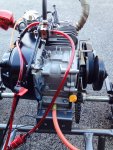 image.jpg546.2 KB · Views: 21
 -
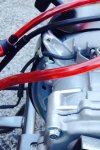 image.jpg187 KB · Views: 16
Last edited by a moderator:
Rail rider
Inmate # 3192016
Nice plumbing work...the oil drain is orange the fuel is red ... Are you a plumber ?So I rolled the kart outside and cut them off. Used a cutting disc on my grinder and dremel tool. Then sanded and smoothed with some very small files.


 PS.... Photo shop in the 2017 cookies sign ... And enter the build off..As of now you have my vote...
---------- Post added at 08:57 PM ---------- Previous post was at 08:55 PM ----------
We love our 4" 10,000 rpm erasers...You can't really even tell they were there.
- Status
- Not open for further replies.