"SchizoBallz" kart build started......

madprofessor

"Loose Cannon Creations"
Messages
2,899
Reaction score
888
Location
Jacksonville, Florida
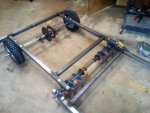
"SchizoBallz" is a Predator 212 (hemi)-powered schizophrenic kart that's the follow-up to my "DragginBallz" minibike build with the same engine.
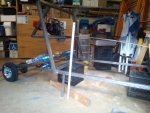
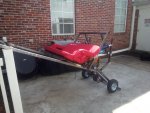
She'll be just as one-of-a-kind unique as before, schizophrenic because she'll be both a boonie-crasher with a foot of ground clearance between the axles, and a flat-tracker with your backside about 3 inches off the pavement.
The changeover will require no tools at all (same as DragginBallz), all done with wingnuts and lockwashers out in the field whenever the schizo mood takes you. Pictures will be posted as things progress, materials cost is already $1,116.18, so it's all building from here on.
Stay tuned, it's gonna be a good one...….
 

madprofessor

"Loose Cannon Creations"
Messages
2,899
Reaction score
888
Location
Jacksonville, Florida
Pics in a couple of days......

Will be posting progress pictures in a couple of days. The build has the basic mainframe and swingarm outlines tacked or welded up. Had to make that basic outline to see how wide everything would be with the 44" x 1" rear axle wearing its 6" rims and basic tires.
All that required getting the swingarm pivot built to connect to the mainframe. Using a 41" x 3/4" axle for the swingarm pivot and for the jackshaft, all in a line so that motor can sit rigid while the swingarm slams up and down a couple of feet.
Will take before and after pics of that axle still whole and wearing 8 pillow block bearings, and of it cut up into 3 pieces so only the center section (jackshaft) will spin up near the bearing limits of 4K rpm. The other 2 sections will just be the swingarm pivots.
 

madprofessor

"Loose Cannon Creations"
Messages
2,899
Reaction score
888
Location
Jacksonville, Florida
Progress pics attached......

Attached 5 pics. Shows frame outlines where it started with just basically 4 sticks each for mainframe, swingarm, and a backrest to frame off of for hanging the motor.
Pics show both low down flat track mode and raised up off road mode, and a crazy pic of just how high the swingarm could go if desired.
There's a closeup pic of the bearings arrangement on the left side showing how the jackshaft and the swingarm pivot are one and the same, and a further back pic of the whole combo.
This should be the last pics of that combo in one piece. After all the bearings are in their final positions I'll be cutting the 3/4" axle between the inboard bearings of the pivots and the pair that will be the jackshaft by itself.
NOTE: All of the 17" coilover air shocks will be cantilever actuated, with diminishing resistance as they're compressed. That means the highest stance possible sitting still with them supporting the full weight of the kart, but fuller range of travel from there. Just look at the pic with the rear end sitting on 2 milk crates.
 

Attachments

  • IMG_20200114_142013.jpg
    IMG_20200114_142013.jpg
    328.7 KB · Views: 28
  • IMG_20200111_145232.jpg
    IMG_20200111_145232.jpg
    261.7 KB · Views: 24
  • IMG_20200114_144024.jpg
    IMG_20200114_144024.jpg
    305.7 KB · Views: 26
  • IMG_20200114_141946.jpg
    IMG_20200114_141946.jpg
    300 KB · Views: 32
  • IMG_20200114_142349.jpg
    IMG_20200114_142349.jpg
    344 KB · Views: 31

madprofessor

"Loose Cannon Creations"
Messages
2,899
Reaction score
888
Location
Jacksonville, Florida
6013 instead of 6011......

Forgot to mention: Please completely overlook the crazy welds and tacks, looks like 3-scoop slag cones. All will be ground off before any final welding. Had run out of E6011 welding rods before build started, bought 6013 rods that run on 70-110 amps when the depot was out of the right ones.
Thought they'd be alright with my 80 amp Klutch welder, but the things do more piling up of weld than they do penetrating. Will not strike even one more arc with those 6013's using my machine.
 

Dingocat

Broke
Messages
722
Reaction score
159
Location
NE Ohio
Maybe you need to change some settings. I can weld with both but perfer the 6013 because it isn't fast freeze like 6011.
 

landuse

Moderator
Staff member
Messages
18,626
Reaction score
220
Location
Pietermaritzburg, South Africa
6013 is my go-to stick. I have never had any issues with them.

The kart is looking good. Are those HF wheels? If they are, please don't use them....ever. Put them on your wheelbarrow if you ever need a spare :D
 

madprofessor

"Loose Cannon Creations"
Messages
2,899
Reaction score
888
Location
Jacksonville, Florida
Only ever put HF wheels on a pushcart......

No HF wheels, landuse, just the engine, and that's been heavily changed up with parts from diyperform____, where most of my 212 parts come from.
Like most of my other parts, the wheels came from MFG. 6" split rims w/L-stem tubes, wearing 4.10x3.50x6 stud 2-ply tires. FYI: That works out to $50.36 per set, because they get $33.99 for the rims. Funny that, because they're just straight-thru live axle wheels, while 6" splits with 3/4" bearings installed are only $24.99......backwards weird.
The 6013 seems to be a go-to for a lot of home garage people I've talked to because you can just set max on your machine and just shove the rods into the steel, very little welding skill needed. I've welded a lot in my career, so I have no trouble with a hotter, more penetrating rod like the 6011. Deeper welds with less to grind down, far and away my favorite.
 

madprofessor

"Loose Cannon Creations"
Messages
2,899
Reaction score
888
Location
Jacksonville, Florida
Consider this..........

A piece of unsolicited advice, landuse……..
Get a piece of thin scrap steel and a piece of thicker steel. Like maybe some EMT thinwall conduit and a heavy piece of angle iron. Lay them down so they're up against each other, clamped together and to the table or whatever so they can't move.
Turn your welder up as far as it will go, and try just sort of feeding a rod into the place where they touch, see which one actually gets welded solid, and if thin stuff gets holes in it. Then try moving the rod over toward the piece that needs more weld/away from the piece getting blown away.
Once you get the eye for where to direct your rod, start turning the welder down until you can only make the rod get stuck, can't strike an arc. Try dragging the rod at an angle until sparks are blowing, try to stop there and weld. Start turning machine back up.
Always stop when you go blind, ie; when the ball of light from the arc keeps you from seeing the end of your rod. Stop for a second, get your bearings, then continue.
10 minutes of this and 3-4 rods later, you'll find that you're now twice as good a welder as you were before this started.
 

landuse

Moderator
Staff member
Messages
18,626
Reaction score
220
Location
Pietermaritzburg, South Africa
A piece of unsolicited advice, landuse……..
Get a piece of thin scrap steel and a piece of thicker steel. Like maybe some EMT thinwall conduit and a heavy piece of angle iron. Lay them down so they're up against each other, clamped together and to the table or whatever so they can't move.
Turn your welder up as far as it will go, and try just sort of feeding a rod into the place where they touch, see which one actually gets welded solid, and if thin stuff gets holes in it. Then try moving the rod over toward the piece that needs more weld/away from the piece getting blown away.
Once you get the eye for where to direct your rod, start turning the welder down until you can only make the rod get stuck, can't strike an arc. Try dragging the rod at an angle until sparks are blowing, try to stop there and weld. Start turning machine back up.
Always stop when you go blind, ie; when the ball of light from the arc keeps you from seeing the end of your rod. Stop for a second, get your bearings, then continue.
10 minutes of this and 3-4 rods later, you'll find that you're now twice as good a welder as you were before this started.

Thanks for the advise. If people don't give advice on this forum, we will never learn. I will give this a try when i do some welding again :thumbsup:
 

madprofessor

"Loose Cannon Creations"
Messages
2,899
Reaction score
888
Location
Jacksonville, Florida
Lots of progress made.....

It isn't schizophrenic yet, as only the off-road suspension is being engineered right now, but that (hardest) part of it has progressed a lot. Will be some time before the flat-track suspension gets figured out.
Pics will follow soon, just too messy for taking any right now. The 40&5/8" x 3/4" jackshaft/swingarm pivot has finally been cut up into 3 pieces, works just like it's supposed to.
The geometry of the cantilevered-diminishing-resistance-swingarm-suspension has been decided, pieces to make the entire linkage for 1 side is cut and welded up, ended up using 3 of the 3/4" threaded rod couplings for the pivot points. Looks awesome with the coil over air shocks and the big hefty knuckles.
Kart has a full 2' of travel at the rear bumper, and the geometry manages to use almost all of the shocks' 2.6" of compression.
Next will be making a mirror image of it all for the other side, but welded on in slightly different spot. Will decide then which one to cut loose and reweld to match the other one.
The cool adjuster for the motor that will tension the chain is built, now that I've got coarse 3/8" threaded rod, had picked up a fine thread by mistake.
Cut off the top cross bar and cut the uprights down almost 3", rewelded the cross bar, now will roll into the van easier. Lots of progress, happy, happy, happy!
 

madprofessor

"Loose Cannon Creations"
Messages
2,899
Reaction score
888
Location
Jacksonville, Florida
Finally back to post gains.........

Been a while since posting progress due to nonstop busy work running all of the events for the church, several ran almost consecutive.
Have the seat now, and it's as perfect a fit as I'd hoped. Only the armrests might be a shade wide. Excellent choice, I ordered it from W__mart for $54, it's a heavily padded folding bench seat meant to set on a tailgate to party, or backpacked up into bleachers for a game. It'll cover the 2-seater playing function, and the single-seat racing function.
Got in a pair of 4-point racing harnesses from same place for $39, covers 2-seater of course, but one side of each swung to middle makes it perfect for single-seater.
This all determined final cutoff length of frame front, and placement/design of dual pedals. Pedal. Just 1 brake pedal, 2 gas pedals linked in tandem.
Now have "dashboard" decided, where moving removable steering wheel will attach, changes from left to center drive, will telescope in for center position, scope out for left. Dash will also have controls for lights and engine.
Lights will power up from a rechargeable 9600 mAh lithium-ion battery pack ($21) in the dash. Using a pair of 60-watts each square LED headlights ($15 pair), smaller pair of red ones ($7) for rear w/brake lights also if I want to add a tee ($11) to the brake line for a brake switch ($10). Flip-cover toggle switches, big E-stop button, ignition switch, horn button, indicator lights will all be in dash. Maybe even a locking glove-box.
Got in 86" braided steel brake line, will not wear and break with massive travel of swingarm. Not much linkage to build for reaching it either.
Replying to "Budget GoKart", yes the 4.10x3.50x6 tires are going to look funny for sure on such a big kart. Will need to see how bad she tries to flip over backwards (should get 15 hp. @7200 rpm) before deciding on a possible upsizing.
Since reducing rpm from 12-tooth on the CVT to 24-tooth ($12) on the swingarm to save the 4K-rpm-rated pillow block bearings, and staying with another 24-tooth back to the 60-tooth ($15) split drive sprocket, I'll have all kinds of options for changing that 6-to-1 ratio to compensate for bigger tires, so it's very possible.
BTW, all the new stuff has been ordered in the colors that fit the American flag paint scheme of the kart. Red seat, blue harnesses, red and blue fuel lines, pull-off steering hub and 3 pedals will be blue, a real embroidered flag will cover the entire back of the seat, etc. Expecting to take pics very soon, will post asap.
 

madprofessor

"Loose Cannon Creations"
Messages
2,899
Reaction score
888
Location
Jacksonville, Florida
Oops! 5-to-1 ratio........

Just reread last post, said 6-to-1 ratio of existing. Last I checked, 12 teeth into 60 teeth only goes 5 times. Duh. It's currently only a 5-to-1 ratio.
Finally finished matching the left side diminshing-resistance swingarm suspension geometry to the right, amazingly close for a total setup with 10 pivots, 18 nuts, and yards of steel. Only had to make 1 cutoff wheel slice into a tube, pinch it, and weld it. Perfect!
Both 17" coilover air shocks mounted, disappointed at weakness. Cranked on the preload collars all the way to the stop, backed off half a turn. Amazing! Made them way stiffer than I'd thought it would, almost good enough alone.
Will be adding a pair of little shocks to that suspension to finish getting enough load-bearing the way I want. Going to be little 4, 5, maybe even 6" springs, most are rated for 650 lbs. Ebay stuff, nice and cheap.
 

madprofessor

"Loose Cannon Creations"
Messages
2,899
Reaction score
888
Location
Jacksonville, Florida
Trying to add some pics now.....

Sorry for the delay, finally adding some pics. If those 5 upload, what they show is:
Schizoballz (still without the now-completed front end) with its frame front end sitting up on a fence, showing almost how far it'll wheelie up before dragging the rear bumper(wheelie rollers yet to come).
There's a good shot of that cantilevered diminishing-resistance rear swingarm suspension.
A side view with me in the new seat of just how big things have gotten. With the front end clamped on, it'd have about 8' wheelbase, about 9' overall length.
There's also a shot with the motor in place that shows fairly well how the chains and sprockets drive the live axle without the motor moving, regardless of crazy amount of rear travel, without final drive chain tension ever changing.
The front end is completely built and welded out. Twin independent A-arms made from 1" EMT that's sistered up with 1" angle iron and has some 1/2" EMT inside for even more strength. Stupidly strong and overbuilt. 8 door hinges are welded together (2 quads) to make piano-hinge type anchors for the arms to swing on, very unique.
No pics of that yet, just finished. Want to grind on it a lot before showing any of the impatient welding.
 

Attachments

  • IMG_20200315_161153.jpg
    IMG_20200315_161153.jpg
    301.3 KB · Views: 19
  • IMG_20200325_150828.jpg
    IMG_20200325_150828.jpg
    319.3 KB · Views: 24
  • IMG_20200325_151155.jpg
    IMG_20200325_151155.jpg
    315.1 KB · Views: 19
  • IMG_20200325_151215.jpg
    IMG_20200325_151215.jpg
    344.6 KB · Views: 19
  • IMG_20200315_161133.jpg
    IMG_20200315_161133.jpg
    223.2 KB · Views: 18

madprofessor

"Loose Cannon Creations"
Messages
2,899
Reaction score
888
Location
Jacksonville, Florida
About those extra little shocks......

Addendum: Forget what I said about adding an extra pair of little shocks to increase strength of swingarm suspension, not needed.
I cut a pair of little 1" or so standoffs of the 1.5" square tube and welded them on just above where the shocks were mounted at the top. After a couple of adjustments, it's all magic. That subtle change in the geometry gave me all the tension I wanted and then some, will even be able to back off of the preload a little bit. Thrilled.
 
Top