"SchizoBallz" gets a new thread started...........

madprofessor

"Loose Cannon Creations"
Messages
2,899
Reaction score
888
Location
Jacksonville, Florida
Original "SchizoBallz" thread now over a year old and way too big a read, so starting off fresh and new. This is the follow-up build to the "DragginBallz" minibike build I spent a year on to guarantee it was so stupidly dangerous it would maim or kill whoever bought it. Shipped it to Ohio, prayers included.
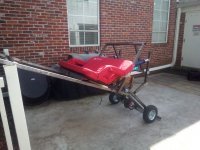
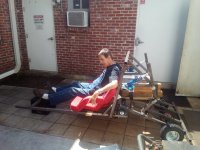
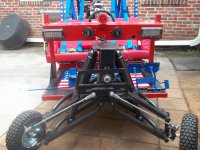
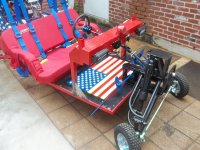
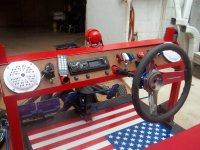
Current kart status has a couple of major things remaining to be done............
Have to make a horizontal chain drive in front of dashboard arch, between the steering shaft's left-drive and center-drive positions. That's because shaft will stay in center position, and only the steering wheel will swap back and forth with quick-release hubs. (That's 3 hubs total, as wheel itself is on one already.)
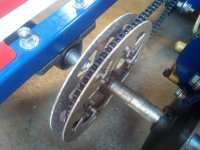
Still have to slice the 1" live axle between bearings on left side, spread equally right/left until 3" apart, and splice on a 5" long piece of 1" water pipe. (Makes 44" long 1" live axle w/.75" step-down ends 47" long for wheel hubs clearance.) Just to be able to fit 8" wide turf tires.
Have to make mounts for some little 4"-6" shocks for rear end when transformed to flat-track mode. Need limiting straps for both front and rear.
Tons of little things left to do, like paint touch-ups and more clearcoats, flamethrower wiring, secure the seat, y'all know the drill.
 

Attachments

  • IMG_20200111_145232.jpg
    IMG_20200111_145232.jpg
    2.2 MB · Views: 14
  • IMG_20200325_151155.jpg
    IMG_20200325_151155.jpg
    2.4 MB · Views: 18
  • IMG_20200325_150828.jpg
    IMG_20200325_150828.jpg
    2.4 MB · Views: 20
  • 100_0168.JPG
    100_0168.JPG
    2.6 MB · Views: 22
  • 100_0164.JPG
    100_0164.JPG
    2.6 MB · Views: 16
  • 100_0165.JPG
    100_0165.JPG
    2.5 MB · Views: 19
  • 100_0171.JPG
    100_0171.JPG
    2.5 MB · Views: 17
  • 100_0167.JPG
    100_0167.JPG
    2.4 MB · Views: 18
Last edited:

madprofessor

"Loose Cannon Creations"
Messages
2,899
Reaction score
888
Location
Jacksonville, Florida
Been working on the wiring for the flamethrower. Have to get the inputs for the arc transformer and the gas solenoid coil to power up with a 9vac battery-in-a-box. Only a couple of sparks from arc points, which are stiff and heatproof oven wire.
Since it's all 12vac stuff, thought solenoid was pulling too much for the arc. Put 2 of the 9vac together, much better arc. Still didn't work...........
Solution: Cheap Chinese momentary contact pushbutton was partially failing erratically, then quit altogether. Replaced with 20amp toggle. Still didn't work..............
Solution: Smartboy using the heatproof oven wire around that hot exhaust and the arc made a mistake. That wire insulation bleeds off voltage to the frame of the kart, got me good with that 40kva, made a drop of pee come out. Replaced with some 14ga. romex. Still didn't work...........
Finally got it working by mounting arc transformer right there at the arc point, only using the existing little 3" wires from it to set the arc gap. Any wire to extend it weakens the arc. Working first time every time now.
And the propane bottle leaked gas like a sieve...............3/4" I.D. heater hose too stiff for ring clamps to seal. Softer vinyl tubing on order..........
 
Last edited:

madprofessor

"Loose Cannon Creations"
Messages
2,899
Reaction score
888
Location
Jacksonville, Florida
Let the air out of the front shocks to drop it to the ground (transformer kart), and made the worst case of bumpsteer I've ever seen. Had forgotten that the new steering setup made the tierods not be parallel to the A-arms anymore.
Limited time, but did relocate tierods/spindles connections from top of spindle arms to the bottom. Huge difference after adjusting toe, but not happy with it just yet, need to figure out some more possibilities.
Limited options left since I refuse to sacrifice any ackermann on a live axle kart. Hard enough to steer as it is. Next kart will definitely be a trailing arms spindle setup. Leading arms puts your connection too close to tires and/or hubs.
 
Last edited:

madprofessor

"Loose Cannon Creations"
Messages
2,899
Reaction score
888
Location
Jacksonville, Florida
Forgot to mention that on last test (I call it successful) it got up to 21mph. in the church's driveway and speedbumps.
Wasn't even half throttle. I'm forecasting 55mph. on current 5:1 ratio.
 

madprofessor

"Loose Cannon Creations"
Messages
2,899
Reaction score
888
Location
Jacksonville, Florida
Sad and disappointed. Able to floor it for the first time without the chain trying to skip. 22 mph. Yeehaw. Whoopee. Barely even able to doughnut it in the grass and leaves on the new 16" tall tires with my 5:1 ratio through a CVT.
Not sure what's wrong with what should be a 15+ hp. demon, but realized part of it right away.
Took out the wrong size timing advance key (#9 = 10.8 degrees, was supposed to be a #6) a good while back, put the stock OEM (0 degrees) key back into my 28 degree PVL flywheel for testing. Still there. Will put the #6 (7.2 degrees advance) in tomorrow.
Hooked up the tachometer when back in the shop, that will tell me a lot next time. Should be a 7,200 rpm motor on the bench.
NOTICE TO ALL on those 2" wide rolls of fiberglass header "insulation": Smoking when back to shop, found the silencer box's fiberglassed and VHT-sealed "insulation" gets hot enough to melt the flamethrower's gas line in two, and both outer and inner shielded wire's insulations. Pic of melt damage below.
LOOK: Pic also of homemade shaft lock for torqueing flywheels. 3/4" water pipe not DOM, so cut out my 1/4" slice on the seam. Insert piece of 1/4" keystock, weld on outside. Weld on piece of slotted angle, use its holes to bolt tight to engine case, with key in shaft's keyway. Feel free to copy, it really works easy, simple, great. Putting on a flywheel with an impact gun es muy malo, muy no bueno!
 

Attachments

  • IMG_20210420_152205.jpg
    IMG_20210420_152205.jpg
    3.7 MB · Views: 4
  • IMG_20210420_180049.jpg
    IMG_20210420_180049.jpg
    2.4 MB · Views: 4
Last edited:

madprofessor

"Loose Cannon Creations"
Messages
2,899
Reaction score
888
Location
Jacksonville, Florida
Cut off pitman arm's shaft, relocated and welded to top side of that frame section. Welded small extension plates to spindles so tierods would reach them. Mounted close, used cone washers (like FRoM washers, but available in 3/8"). Bad bumpsteer solved.
72-tooth split sprocket from GPS and a 20MP sport camera (like the GoPro) from ebay on the way after a solid test run.
Same 22 mph., at 2200 or less rpm. New sprocket will address some of the low power issue, camera will accuse or exclude CVT as a problem.
 
Last edited:

madprofessor

"Loose Cannon Creations"
Messages
2,899
Reaction score
888
Location
Jacksonville, Florida
Had originally ordered a 9" double-sided split sprocket guard (instead of the 8") knowing an 8" would have been plenty big enough to protect the 60-tooth #35 split sprocket. Reason was due to expectation that 60-tooth might be changed to a 72-tooth, hoped the 9" would be big enough to still protect the sprocket going over curbs, etc.
Sprocket's here, and it measures about 8.7" across. With chain it'll be 9" O.D., just like the guard. Attaching a pic of how much bigger the 9" guard is than the 60-tooth. Now y'all know how big a 72-tooth is also, order your sprocket guards accordingly. I strongly recommend double-sided guards, for strength, and because the pair together incidentally act as a chain guide.
 

Attachments

  • IMG_20210420_182339 (1).jpg
    IMG_20210420_182339 (1).jpg
    2.5 MB · Views: 2
  • IMG_20210501_152755.jpg
    IMG_20210501_152755.jpg
    2 MB · Views: 2
Last edited:

Bansil

Painter of gnomes....
Messages
1,360
Reaction score
914
Location
Mnts of the farthest NE TN you can go
Will those alum rings actually protect the sprocket? Or just bend over and be shredded by the chain as it rotates on the alum. Sprocket? I plan a 3/16 steel guard solid welded from say 1 o'clock cnt clockwise to 16:00 mounted to frame :popcorn:
 

madprofessor

"Loose Cannon Creations"
Messages
2,899
Reaction score
888
Location
Jacksonville, Florida
Bansil, I salute you for addressing the core of a possible clearance issue, instead of going for a weaker answer to a possible symptom, just for the aesthetics of the look you may want, the way I did. Already had a racy hub and a fancy red sprocket.
I truly did originally plan on mounting a permanent bash plate under the sprocket, including however much cross-bracing needed to make it solid. When 12" tall tires were on there the clearance would be 1.5" if 72-tooth sprocket used, no room for a bash plate. Settled for form and some small function, insisting on double-sided, metal, 4-piece, and fancy looking.
Have 16" tall tires now, 72-tooth just arrived, 3.5" clearance now, but staying with same guard. Itz jus reel purty.
Probably would try to fold if bashed on a concrete curb, but 72-tooth now same O.D. as guard, wouldn't fold. Would get all ugly looking though. I promise now to consider again making a solid bash plate under all of it.
 
Last edited:

madprofessor

"Loose Cannon Creations"
Messages
2,899
Reaction score
888
Location
Jacksonville, Florida
VHT? I have flat black Very High Temperature (VHT) spray paint for my header and silencer box, rated 1200-2100 degrees.
Is that the VHT you mean, or is there something else called that? Would love to paint the guard blue against the anodized red (new 72-tooth is red also) sprocket for my stars and stripes paint scheme, just didn't think simple primer and paint would stick sufficiently to the aluminum.
 

Bansil

Painter of gnomes....
Messages
1,360
Reaction score
914
Location
Mnts of the farthest NE TN you can go
Sample, too $$$$

cheaper at other vendors, part prep is key make it shiney and then clean real good (no scratches) then wipe a couple times with 91+% alcohol or acetone...have never tried with clear coat on top, Amazon is 1/2 that price, also some lowes/Walmart carry that line
 

madprofessor

"Loose Cannon Creations"
Messages
2,899
Reaction score
888
Location
Jacksonville, Florida
How embarrassing. VHT is a "name brand", like the "Stupidity Salve" I should be rubbing into my forehead.
My version of the paint was chosen for being good to 2K+ degrees, and it says right under the VHT, "Very High Temperature". Thought the VHT was initials. It also says "Flame Proof", which apparently is a subset "name brand". Embarrassing.
Note: Mine came from my usual auto parts house, O'reilly's Auto Parts, think it was about $12 or less.
 
Last edited:

madprofessor

"Loose Cannon Creations"
Messages
2,899
Reaction score
888
Location
Jacksonville, Florida
Been 3 weeks since posting progress, had a bad attitude lately, didn't feel like working on it. Finally got a PROPER test run after replacing 12:60 with 12:72 (same pretty red anodized for larger sprocket though). Apologies all the way through post #7 for inaccurate statements about giving it a couple of good test runs, they were NOT good runs, only thought so.
Church next door's larger parking lot and grass ball field weren't big enough after all. Didn't realize how slowly top end was in building up for my 520 lbs. kart plus my 165 lbs. self in it. Finally had enough confidence in motor and steering to take it out on the neighborhood streets. (Completed a new gear-drive chain tensioner for the steering to tighten it up.) Found out if given enough legroom and time the kart would stretch on out and get faster.
New 72-tooth wound it on out to 31 mph., but rpm unknown. Tach still sitting in seat because of wire length, hands too full of kart to grab it and try to read it. Still disappointed in top end, need more rpm to start using all that hotrod power, and clutch is real "snatchy", either doesn't move or tries to bark the tires, no real easy medium. Steering is terrifying, all that chain drive effort with gearing ratio still hasn't got me enough degrees of steering wheel turn. Going to use the 10" wheel on next kart (BareBallz), order a bigger one for this kart. Be less twitchy.
Finally wired another 9' of 18/2 solid thermostat wire to end of cheap Chinese induction tach's wire, found out it actually does work the same when made longer. So now have tach ziptied temporarily to back of siren on dash arch, will be able to see it next time. Will mount camera for that test, see what's happening with TC. Belt got stuck in the driven once before street run, hard enough to lock up the tires on asphalt, makes me think I need to change pinholes to tighten it.
Looks like a larger jackshaft sprocket on the primary chain is in my future to get kart to really perform like 15+ hp. should. Hmmmm.......... Smaller jackshaft sprocket on secondary chain wouldn't require adding any chain links..........
 
Last edited:

madprofessor

"Loose Cannon Creations"
Messages
2,899
Reaction score
888
Location
Jacksonville, Florida
Modifications completed. Changed out 24-tooth secondary jackshaft sprocket for a 16-tooth. Ratio now changed from 6:1 to now 9:1 ratio.
Should now be able to get the rpm's up to where the actual real power is in that 15+hp. beast.
Tachometer is set for reading right in front of center-drive position, camera is mounted looking down on the CVT to see what it does, ready to test when the weather here clears up. Been raining, don't want to get my seat wet, although it's for outdoor use.
Logarithmic logic says it should really fly now. Ratio increase should lead to rpm increase. Rpm increase should lead to horsepower increase. Horsepower increase should lead to more rpm increase. More rpm increase...................................................................etc.
 

madprofessor

"Loose Cannon Creations"
Messages
2,899
Reaction score
888
Location
Jacksonville, Florida
Thanks for the positive wishes, Bansil. Funny thing about your "nanana", takes me back to my late 20's. I was such a dead ringer for Bowser, the lead singer of Shanana, that some of the ladies literally called me Shanana!
And my Dad had been friends with their sax player.
 

madprofessor

"Loose Cannon Creations"
Messages
2,899
Reaction score
888
Location
Jacksonville, Florida
Okay, got the test run of the new 9:1 ratio done, very disappointing. Got confused, forgot to turn on the camera to see what the CVT was doing. Forgot to look at the tachometer. Got less speed than last time, only 28 mph this time. CVT's driven grabbed the belt again, had to pry it out again. Then at much higher speed it did it again, but the forward motion snatched it right out again.
Had it going flat out on straightaway, then motor quit like the key got turned off, coasted down to a stop. Verified spark with plug resting against block, both transparent fuel filters showing plenty of fuel, just wouldn't crank. Even after letting it cool off.
Got my DOA kart back to my shop 0.7 mile away, no I will not tell how that wacky story went. Something's wrong with the steering, going to cut it all off and do the planned rebuild with chain-drive for the dual positions before trying to fix engine. :censored:
 

karl

Well-known member
Messages
2,363
Reaction score
546
Location
North east Ohio
That's a bummer. Getting the jetting right, and the torque converter dialed in
is going to take many test runs. I took the monster moto up and down
the road least 40 times, and had the jets out around 20 to get it where I wanted.
I heard the carb worked quite well on another 212cc down in texas.

Your a bright guy, Im sure you'll straighten it out and get er ripping!

Maybe the float just stuck? Interesting how it just quit so sudden.
Id throw a plug in it before going too deep and pull the bowl drain, sanity check.

What up with the steering? Hard to keep straight? Wobble?
 
Top