Razor Scooter Gas Conversion

Status
Not open for further replies.

rmm727

New member
Messages
621
Reaction score
0
Location
Brookville, PA
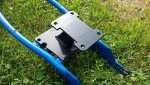
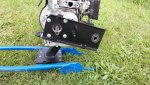
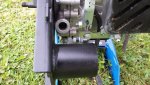
I'm not sure I understand what you mean by pillars. Are you guys talking about the mount I built or what I bolted it to on the Razor's frame? I assume you're talking about the part of the frame I bolted to. My mount is made up entirely of 3/16" steel plate and 3/16" wall square tubing. Not sure how that is weak. The engine is being bolted up the same way it would be bolted in a Baja DB30.
 

DaiSan76

New member
Messages
734
Reaction score
1
Location
Nixa, MO
I think the mount you fabricated will be fine, assuming you lay down good beads without stress risers. I don't know about the Razor frame. It's probably pretty thin stuff.
 

rmm727

New member
Messages
621
Reaction score
0
Location
Brookville, PA
Well, I looked the frame over and I think I will proceed as planned. The straps that my mount will bolt to are 1/8" thick. The handle bars on this thing are no thinner than most mini bikes so if the rest of the frame is the same thickness, I think I should be good. I will keep an eye on it though. Also, I wish I could come up with a more aesthetically pleasing mount but I can l live with that for now. Gonna finish welding what I have and figure out the jackshaft.
 

B.M.800

TheBeal.
Messages
2,384
Reaction score
1
Location
Central PA
I have a 3hp briggs 2 stroke... If Ida been paying attention maybe you could have used it... a bit too far along now I see. Ohwell haha.
I though about putting it in a little kids bike. Not that I need any more projects... :ack2:
 

rmm727

New member
Messages
621
Reaction score
0
Location
Brookville, PA
I like this little Doodle Bug engine for this purpose. I'm gonna have more gear than a DB with about half as much tire. It will have plenty of power.

Beal, I've never seen one of those Briggs 2 strokes. Got a pic?
 

B.M.800

TheBeal.
Messages
2,384
Reaction score
1
Location
Central PA
Just noticed its missing a few screw to the flywheel housing... whoops. I did have it running a while back. Then I stashed it away..
 

Attachments

  • briggs 2 stroke 001.jpg
    briggs 2 stroke 001.jpg
    108.2 KB · Views: 13
  • briggs 2 stroke 002.jpg
    briggs 2 stroke 002.jpg
    87.5 KB · Views: 14
  • briggs 2 stroke 003.jpg
    briggs 2 stroke 003.jpg
    109.8 KB · Views: 14

rmm727

New member
Messages
621
Reaction score
0
Location
Brookville, PA
Ok, that doesnt look all that different than the Tecumseh 2 stroke I originally planned on using except your Briggs can be mounted from the bottom or side.
 

B.M.800

TheBeal.
Messages
2,384
Reaction score
1
Location
Central PA
Ahh. Well if you ever think you could use it let me know.
I probably wont be using it anytime soon....
 

rmm727

New member
Messages
621
Reaction score
0
Location
Brookville, PA
Must have feel asleep on this project. (like all my other ones)

Anyways, here is sort of an update. I had to modify my original engine mount idea as I didn't quite have enough clearance between the jackshaft and the top of the rear tire. So I changed the angle of the tube from 45 degrees to 22.5 degrees if I remember correctly. This required that I make the tube longer as well. Then I realized that if the kickstand ever came loose, I'd have to take the engine and mount off just to re-tighten it. So I cut a notch in the base so I can slip an Allen wrench in there. Wish I could have done the notch using an end mill but I'm off for the summer so I drilled it and finished it off with a die grinder.

Here is the mount after being painted.
 

Attachments

  • 20140729_170715.jpg
    20140729_170715.jpg
    174.2 KB · Views: 5

rmm727

New member
Messages
621
Reaction score
0
Location
Brookville, PA
Here are pics of the modified Baja Warrior jackshaft. The tabs for the covers are always bent on these so I hacked them off. I also plasma'd off the rear mount that ties the jackshaft to the Warrior frame. I then blasted it in the blast booth at work. It uses a cast steel shot/grit so it really textures (made up word) the part. I then skipped the primer and gave it a coat or two of semi-gloss black spray enamel. Lastly, I press in two 35mm OD, 5/8" ID bearings after removing the snap rings.
 

Attachments

  • 20140729_181414.jpg
    20140729_181414.jpg
    48.8 KB · Views: 3
  • 20140729_181404.jpg
    20140729_181404.jpg
    76.5 KB · Views: 3

rmm727

New member
Messages
621
Reaction score
0
Location
Brookville, PA
Bought some new flanged head bolts and bolted the jackshaft on. Later on I realized I was going to have an issue with the factory throttle cable location. I think I have a fix for that but time will tell.
 

Attachments

  • 20140729_181717.jpg
    20140729_181717.jpg
    166.2 KB · Views: 6
  • 20140729_181941.jpg
    20140729_181941.jpg
    107.8 KB · Views: 5

rmm727

New member
Messages
621
Reaction score
0
Location
Brookville, PA
Last update for the evening. I bought a couple of these cheap Chinese thumb throttle off the Internet but these had no way to hold the cable in place. I took one to an ATV shop that makes cables and he offered one solution but it require drilling. I ended up having him make me an inner cable that was way longer than I needed. I then went to a bicycle shop and got the idea to try a large cable adjuster from a BMX brake lever. I still had to drill and tap the thumb throttle for it to work but it looks ok I guess. I didn't have the cover tightened the whole way when I did all that so after I tightened the cover, I can't turn the adjuster but I'm ok with that. So I installed the thumb throttle along with a locking bicycle brake lever and grips I had laying around.
 

Attachments

  • 20140805_200209.jpg
    20140805_200209.jpg
    144.4 KB · Views: 4
  • 20140805_200216.jpg
    20140805_200216.jpg
    97 KB · Views: 3
  • 20140805_200225.jpg
    20140805_200225.jpg
    129.9 KB · Views: 4

rmm727

New member
Messages
621
Reaction score
0
Location
Brookville, PA
No pics tonite. I grabbed the clutch and went to install it sprocket outboard like it was on the DB30 and the drum hit the jackshaft mount. So its has to get installed sprocket inboard. (which is normally how most mini bikes are). That required me to grind off the part on the jackshaft mount that used to hold a chain tensioner because it was in the way of the chain. Slipped with the grinder and gouged one of the bends in the mount. :censored: 
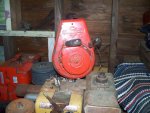
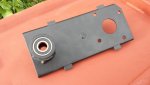
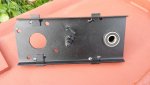
Gonna have it blasted again at work tomorrow. That steel grit roughs up the surface so good you won't see the grinder marks. Almost never need a flap disk. Will repaint tomorrow and reinstall with the clutch.
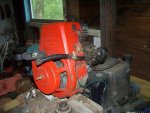
 

rmm727

New member
Messages
621
Reaction score
0
Location
Brookville, PA
Must be talking to myself here.:rolleyes:

I had the part blasted today at work. Painted it again and reinstalled. Used a mallet and tapped a length of 5/8" keyed shaft thru the two bearings in the mount. Installed the clutch and slipped on a 24t B-type sprocket. Need to buy a couple pieces of key stock and get the chain cut.
 
Status
Not open for further replies.
Top