Radio Flyer Go Kart

Status
Not open for further replies.

robotmickey

Member
Messages
171
Reaction score
0
So, made some progress...
Added a little instrument panel to under neath the seat and added the pretty aluminum diamond plate stuff. Also added a place to put your feet, I got the metal for them from our old ping pong table. Still need to paint it. Thinking about bed liner for the inside.
 

Attachments

  • IMG_0012.jpg
    IMG_0012.jpg
    91.4 KB · Views: 26
  • IMG_0013.jpg
    IMG_0013.jpg
    75.8 KB · Views: 26
  • IMG_0014.jpg
    IMG_0014.jpg
    92.9 KB · Views: 37
  • IMG_0015.jpg
    IMG_0015.jpg
    94.6 KB · Views: 28

cboy

New member
Messages
43
Reaction score
0
can u give me a little more detail as how u did the sprocket on the live axle?

i assume its a #25 chain you u are using?

how did you mount the sprocket to the live axle?

is that a 1" axle?
 

robotmickey

Member
Messages
171
Reaction score
0
It is a 3/4" axle, #25 chain. I used the weldable hubs from surpluscenter.com. What I did was:
The sprocket had a threaded collar on it which was how it originally attached to the scooter. So, fortunately and coincidentally the hub slide right into the threaded collar, it was centered pretty good, then I just welded the hub to the sprocket. I feel like I didn't explain it very well.
 

robotmickey

Member
Messages
171
Reaction score
0
Yeah, exactly.
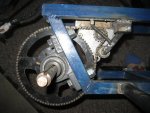
My sprocket it a 90 tooth.
For the sprocket you got, you're going to have to make a hub withe the four bolt holes drilled in it, with a center hole of 2" so you can slide it onto the hub, and weld it on.

Unless you have access to a lathe, in which case you can turn down the first 1/4" or so of the larger part of the hub to make it 2 1/8" to fit your sprocket.
Again, I'm not very good at explaining things unless I have the piece in front of me point things out.
 

robotmickey

Member
Messages
171
Reaction score
0
I added a chain tensioner because it was a little loose and really had no other means to tighten it.
I know there is a small hole in the frame at the top on the joint. It will be fixed. Also the axle looks distorted in the picture, but it is only the light.
 

Attachments

  • IMG_0018.jpg
    IMG_0018.jpg
    96.8 KB · Views: 76

robotmickey

Member
Messages
171
Reaction score
0
Painted the wagon. I went with red so that you could tell it's a wagon, if it was black you might not be able to tell from a distance. I tediously masked over each letter with masking tape before I painted it. It probably took me five hours to tape over each letter and the little guy on the wagon in the middle, but I think it was worth it. Couple pictures:
 

Attachments

  • IMG_0029.jpg
    IMG_0029.jpg
    69.9 KB · Views: 26
  • IMG_0027.jpg
    IMG_0027.jpg
    59.2 KB · Views: 28
  • IMG_0025.jpg
    IMG_0025.jpg
    69.9 KB · Views: 25

cboy

New member
Messages
43
Reaction score
0
looks nice!

where did you get the axle kit from? Im only finding 1" axles

thanks in advance you have been really helpful in me figuring out how to setup my kart
 

robotmickey

Member
Messages
171
Reaction score
0
It wasn't a kit, I bought two 3/4" bearings from surpluscenter.com (the locking kind), then I bought an 18" 3/4" keyed axle from bmikarts.com, but on that site they consider it a jackshaft, not an axle, due to its small diameter and short length. Then I used the weld-hubs from surpluscenter.com which I centered and welded to my wheels, brake drum and sprocket.
 

robotmickey

Member
Messages
171
Reaction score
0
Painted the frame and parts today, Veeeeeery close to being done. Just going to paint the rims. What color do you guys think? Red Black or White? I was also thinking about make the tires white walls with a red pin-strip.
 

Attachments

  • IMG_0035.jpg
    IMG_0035.jpg
    104.2 KB · Views: 54
  • IMG_0040.jpg
    IMG_0040.jpg
    123.2 KB · Views: 41
  • IMG_0037.jpg
    IMG_0037.jpg
    69.9 KB · Views: 33

landuse

Moderator
Staff member
Messages
18,740
Reaction score
506
Location
Pietermaritzburg, South Africa
You did a good job with the painting there. I also like how you engineered your chain tensioner. Does it work well?

I would go with the white wall tyres as well. I am just not too sure if the paint would stick to the rubber that well though.
 

robotmickey

Member
Messages
171
Reaction score
0
Yes, the chain tensioner works very well. Yeah, it's all right if the paint comes off, as long is it looks cool for a little bit.:thumbsup:
 

cboy

New member
Messages
43
Reaction score
0
I would do red rims, and white walls....for the white walls use Krylon fusion paint..prep the tires by scuffing them up with a clean kitchen scubber and some alcohol, mask and paint.

krylon fusion is really good at bonding to plastics and should work well on rubber too.
 

robotmickey

Member
Messages
171
Reaction score
0
Thank guys. Couldn't do anything today. FINALS!!! AAAAHHHHH!!!!! Tomorrow is my AP calculus final, which is really the only one I'm worried for. Wish me luck!!
 

robotmickey

Member
Messages
171
Reaction score
0
soooo close:
 

Attachments

  • IMG_0041.jpg
    IMG_0041.jpg
    100.3 KB · Views: 56
  • IMG_0045.jpg
    IMG_0045.jpg
    94.5 KB · Views: 62
  • IMG_0043.jpg
    IMG_0043.jpg
    43.4 KB · Views: 41
  • IMG_0048.jpg
    IMG_0048.jpg
    120.7 KB · Views: 45
Status
Not open for further replies.
Top