You may also want to make a slot in your engine plate for the oil drain plug. Looks like a messy job right now...
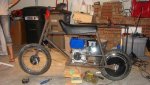
Or you could put an extention tube on there. See mine in the picture below. I simply put a jack under the front of the kart and lift as high as it goes while it drains. Originally my kart had an oil drain 'gulley' built into the plastic guard in the front of the engine (if you look closely at the picture, you can still see the remaining part to the right of the engine), but I had to cut it out due to the larger footprint of the EX27 motor upgrade.
What is your plan for brakes? It does not look like you planned on them so far. Remember, front brakes are 3/4 of the stopping power; so I would recommend adding them...
Also, your rear wheel spacer for chain tension is not completed yet I see. The adjuster bolt is hanging straight down.
 DSC07552.jpg94.6 KB · Views: 51
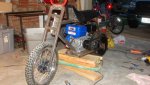 DSC07555.jpg94.5 KB · Views: 39
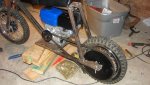 DSC07553.jpg96.5 KB · Views: 48
 DSC07551.jpg99.9 KB · Views: 55
