Predator 212cc Build up engine #1

Status
Not open for further replies.

Relativity

Member
Messages
92
Reaction score
3
Location
West Tx
This is an update for my Predator #1 engine build up. Part #69727
-Progress so far.
Disassembly of new engine. Including removing everything except block housing casing bearing and coil.
Installed complete Predator Loncin Model 210FA piston and ARC 6252 rod assembly.

Wore my rubber gloves, used lint free towels, and used Lucas Oil 10152 Assembly Lube.

Careful to keep work area clean, inside of block clean, as well to the rotating assembly with just enough lube.

Feel good about my work tonight. Tomorrow is another day and maybe will work on it again then.

Before wrapping up work tonight I measured the take out cam shaft ends and compared it the MOD2 Grind, Predator Core Dyno Cams ends. Both measured right at .55 inch.

I had one thought of the work done today. When rotating the assembly I was truely expecting the piston to go to the very top of the deck. My opinion it looked still about .002 from TDC. I will measure it later to know for sure. :thumbsup:
 
Last edited:

OzFab

Well-known member
Messages
15,615
Reaction score
74
Location
Warwick Qld, Australia
1. Did you have the side cover on when you measured it? Without the side cover in place, the crank will have a minimal amount of movement, which relates to a minimal amount of movement at the head of the piston...

2. The top of the piston in a new engine will never sit flush with the deck of the block; this allows for any possible movement & wear when the engine is running...

You're doing well but, where's the pics? :D
 

Relativity

Member
Messages
92
Reaction score
3
Location
West Tx
Hi Fabroman, thanks for the response. I had the cover on for a moment to check to see if piston was flush with the top of the deck. Cover on but not bolts not tight. Today I begun worrying while at work that I ordered the wrong rods. I was worried I had the ARC6256 HF Predator +.020 3.328 Billet Rod, but to my relief I had the ARC 6252 3.348 rods when i checked after getting home. I havent actually measured the the the piston tdc to the top of the deck yet but its looks like a very small amount of small. maybe .002, or .003. I know I need to measure it for sure but havent come across my feeler gauge yet.
So I am at a stand still at the moment though. I had to order a 1/4" 12 point 3/8 drive socket to complete my rod installation. Still need to torque rod down to specifactions.
Other than that I am thinking starting work on the head. I need to drill out two mounting holes on bottom of head for the dowels to fit. I plan of using a drill press with correct size drill bit. I need to measure the 212cc head dowel pin holes width and depth. Then tomorrow drill the holes accordingly on the 160cc. head.
Will post a few pics of my progree so far along in the post.
Some of the parts I have so far for build(s), mind you I am building two engines for my go kart.

You can barely see the ARC 6252 rod installed in this pick. Notice the lack of governor and oil sensor.

Here is the Predator Loncin Model 210FA piston in engine at TDC.
 

dexter

New member
Messages
17
Reaction score
0
Location
KY
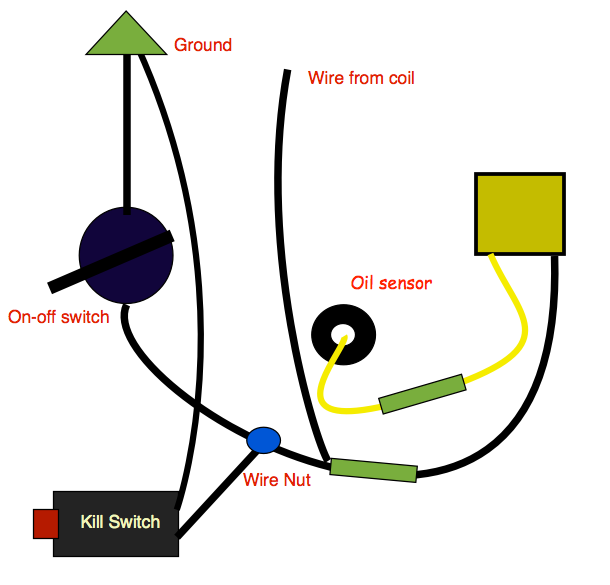
Looking good. Quick question though, if you were going to hook a kill switch up which wire would you tap into
 

Relativity

Member
Messages
92
Reaction score
3
Location
West Tx
Looking good. Quick question though, if you were going to hook a kill switch up which wire would you tap into
Hi Dexter, I havent put too much thought into it but doing a quick google image search I think I would put it between where the oil sensor wire was. Meaning I think I would ground one wire from switch on steering wheel and the other from switch there to the black wire where the oil sensor connect to, I think.
 

Relativity

Member
Messages
92
Reaction score
3
Location
West Tx
Man I am tired from work all day. Did not do much except drill two holes in the gx160 head bolt holes to fit the predator dowel pins. While I did drill them out to same depth and width as the predator head I think I need to drill them .02 deeper to accommodate the .010 head gasket, I think.
 

Relativity

Member
Messages
92
Reaction score
3
Location
West Tx
You can see the dowel pins installed on the gx160 head on the right.

You may be able to see that the head does not fit flush with deck. While I drilled it at same depth as the predator head I think I may go .01 or .02 deeper for the thin .010 head gasket I have coming. Thinking that I may more easily blow head gasket if I do not.
 

Metal_Rott

New member
Messages
91
Reaction score
0
Location
Laredo, TX
Whew, Nice! I did almost the opposite. Dirty and Free! :p What is this Atmosphere Eater going to power? I didn't do any measuring. I removed head gasket with no lapping no measuring and used whatever lube was on my hands when changing cams, lol. But it runs stronger than ever :p I respect your work ethics for sure haha!
 

Relativity

Member
Messages
92
Reaction score
3
Location
West Tx
Whew, Nice! I did almost the opposite. Dirty and Free! :p What is this Atmosphere Eater going to power? I didn't do any measuring. I removed head gasket with no lapping no measuring and used whatever lube was on my hands when changing cams, lol. But it runs stronger than ever :p I respect your work ethics for sure haha!

Hi Metal Rott, thanks for your post. This is one of two engines I am pputting on my two seater go kart for build off.
While I was careful measuring and thought I did do all my studying I did run into a problem.
1: The push rods from the predator engine were way to short to reach the rocker arms.
2: The intake valve measured 27mm while the gx160 head intake seat measure at around 25mm, or 26mm. Needless to say it not going to work.
Solution! Ordered two more gx160 heads from NR Racing and expecting them any day now. Also, order a couple of predator hemi pushrods. :roflol::roflol:
 

OzFab

Well-known member
Messages
15,615
Reaction score
74
Location
Warwick Qld, Australia
1: The push rods from the predator engine were way to short to reach the rocker arms.

Are you sure the lifters were in place?

2: The intake valve measured 27mm while the gx160 head intake seat measure at around 25mm, or 26mm. Needless to say it not going to work.

Umm, what? That's exactly what you want; the valves should be larger than the seat; Have you tried lapping them? Or, better still:
- put a light smear of lapping paste on the seats
- drop the valves in, exert a little pressure just to seat them completely
- remove the valves & see where the lapping paste is on the valve heads & post pics of your findings

Worst case scenario, it's cheaper to have the valves ground down than to buy 2 new heads...
 

Relativity

Member
Messages
92
Reaction score
3
Location
West Tx
In all honesty I have never built heads, nor for that fact ever even worked on them. I was thinking after all my research it may be and easy feat for me.*
The very, very first problem I ran into was that the valve guides were different between the two heads.

Top one is the predator valve guide and bottom on the gx160. Notice the lengths are different. The girth was the same and was able to exchange them between the heads.

*No I never did any of the lapping of the valve seats neither.
 

Relativity

Member
Messages
92
Reaction score
3
Location
West Tx
The gx160 head with the clone valve train less the valve guide and rockers which or 1:3 ratio rockers and 1:3 guides. A;so, 18lbs re, super strength springs or something.
 

Relativity

Member
Messages
92
Reaction score
3
Location
West Tx
The final assemblied head.

Afterwards I placed head on engine and tried using the stock push rods to which were no long enought for my application.
I rotated the engine for giggles and had pressure coming from up stroke and vaccum from down stroke through the intake port. The exhaust port was locked tight and I couldnt even blow air through even after pressing my lips on exhaust intake and blowing my hardest.
 

Relativity

Member
Messages
92
Reaction score
3
Location
West Tx
My biggest insecurity came from the thought of not having every done head work before and really know what I was doing at this point and maybe dropping a valve in the combustion chamber if I every did get it running. My solution was to order to built heads from NR RACING. Specs below:
Head, Racing, GX160/GX200 Honda
[Casting:18cc (UT2 Casting) OEM Honda]
[Milling Options:Do Not Mill (-$10)]
[Porting:Blueprint for QMA, USAC, ASN, No Porting (-$20)]
[Springs:22lb (Stock, CL1, & Mod2 Cams)]
[Valve Size & Type:27mm Intake, 24mm Exhaust, Stainless]
[Add 1:Modify Head to Fit Predator (+$10)]
 

Relativity

Member
Messages
92
Reaction score
3
Location
West Tx
Are you sure the lifters were in place?


Umm, what? That's exactly what you want; the valves should be larger than the seat; Have you tried lapping them? Or, better still:
- put a light smear of lapping paste on the seats
- drop the valves in, exert a little pressure just to seat them completely
- remove the valves & see where the lapping paste is on the valve heads & post pics of your findings

Worst case scenario, it's cheaper to have the valves ground down than to buy 2 new heads...

Man, I am scared! I wish I had a knowledgeable buddy by my side during this point. Your solution sounds like it would have been a heck of alot less expensive. Well I guess I will try and recoup a few dollars later when I post some of this stuff in the buy/sell section of the forum.
Thanks for you support though. I just get in a big big hurry sometimes.
 

OzFab

Well-known member
Messages
15,615
Reaction score
74
Location
Warwick Qld, Australia
Casting:18cc (UT2 Casting) OEM Honda

Oh wow, you got the 18cc heads; I thought you would've gone for the 14cc heads

14cc head = more compression = more BANG! = more power (live & learn :lolgoku:)

Valve Size & Type:27mm Intake, 24mm Exhaust, Stainless

Note the valve sizes?

Whether it be a 200cc go kart engine or a 500cu/in top fuel dragster engine, building an engine should never be a hurried process; take your time & do it right the first time (especially if you have no experience); the last thing you want is to waste all that money because you missed a simple step...

Have a read of this thread. In short, landuse, one of the mods here, had a non running engine he wanted to do something with but, he'd never torn down an engine; as a community, we talked him through the entire process &, at the end, he had a beast of an engine... food for thought...
 

Relativity

Member
Messages
92
Reaction score
3
Location
West Tx
Head Trauma

Oh wow, you got the 18cc heads; I thought you would've gone for the 14cc heads

14cc head = more compression = more BANG! = more power (live & learn :lolgoku:)


Note the valve sizes?

Whether it be a 200cc go kart engine or a 500cu/in top fuel dragster engine, building an engine should never be a hurried process; take your time & do it right the first time (especially if you have no experience); the last thing you want is to waste all that money because you missed a simple step...

Have a read of this thread. In short, landuse, one of the mods here, had a non running engine he wanted to do something with but, he'd never torn down an engine; as a community, we talked him through the entire process &, at the end, he had a beast of an engine... food for thought...

Hey Fabroman,
Ugh, Received my 18cc heads from NR Racing today. I now think I under stand I had 18cc heads originally on the Predator, even same size valves 27mm intake and 25 exhaust. Oh well expensive lesson learn. I am happy with my new modestly built heads though and really dont have a worry about running them on the engine. Even the original push rods from the Predator seem to work perfectly with the 1:3 rocker arms now.

Picture above: From Top left to right my home built 14cc head and then the NR Racing 18cc head with stainless steel valves. Bottom left to right 14cc head and original Predator 18cc head.

All hope is not not with the old heads. I am determined to use them in another future build.
 
Status
Not open for further replies.
Top