My Design

Status
Not open for further replies.

TorqueRanger

New member
Messages
257
Reaction score
1
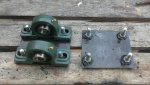
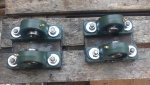
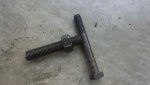
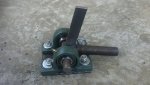
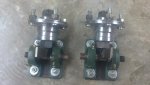
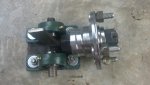
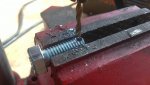
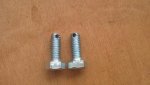
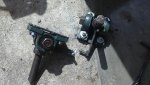
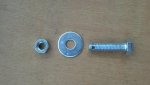
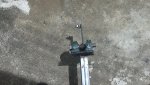
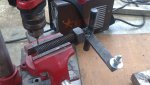
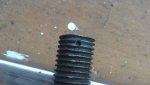
Good question. It is as the media to hold the inner race (which I use as a hub) and as a base to weld the screw (used to hold the sprocket or brake disc).

Hope I answer you. It is low cost method to have a simple hub. Actually, the bearing housing cast ion here has no meaning. Coincidentally they are sold that way.

LOL Thanks I just realized from the pic what you were doing and that's why I deleted the question ...
 

Simon Thomas

New member
Messages
324
Reaction score
0
Location
Sarawak, Malaysia
TorqueRanger,

I saw your question therefore immediately replied you on the washer being welded there. I supposed to attach some more photos from last weekend works, however the poor internet connection has limited me doing so.

Will include them when I have better internet coverage.
 

Simon Thomas

New member
Messages
324
Reaction score
0
Location
Sarawak, Malaysia
This is my own way of making my left and right front spindles. I know during the process of making them, it consumes lots of energy and time to make. However, I can re-use these stuffs again in future if I want because of conventional process of making them.

The internet coverage not so good at this moment. Will include the photos tomorrow.

Included the photos.

You soon will realize I rely alot on bearings. It is quite easy to find bearings here and some more the price is cheaper. Probably because they are the Chinese made product. However we cannot under estimate the performance because some with high precision made.
 

Attachments

  • 19112011493.jpg
    19112011493.jpg
    132.3 KB · Views: 7
  • 19112011495.jpg
    19112011495.jpg
    96.3 KB · Views: 5
  • 19112011498.jpg
    19112011498.jpg
    107.5 KB · Views: 5
  • 19112011499.jpg
    19112011499.jpg
    98.3 KB · Views: 6

Simon Thomas

New member
Messages
324
Reaction score
0
Location
Sarawak, Malaysia
Some Front Left and Right Spindle Part

I continued the welding works with some parts for my front spindles.
 

Attachments

  • 19112011502.jpg
    19112011502.jpg
    73.4 KB · Views: 8
  • 19112011504.jpg
    19112011504.jpg
    64.9 KB · Views: 10
  • 19112011506.jpg
    19112011506.jpg
    71.1 KB · Views: 10

Simon Thomas

New member
Messages
324
Reaction score
0
Location
Sarawak, Malaysia
Screw and Front Bearing

Included the nuts with some grinding works before I placed the bearing on the spindles.
 

Attachments

  • 19112011509.jpg
    19112011509.jpg
    58.3 KB · Views: 13
  • 19112011507.jpg
    19112011507.jpg
    66.4 KB · Views: 14
  • 19112011500.jpg
    19112011500.jpg
    81.3 KB · Views: 6
  • 19112011501.jpg
    19112011501.jpg
    63.4 KB · Views: 7

Simon Thomas

New member
Messages
324
Reaction score
0
Location
Sarawak, Malaysia
Included the Tire

Included the tire.

Will continue the works again this weekend which so far I enjoy doing it. In the same time, I also enjoy riding my buggy which is like my tourist bus that I ride at the remote area and country side here.

Every weekend, I travel more and more mileage. While enjoying the scenery, I also take the opportunity to test the durability of my build. This weekend is the time to test the rear wheel screw which I have glued with the threadlock adhesive (Hardex brand).
 

Attachments

  • 19112011510.jpg
    19112011510.jpg
    59.8 KB · Views: 10
Last edited:

landuse

Moderator
Staff member
Messages
18,762
Reaction score
544
Location
Pietermaritzburg, South Africa
I really like how you have made your spindles for your frnt wheels. I would never have thought of using bearings for that.

I am glad your first buggy is still doing well too.
 

Simon Thomas

New member
Messages
324
Reaction score
0
Location
Sarawak, Malaysia
Front Wheel Spindle

Thanks for correcting my term. I think I used term "axle" instead of "spindle" in earlier posts. Used to it:D as commonly used.

Front wheel spindle made of bearings is quite easy for me, cheaper and practical. Each bearing costs me about RM11 (less than USD4). Some more easily changed if spoiled. From my experience, the advantage of using bearing is for sturdy, smooth turn and movement. Only that the spindle side will be heavier compared to some design using solid bar or something.

If you do the same method with mine, I recommend better use double piece of metal sheet or thicker metal sheet where you sit the 2 bearings. This will provide strong support. My old design has a bit of bend as result from taking frequent cornering.
 

Simon Thomas

New member
Messages
324
Reaction score
0
Location
Sarawak, Malaysia
Back to my first design, I broke the rear axle shaft again yesterday. Still happened at the same place like last time and I called my wife to tow it back. Luckily not far about less than 10 km. I should include the photo in next post as now the internet connection is quite weak.
 

Simon Thomas

New member
Messages
324
Reaction score
0
Location
Sarawak, Malaysia
My Rear Axle Shaft Broken Again

Here are the photos. 2 contributing factors I observed:
1. Drilled too deep to hold the rear chain sprocket
2. Bearings were not align thus broken occurred at certain weak points
 

Attachments

  • 27112011585.jpg
    27112011585.jpg
    67 KB · Views: 13
  • 27112011586.jpg
    27112011586.jpg
    60.6 KB · Views: 11
  • 27112011584.jpg
    27112011584.jpg
    87.3 KB · Views: 13

Simon Thomas

New member
Messages
324
Reaction score
0
Location
Sarawak, Malaysia
Did it break all the way through the rod. Wow! there must be some really strong forces there to break that axle. Have you identified the cause?

It broke at the chain sprocket (at the screw to hold the chain sprocket on the rod). From back, it happened between the left wheel to the chain sprocket.

Besides the 2 contributing factors mentioned earlier, I believe the continuous vibration during the ride could potentially contribute to this. Imagine that I rode it about 100km on tarred road before it broke.

Do you have any solution / alternative to my problem? I have some ideas on how to resolve this but in the same time I want to hear any thought from the others as well.
 

Simon Thomas

New member
Messages
324
Reaction score
0
Location
Sarawak, Malaysia
Last weekend Saturday, I spent some time with my 2nd design and did some works which I focused on the front parts. Started by lying the frame on my plywood.
 

Attachments

  • 26112011545.jpg
    26112011545.jpg
    78.7 KB · Views: 2

Simon Thomas

New member
Messages
324
Reaction score
0
Location
Sarawak, Malaysia
Drilling holes to hook safety pin. This is done for a set of screw used for the left and right spindles. Choosing a shorter screw.
 

Attachments

  • 26112011547.jpg
    26112011547.jpg
    72.4 KB · Views: 3
  • 26112011548.jpg
    26112011548.jpg
    77.9 KB · Views: 3
  • 26112011551.jpg
    26112011551.jpg
    82.6 KB · Views: 1
  • 26112011554.jpg
    26112011554.jpg
    142.2 KB · Views: 5
  • 26112011555.jpg
    26112011555.jpg
    116.8 KB · Views: 3

Simon Thomas

New member
Messages
324
Reaction score
0
Location
Sarawak, Malaysia
And for the steering, choosing a longer screw. Repeat the same work with drilling hole at the screw tip for safety pin.
 

Attachments

  • 26112011557.jpg
    26112011557.jpg
    65 KB · Views: 0
  • 26112011553.jpg
    26112011553.jpg
    80.6 KB · Views: 0
  • 26112011552.jpg
    26112011552.jpg
    71.4 KB · Views: 0

Simon Thomas

New member
Messages
324
Reaction score
0
Location
Sarawak, Malaysia
Put special focus on steering making works last weekend. Also not forgetting welded the left and right spindle bases.
 

Attachments

  • 26112011556.jpg
    26112011556.jpg
    83.8 KB · Views: 4
  • 26112011559.jpg
    26112011559.jpg
    86.5 KB · Views: 5
  • 26112011566.jpg
    26112011566.jpg
    87.4 KB · Views: 6
  • 26112011571.jpg
    26112011571.jpg
    130.8 KB · Views: 1

jrmints1415

New member
Messages
570
Reaction score
4
Location
Naperville Illinois
are you sure your welds will hold?? Your moving to fast slow down and drag the puddle of wire across to ensure good penetration. pillow blocks are kinda overkill dont you think? Looks great though nice job!
 

Simon Thomas

New member
Messages
324
Reaction score
0
Location
Sarawak, Malaysia
The same drilling works were done for the big screw holding the wheel. Need to drill hole for safety pin as well.
 

Attachments

  • 26112011572.jpg
    26112011572.jpg
    82.2 KB · Views: 3
  • 26112011574.jpg
    26112011574.jpg
    49.2 KB · Views: 3
Status
Not open for further replies.
Top