Mini monster truck rebuild

Possom Point

Well-known member
Messages
247
Reaction score
360
Location
Virginia
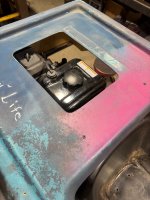
Mocked up the engine and gearbox (rough fit) and put the body on to check clearance and to see where the exhaust will fall, I will be making a new exhaust setup for this and plan to have it come down and out below the rear bumper. Gotta do some more figuring and lay out some tubing to see where things will be best for placement.
 

Attachments

  • IMG_8969.jpeg
    IMG_8969.jpeg
    425.4 KB · Views: 8
  • IMG_8970.jpeg
    IMG_8970.jpeg
    388.8 KB · Views: 8

Possom Point

Well-known member
Messages
247
Reaction score
360
Location
Virginia
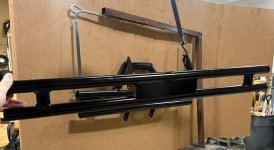
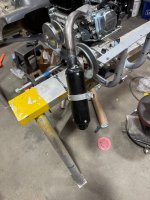
Got my bumpers cleaned up, blasted, primed and painted Friday and welded the exhaust pipe up today. This is a motorcycle type muffler (cheap) that slips on. I had to make an adapter to make it work for my Setup, so I drilled and tap for 2 sets screws on top and bottom to hold it on. This may work or may not work, if it does great, if not then I have another idea to make it work out, but we’ll see down the road. Still have a long way to go but took advantage of the good weather we had.
 

Attachments

  • IMG_8998.jpeg
    IMG_8998.jpeg
    431.4 KB · Views: 6
  • IMG_8999.jpeg
    IMG_8999.jpeg
    287.4 KB · Views: 6
  • IMG_9008.jpeg
    IMG_9008.jpeg
    392.7 KB · Views: 6

Hellion

Moderator
Messages
8,522
Reaction score
3,617
and welded the exhaust pipe up today.

It looks good, I like the motorcycle muffler but I was visualizing another bend on the pipe, maybe 90° to permit the pipe to run horizontally and emerge from under the rear bumper area just like on a 1/1 truck. I've actually seen some pre-fab Predator exhausts that look like that.

Let us know how quiet that muffler is. I'm always looking into non-stock mufflers.

You got mad fab skills, all these parts are primo. The front brush bumper...:love:
 

Possom Point

Well-known member
Messages
247
Reaction score
360
Location
Virginia
It looks good, I like the motorcycle muffler but I was visualizing another bend on the pipe, maybe 90° to permit the pipe to run horizontally and emerge from under the rear bumper area just like on a 1/1 truck. I've actually seen some pre-fab Predator exhausts that look like that.

Let us know how quiet that muffler is. I'm always looking into non-stock mufflers.

You got mad fab skills, all these parts are primo. The front brush bumper...:love:
That would look much better I believe as well, I don’t have a way of bending pipe, I snagged the 90 from work that was a cut off from a job.
We’ve got a top tube bender we use sometimes and occasionally we’ll have some test bends that get chucked in the scrap bin.
I will definitely post up a video when I get the engine wired up, I’m hoping it sounds good, I don’t really want a loud exhaust on this one since the kids will be riding it more.
I appreciate that 😎😎. I’m far from expert and a professional but I do what I can with what I’ve got.
 

Possom Point

Well-known member
Messages
247
Reaction score
360
Location
Virginia
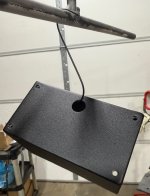
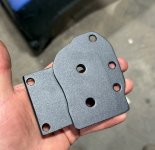
Powder coated a couple parts tonight with a new to me fine texture lack matte powder, I think it turned out nice for the first time using this stuff, gives it a different look.
 

Attachments

  • IMG_9013.jpeg
    IMG_9013.jpeg
    381.3 KB · Views: 5
  • IMG_9014.jpeg
    IMG_9014.jpeg
    360.4 KB · Views: 5
  • IMG_9015.jpeg
    IMG_9015.jpeg
    537.6 KB · Views: 5

Possom Point

Well-known member
Messages
247
Reaction score
360
Location
Virginia
What kind of oven do you use.
I want to try powder coating and could do well with business but the large oven kinda put a stop to that.
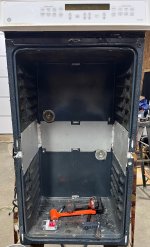
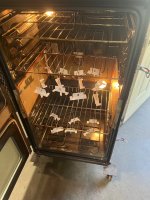
Haha, I took a double wall oven , cut the center out, rewelded it together. I’ve got maybe sub $200 total in it. Reused the insulation and parts to make it work.
 

Attachments

  • IMG_3963.jpeg
    IMG_3963.jpeg
    350.2 KB · Views: 7
  • IMG_3966.jpeg
    IMG_3966.jpeg
    472 KB · Views: 7
  • IMG_7170.jpeg
    IMG_7170.jpeg
    512.5 KB · Views: 7

Whitetrashrocker

Inmate #952016
Messages
4,646
Reaction score
3,736
Location
Southern New Mexico
Haha, I took a double wall oven , cut the center out, rewelded it together. I’ve got maybe sub $200 total in it. Reused the insulation and parts to make it work.
Very cool.
My things would be much larger projects.
I cut cnc signage, and auto parts like axles and such.

Was the learning curve steep?
It doesn't sound hard, clean parts and an even coat of powder.
What gun are you using.
 

Functional Artist

Well-known member
Messages
5,333
Reaction score
2,815
Location
Toledo, Ohio
Haha, I took a double wall oven , cut the center out, rewelded it together. I’ve got maybe sub $200 total in it. Reused the insulation and parts to make it work.
Creative & clever :cheers2:

Very cool.
My things would be much larger projects.
I cut cnc signage, and auto parts like axles and such.

Was the learning curve steep?
It doesn't sound hard, clean parts and an even coat of powder.
What gun are you using.
As for a DIY oven for large stuff, I've seen guys mount DIY sheet metal boxes (of various sizes) on top of old gas grills
...like windshield size boxes, for forming polycarbonate sheets
...into compound-curved, race car windshields ;)
 

Possom Point

Well-known member
Messages
247
Reaction score
360
Location
Virginia
Very cool.
My things would be much larger projects.
I cut cnc signage, and auto parts like axles and such.

Was the learning curve steep?
It doesn't sound hard, clean parts and an even coat of powder.
What gun are you using.
That’s really neat, I need a bigger oven as well, parts are getting bigger for me as well.

It’s not to bad, biggest thing is prep work, has to/needs to be very clean. I try to sandblast parts before powder if I can, other wise DA sand and clean with laquer thinner, and use lint free rags, the little hair fibers won’t burn off during bakin. I started off with the Eastwood dual voltage powder coat gun, easy to use and not expensive for starting out. They have great prices on powders as well. Only thing I haven’t tried is a clear coat over parts. I’m a little skeptical on the re-coating part.
 

Possom Point

Well-known member
Messages
247
Reaction score
360
Location
Virginia
So the set screws didnt work out , which I kinda figured, so I added some springs just like a motor muffler, once the muffler bracket is bolted to the bumper everything should be tight and good to go. I finally got the frame painted to while we had some good weather in our area, hopefully in the next week or so and I can start putting the parts back on the frame and work on the body soon as well.
Here’s a short video of the muffler.


Possom Point

Well-known member
Messages
247
Reaction score
360
Location
Virginia
Sneak peak
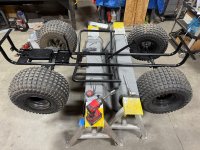
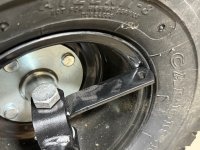
Finally got the frame painted and at the point of re-assembly, however I ran into a snag, the Manco spindles I’m using hit the wheels, so I’ll be modifying these to hopefully work and not mess up the way it steers.
 

Attachments

  • IMG_9153.jpeg
    IMG_9153.jpeg
    575.2 KB · Views: 4
  • IMG_9155.jpeg
    IMG_9155.jpeg
    444.5 KB · Views: 4

Functional Artist

Well-known member
Messages
5,333
Reaction score
2,815
Location
Toledo, Ohio
Are the spindles long enough to install a simple (~1/2") "spacer" behind the hub?

Which should give'ya enough clearance
...without modifying the Tie Rod Arms
...&/or "messing up the way it steers"
 

Possom Point

Well-known member
Messages
247
Reaction score
360
Location
Virginia
Are the spindles long enough to install a simple (~1/2") "spacer" behind the hub?

Which should give'ya enough clearance
...without modifying the Tie Rod Arms
...&/or "messing up the way it steers"
I did put 3 (1/8”) washers behind the hub when I saw this but that didn’t change much, I believe the offset for these wheels is to much.
i have enough room for spacer on the axle but I feel that won’t solve my issue. Good call though.
 
Top