Improving Steering Geometry with Reverse Ackermann Setup

66dellwood

New member
Messages
14
Reaction score
9
The kid's kart has the tie rods ahead of the axle (so the spindle arms face forward). Getting way too much "scrubbing" at low speed turns. Current setup: no tire toe-out or toe-in; spindle/steering arms are at 90 degrees to the axle; the Pitman arm is single hole centered. I consider these my 3 geometry variables/levers.

It is clear that the outer tire turning radius is way too tight relative to the inner tire. I am replacing the front axle, steering spindles and tie rods. However, I cannot flip the design to have the tie rods behind/trail the axle. I know this is preferred for better Ackermann geometry. I need to finalize the design for the new axle/spindle/tie rod setup and the proper Ackermann adjustment to the spindle arm angle (understanding it should not be 90 degrees), if any.

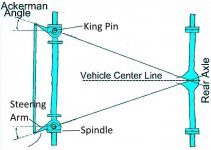
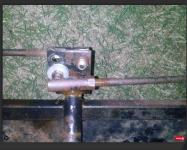
I understand that in a tie rods ahead of axle/reverse Ackermann setup, one of the adjustment variables to improve steering geometry is to angle the spindle arms outward by the Ackermann angle (in my case this angle is 17 degrees). This "outward adjustment" can cause problems if the arm interferes with the rim when turning. See the second photo.

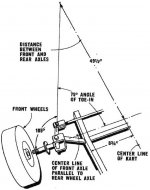
My question is whether the same Ackermann improvement (which for me is either tightening the inner tire turn radius and/or widening the outer tire turn radius) can be achieved by angling the spindle arms inward (instead of outward) by the Ackermann angle. I found the attached image (first photo) that seems to suggest this could be the case. Without a good modeling tool, my head explodes trying to simulate the geometry changes and I fear this inward angling may actually make my geometry worse. However, based on the plane of movement of the tie rods, my instinct is the inward angling may work to tighten the inside tire turning radius relative to the outside tire-- but maybe not. OH NO!! Any thoughts on this would be appreciated.

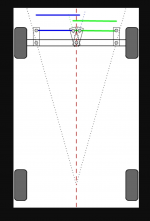
For anyone interested, I understand that I can also change/improve my steering geometry by toeing out my tires and by utilizing a 2-hole pitman arm plate (with the tie rods connecting to the farthest hole in the pitman arm plate). See photos 3 and 4. I will hold these in reserve depending on how well the new steering axle/spindle set up works.

BTW: this is awesome, wish I had his modeling tool to test this Q.

thanks,
Jim
 

Attachments

  • Ackerman go-kart-steering-wagon.jpg
    Ackerman go-kart-steering-wagon.jpg
    56.8 KB · Views: 16
  • Ackermann 3.jpeg
    Ackermann 3.jpeg
    58.4 KB · Views: 17
  • Screenshot (49).png
    Screenshot (49).png
    3.7 MB · Views: 15
  • Screenshot (50).png
    Screenshot (50).png
    106.8 KB · Views: 16
Last edited:

Denny

Canned Monster
Messages
8,517
Reaction score
4,750
Location
Mayberry, Indiana
It looks as if you have a thorough grasp on the Alerman Principal that’s the good news! The bad news is I’m going to have to explain it to you because I’m a computer idiot. Ready to start? Good.
i am going to explain this to you using only the lh side if you are sitting in the drivers seat. Looking down from above the spindle, axle and pitman arm look like a giant upside down capital letter T right. Now the spindle and axle are ok just where they are, they form the top of the T. It is the pitman arm that we are concerned about. Step 1. Remove the tire after you have it pointed straight ahead.
Step 2. Cut off the old pitman arm as close to the king pin tube with out cutting it and then grind that area smooth.
Step 3. Run your strings from the center of the axle through the center of the king pin and forward about a foot.
Step 4. Now position your old pitman arm in line with your Ackerman string to the front of the kart and weld that sucker up solid!
Step 5. Make a cut across the pitman arm about 1/2” from the weld do not cut through the pitman arm completely because you will need to bend the arm for tire clearance. Once you put the tire back on and make sure you have proper clearance take it back off and weld the arm up solid and reinforce if necessary.
Step 6. Put the tire back on and repeat on other side.
I hope you can understand that, Good Luck!
 

Functional Artist

Well-known member
Messages
4,411
Reaction score
1,694
Location
Toledo, Ohio
AFAIU ;)
If a kart has rear facing spindle arms, an Ackermann adjustment is usually done (on the spindle arm) bringing them inwards (like on my Hell-raiser kart) (Steering info starts @ post #84)
https://www.diygokarts.com/community/threads/hell-raiser-72v-electric-racing-kart.46066/page-5
&
If the kart has front facing spindle arms, the Ackermann adjustment is usually done (on the spindle arm) bringing them outward
...but, there are usually tire clearance issues doing it this way

So, maybe do the "adjustment" on the pitman arm, instead
...but, keep in mind that if doing the "adjustment" on the (spindle arm) tie rod would need to be longer

If doing the adjustment on the pitman arm, the tie rods would still, need to be longer
...so, to do this, you would need a double hole pitman arm

Then, connect the tie rod ends to the "farthest holes" on the pitman arm, so that they criss-cross. (like on my Aerial Atom kart)
 

66dellwood

New member
Messages
14
Reaction score
9
It looks as if you have a thorough grasp on the Alerman Principal that’s the good news! The bad news is I’m going to have to explain it to you because I’m a computer idiot. Ready to start? Good.
i am going to explain this to you using only the lh side if you are sitting in the drivers seat. Looking down from above the spindle, axle and pitman arm look like a giant upside down capital letter T right. Now the spindle and axle are ok just where they are, they form the top of the T. It is the pitman arm that we are concerned about. Step 1. Remove the tire after you have it pointed straight ahead.
Step 2. Cut off the old pitman arm as close to the king pin tube with out cutting it and then grind that area smooth.
Step 3. Run your strings from the center of the axle through the center of the king pin and forward about a foot.
Step 4. Now position your old pitman arm in line with your Ackerman string to the front of the kart and weld that sucker up solid!
Step 5. Make a cut across the pitman arm about 1/2” from the weld do not cut through the pitman arm completely because you will need to bend the arm for tire clearance. Once you put the tire back on and make sure you have proper clearance take it back off and weld the arm up solid and reinforce if necessary.
Step 6. Put the tire back on and repeat on other side.
I hope you can understand that, Good Luck!
awesome. I follow and the implication is that with front facing spindle arms, the arms need to be angled OUT by the Ackermann angle to achieve a similar, but not exact, result as I would get with backward facing spindle arms angled IN. I can build the axle and spindles to ensure proper clearance with the wheel rims. I will start there and then consider the 2-hole Pitman arm plate and cross mounted tie rods (longer tie rods) if the scrubbing is not adequately fixed. thanks to you both.
 

66dellwood

New member
Messages
14
Reaction score
9
AFAIU ;)
If a kart has rear facing spindle arms, an Ackermann adjustment is usually done (on the spindle arm) bringing them inwards (like on my Hell-raiser kart) (Steering info starts @ post #84)
https://www.diygokarts.com/community/threads/hell-raiser-72v-electric-racing-kart.46066/page-5
&
If the kart has front facing spindle arms, the Ackermann adjustment is usually done (on the spindle arm) bringing them outward
...but, there are usually tire clearance issues doing it this way

So, maybe do the "adjustment" on the pitman arm, instead
...but, keep in mind that if doing the "adjustment" on the (spindle arm) tie rod would need to be longer

If doing the adjustment on the pitman arm, the tie rods would still, need to be longer
...so, to do this, you would need a double hole pitman arm

Then, connect the tie rod ends to the "farthest holes" on the pitman arm, so that they criss-cross. (like on my Aerial Atom kart)

Functional Artist: thanks for the response and the video. The video is exactly what I need. My setup is very similar to yours. We electrified an older cart and the rear motor assembly, wheel/tire and live axle looks almost identical to yours (except we are running only 48v at present). Have the same scrubbing you first experienced but perhaps not as bad b/c the initial tie rod linkage on your 2-hole pitman arm was making the relative tire turn radii worse.

If I could, what is your front wheel base? is it the same as the rear?

Also, I can't quite tell from the video, do your spindle steering arms angle out at all or do they face straight forward at 90degrees to the axle?

Did you fabricate that 2-hole pitman arm plate?

Last (I promise), do your tires toe in or toe out at all? did you experiment with toe-ing out your front tires?

thanks much!
 

66dellwood

New member
Messages
14
Reaction score
9
this guy does a nice job and answers my question. And I love his modeling device. See minute 7. with a front facing tie rod setup, angling the spindles arms inward will make the Ackermann geometry worse. Meaning that angle on the spindle arm will cause the outer tire turning radius to increase relative to the inner tire turning radius and create more misalignment in turns and ostensibly more scrubbing.


Functional Artist

Well-known member
Messages
4,411
Reaction score
1,694
Location
Toledo, Ohio
Yes, I agree he explains it pretty well :thumbsup:

My Areial Atom kart originally had a (1) hole pitman arm (& steered OK)
Yes, I made the (2) hole pitman arm (in an attempt to improve the steering action)
...& record/document the "differences" in the steering action (between where the tie rods were attached on the pitman arm) ;)
https://www.diygokarts.com/community/threads/building-a-go-kart-size-aerial-atom.40167/page-14
The spindle arms are the standard ~90* ones, from BMI Karts

The "track" width on my Areial Atom is ~37" front & rear
...& the "wheelbase" is ~48" (front axle to rear axle)

As far as "toe in" or "toe out"
I've noticed that if the front tires (on a kart) are "toed outwards", it makes the steering feel "squirrely" (technical term)
...because there "fighting" each other & whichever tire gets the most traction (at any given time) wins (& pulls the kart that way)

But, if the front wheels are "toed inwards" a bit (usually only ~1/8') the steering feels much "firmer" (another technical term)
...because the front wheels are (kinda) working (together) toward a common goal (which helps the kart go straight'er) :thumbsup:
 

66dellwood

New member
Messages
14
Reaction score
9
Yes, I agree he explains it pretty well :thumbsup:

My Areial Atom kart originally had a (1) hole pitman arm (& steered OK)
Yes, I made the (2) hole pitman arm (in an attempt to improve the steering action)
...& record/document the "differences" in the steering action (between where the tie rods were attached on the pitman arm) ;)
https://www.diygokarts.com/community/threads/building-a-go-kart-size-aerial-atom.40167/page-14
The spindle arms are the standard ~90* ones, from BMI Karts

The "track" width on my Areial Atom is ~37" front & rear
...& the "wheelbase" is ~48" (front axle to rear axle)

As far as "toe in" or "toe out"
I've noticed that if the front tires (on a kart) are "toed outwards", it makes the steering feel "squirrely" (technical term)
...because there "fighting" each other & whichever tire gets the most traction (at any given time) wins (& pulls the kart that way)

But, if the front wheels are "toed inwards" a bit (usually only ~1/8') the steering feels much "firmer" (another technical term)
...because the front wheels are (kinda) working (together) toward a common goal (which helps the kart go straight'er) :thumbsup:
Awesome build, nice job. I will be fabricating my own 2-hole Pitman arm plate to bolt on to my current pitman arm welded on my steering shaft.

Are you running 72v? What kind of top speed are you getting? my setup and measurements are very close to yours, hope the new Pitman plate will do the trick. thanks again for your help.
 

66dellwood

New member
Messages
14
Reaction score
9
AFAIU ;)
If a kart has rear facing spindle arms, an Ackermann adjustment is usually done (on the spindle arm) bringing them inwards (like on my Hell-raiser kart) (Steering info starts @ post #84)
https://www.diygokarts.com/community/threads/hell-raiser-72v-electric-racing-kart.46066/page-5
&
If the kart has front facing spindle arms, the Ackermann adjustment is usually done (on the spindle arm) bringing them outward
...but, there are usually tire clearance issues doing it this way

So, maybe do the "adjustment" on the pitman arm, instead
...but, keep in mind that if doing the "adjustment" on the (spindle arm) tie rod would need to be longer

If doing the adjustment on the pitman arm, the tie rods would still, need to be longer
...so, to do this, you would need a double hole pitman arm

Then, connect the tie rod ends to the "farthest holes" on the pitman arm, so that they criss-cross. (like on my Aerial Atom kart)
FA: sorry for pestering. How far apart are the tie rod holes on your pitman arm plate? And how far are those holes from the steering shaft? I am going to experiment with different plates with a few different tie rod hole positions. Thanks.
 

Functional Artist

Well-known member
Messages
4,411
Reaction score
1,694
Location
Toledo, Ohio
Thanks! :cheers2:

No worries, "teamwork" ;)

My Aerial Atom has a 60V system (2,000W brushless motor)
...& the top speed is ~35MPH

As for the holes in the pitman arm plate

When I ran a string from the center of the rear axle up to & thru the king pin, to where the tie rod "needed" to be
...& measured the distance, it was ~1" from where the hole for the tie rod end "was" & where it "needed" to be (on each side)

Then, moving to the pitman arm, I figured "they" would also need to be moved over ~1" (so, a ~2" space)
...so, then when "criss-crossed" the tie rods would "need" to be ~1" longer (just like would have been necessary, if you did the extension on the spindle arms)

Hope this makes sense :thumbsup:

Experimenting is good

Let us know how it goes :2guns:
 
Top