Hell-raiser 72V Electric Racing Kart

Functional Artist

Well-known member
Messages
4,411
Reaction score
1,694
Location
Toledo, Ohio
More design concept info

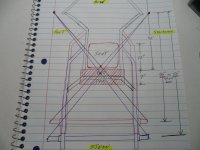
The (3) main "chunks" of weight we have to "deal with" on this kart are
...the driver (~150 lbs.)
...the battery pack (~75lbs.)
...& the motor (~35 lbs.)

By "chunks" I mean their, well..."chunks"
...& ya can't really "spread 'em out" too much :unsure:

So, I guess the next best option would be to try & "centrally" locate most of that weight, on the kart
...& then, maybe even try ta manipulate the situation (if possible) by shifting some of that weight, just a bit forward of the "center" (ta help enhance the steering)

Starting at the front bumper (where the pedals will be mounted) Ima thinkin' ~40" to the seat back (should accommodate a variety of drivers)
...that's ~40" to help "spread out" the (150 lbs.) driver's weight

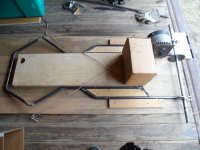
Directly behind the driver is where the (75 lbs.) battery pack will be mounted (piece #8 should provide ample support for this)

The (35 lbs.) motor is to be mounted on the starboard nacelle (right behind/next to the batt pack)

...& then, once all of that is figured/established we'll have a better idea of where would be best ta mount the rear axle ;)
SAM_4065 (1).JPG
SAM_4063 (1).JPG
 
Last edited:

madprofessor

"Loose Cannon Creations"
Messages
2,899
Reaction score
888
Location
Jacksonville, Florida
Just noticed the marine connotations on your drawing, including that you do know correctly which side is port/starboard. Some boat stuff has come into conversations here lately, guessing you'd have some marine knowledge to add to some conversations also. Besides being interesting stuff to some (like me), it's been helpful to discuss certain sealants, trailer bearings, etc. during some of our mechanical gokart ponderings.
 

Functional Artist

Well-known member
Messages
4,411
Reaction score
1,694
Location
Toledo, Ohio
Just noticed the marine connotations on your drawing, including that you do know correctly which side is port/starboard. Some boat stuff has come into conversations here lately, guessing you'd have some marine knowledge to add to some conversations also. Besides being interesting stuff to some (like me), it's been helpful to discuss certain sealants, trailer bearings, etc. during some of our mechanical gokart ponderings.
Um...I learned the "vessel" lingo from Star Treck & pirate movies
...but, it seems to work with go karts too.

As far as I understand, referring to the ends of a "vessel", as front & rear
...or the sides, as left & right could be confusing, depending upon where you were in/on or around the "vessel"
...& your orientation (the direction your facing)

So, I figured I'd refer to them as such

The nacelle (a streamlined housing or tank for something on the outside of an aircraft or motor vehicle) reference is also, from Star Treck
...'cause the side/rear pipes (where the motor & axle will mount) kinda resemble (to me anyways) the nacelles on a starship, like the Enterprise. ;)
 

madprofessor

"Loose Cannon Creations"
Messages
2,899
Reaction score
888
Location
Jacksonville, Florida
Definitely did think Star Trek as soon as I saw the word nacelle there. About that direction confusion, I made up my own way of remembering it decades ago, kinda like word association, works like this (BTW: I think marine in terms of cars for right/left sides)..................
1: Right (hand) has more letters than left (hand), and starboard has more letters than port, so it's right/starboard, and left/port.
2: Arranged alphabetically, left comes before right, and port comes before starboard, so it's left/port, and right/starboard.
3:Bow (like how now, brown cow) is spelled same as bow (like oh no, ain't so). Black tie affair means wearing a bow tie, in the front of you. Bow/front.
4:When my Dad was being extra stern with me because I did another bad thing again, it meant a swift kick in my rear, so stern/rear.
5: Green/red navigation light, shielded with a hood to be only visible from the side and front, has green on the vessel's right for starboard, and red on the vessel's left for port, for the same reason as #1 above. Green has more letters than red, so green/right/starboard, and red/left/port.
Not a grade school teacher, simply made that stuff up while still in grade school. Strange kid.
 

Functional Artist

Well-known member
Messages
4,411
Reaction score
1,694
Location
Toledo, Ohio
Constructing the main frame

I'd say we need ta start by "prepping" pipe's #2 & #3 ta fit nice-n-snug, up ta pipe #8
...but, first we need ta figure which way they (pipe's #2 & #3) need ta be "clocked"

Why do they need to be "clocked"?
...& what the heck is "clocking" on a pipe? o_O

Well. I'm glad you asked :smartass:

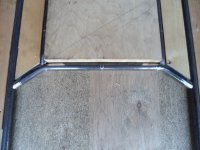
Pipe's #2 & #3 have bends in them
...& the ends toward the "bow" (front) are where the spindles will attach

OK...so...:unsure:

Just stick with me for a minute :thumbsup:

For the kart ta run "level", we need the spindles & the rear axle ta be about the same height
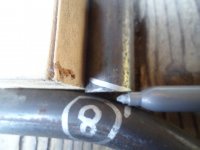
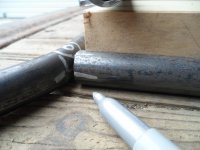
...so, pipe's #2 & #3 need ta be "twisted" a little bit so, the ends toward the "bow" (front) are "raised" up a bit

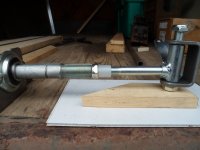
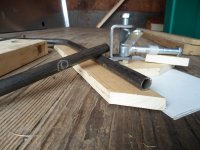
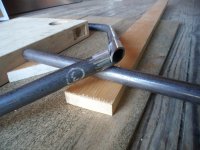
I used an appropriate thickness board, ta line up a spindle, with the end of the axle
...then, I used that info (spindle & board) to establish the proper height (pipe & board) for the "front" ends of pipe's #2 & #3

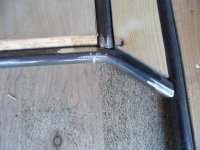
Next, I went back to the "stern" (rear) ends of pipe's #2 & #3
...& marked where they needed angle cuts
...& also, marked 'em for "notching"

* So, which way a piece is "twisted" before being attached to another piece, is "clocking" :2guns:
(kinda made all of that up but, that's really the situation) ;)

* Hope this post makes sense
...maybe the pics will help :cheers2:
SAM_4074 (1).JPG
SAM_4077 (1).JPG
SAM_4084.JPG
SAM_4083.JPG
 

madprofessor

"Loose Cannon Creations"
Messages
2,899
Reaction score
888
Location
Jacksonville, Florida
so, pipe's #2 & #3 need ta be "twisted" a little bit so, the ends toward the "bow" (front) are "raised" up a bit
Bear with my loss of spatial grasp here.......... Are you talking about tilting the spindles for caster or some such? I've lost my ability to plan a geometry that far ahead, have to play it out by hand.
On the notching with a common hole saw in a drill locked down and driven through a pipe at some angle to meet flush with other pipe.............
Nobody's ever told me how to do that properly. Do you saturate the hole saw continuously with cutting oil to keep from burning it up? Just oil it at the start, unless it starts smoking? Don't oil at all because the hole saw will just slip? Seriously, I only know what I do know about by trial, error, and what little I can remember from when I wasn't a thousand years old.
 

Denny

Canned Monster
Messages
8,501
Reaction score
4,733
Location
Mayberry, Indiana
Mad, just remember steering axle in front or bow. Drive axle in rear, back or stern. As for angles just tilt your drill press table or drill press vice to the proper angle. When cutting holes with a hole saw in thicker metals use something like Tap-Magic or some other cutting fluid on it. Need to keep the hole saw cool. If it gets over 700 degrees you will usually loose the temper and it will dull quickly.
 

Functional Artist

Well-known member
Messages
4,411
Reaction score
1,694
Location
Toledo, Ohio
Bear with my loss of spatial grasp here.......... Are you talking about tilting the spindles for caster or some such? I've lost my ability to plan a geometry that far ahead, have to play it out by hand.
On the notching with a common hole saw in a drill locked down and driven through a pipe at some angle to meet flush with other pipe.............
Nobody's ever told me how to do that properly. Do you saturate the hole saw continuously with cutting oil to keep from burning it up? Just oil it at the start, unless it starts smoking? Don't oil at all because the hole saw will just slip? Seriously, I only know what I do know about by trial, error, and what little I can remember from when I wasn't a thousand years old.
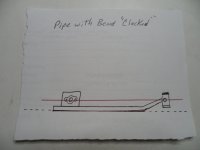
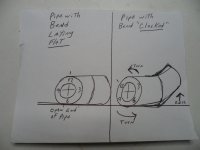
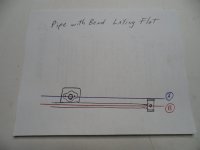
"For the kart ta run "level", we need the spindles & the rear axle ta be about the same height"

If the pieces (pipe's #2 or #3) just lays flat (see B) the "axles" would not be at the same height
...& if the same size wheels were mounted on the front & rear, the frame would angle upwards toward the front

But, if ya "clock" the pieces (pipe's #2 & #3) upwards a bit (see A) then, ya can "align" the "axles" :cool:
SAM_4088.JPG
Like this :2guns:
SAM_4089.JPG
Here is another view (or way ta look at it) :cheers2:
SAM_4090.JPG

As for "notching" ya you can use hole saws (ran slow & using cutting fluid, as stated above)
...but, anymore I "cheat" & just custom carve them out, with an angle grinder ;)
...& then, "clean" 'em up with a 1" round grinding stone, mounted in a router/table (kinda thing)
* There are pics & more details about my "custom notching" somewhere in my Excalibur thread :thumbsup:
 

madprofessor

"Loose Cannon Creations"
Messages
2,899
Reaction score
888
Location
Jacksonville, Florida
Thanks for the hole saw info , folks. Been needing to hear that for a long time, most of my experience with hole saws is on flat material that wasn't very thick, or with hand-carved-out holes bigger than the standard hole saw kit like mine.
Good visual of clocking the pipe by putting the clock face on the end of it, good for the spatially challenged like me.
BTW: Those spindles look exactly like the ones I got from MFG and had to heavily modify and strengthen. Have 90-degree angle on the axles/arms, so zero Ackermann without cutting away or adding on, is that the plan?
 

Functional Artist

Well-known member
Messages
4,411
Reaction score
1,694
Location
Toledo, Ohio
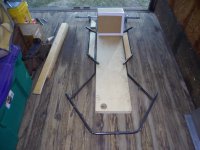
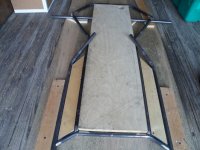
So, I got the angles trimmed off of the "stern" ends, of pipes #2 & #3
...then, notched 'em ;)

Then, I propped up the "bow" ends of pipes #2 & #3 on a board & piece of pipe (like in post #30)
...then, marked, trimmed & notched 'em too :thumbsup:

Also, had ta mark & trim, piece #1 (front bumper)

Now, I could finally set everything up, in the "wooden jig" :2guns:

Next up, a little "tackin" (of progress so far)
...& then, some "fittin" of pipe's #4 & #5 (the nacelles) :cheers2:


SAM_4094.JPG
SAM_4097.JPG

SAM_4095.JPG
SAM_4099.JPG
 

Functional Artist

Well-known member
Messages
4,411
Reaction score
1,694
Location
Toledo, Ohio
Um...?

I just placed an order with BMI for some rims & a seat
...but, I don't understand...

A couple of years ago (like ~2018) when I built my Aerial Atom kart, regular old 6" steel rims, for a 1" axle were $16.95 ea. :)
...then, in (2020) when building Excalibur they were $19.95 ea. :confused: (understandable)
...now today, (2022) them same rims are $32.95 ea. :( (ridiculous)

Um...?:huh::mad2:

What the heck is different?
...their the same rims, from same place

* Yup, I looked elsewhere
...it seems everybody, everywhere went "nuts"

* Have ya seen the price of diesel? :furious2:( today in Toledo, Ohio diesel fuel $4.99 per gal.) :eek: (back in ~2018 diesel fuel was ~$2.00 per gal.)
...see everyone went "nuts"
...but, they got rid of the "mean guy" 🤪
 
Last edited:

madprofessor

"Loose Cannon Creations"
Messages
2,899
Reaction score
888
Location
Jacksonville, Florida
Okay, so I just checked the rims I got from MFG, they went nuts on prices too. Still doing the weird thing where a 6" split rim with just a 1" hole in it for a live axle costs a lot more than the same rim with a nice pair of 3/4" bearings in it, but both have shot up hugely in price. Ridiculously, in fact.
............and holy Toledo, Klinger! Glad I don't use diesel down here. Maybe you should instead ride your camel Habibi.
 

Functional Artist

Well-known member
Messages
4,411
Reaction score
1,694
Location
Toledo, Ohio
After lots & lots of "whittling" I got the nacelles (pipe's #4 & #5) custom fitted/notched
...so, their all nice-n-parallel
...& easily slidable (for length adjustment)
SAM_4101.JPG
These "junctions" required quite an angle
SAM_4102.JPG

SAM_4104.JPG

Now, we can move on to "main" component placement
...& length adjustment ;)
 

Functional Artist

Well-known member
Messages
4,411
Reaction score
1,694
Location
Toledo, Ohio
Before we can figure the "final" frame length, we gotta figure where the rear axle needs ta be. :thumbsup:

So, lets discuss axle placement, gear ratios & sprocket sizes.

I'm going with a 12T 40P (2.17"OD) drive sprocket on the motor
...& probably a 40T 40P (6.65"OD) driven sprocket (for a 3.3:1 gear ratio) :smiley_omg:

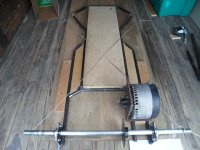
So, it looks like if we mount the rear axle ~ 6" behind the center of the motor
...we should still have ~2" between sprockets
...& a nice short chain
...with good "wrap around" on both sprockets
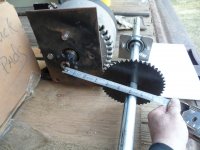
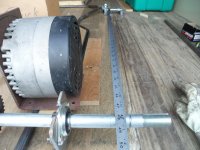
SAM_4105.JPG
& if set up like this, we will end up with a ~48" wheel base
SAM_4107.JPG
 

Functional Artist

Well-known member
Messages
4,411
Reaction score
1,694
Location
Toledo, Ohio
So, ta make a note ;)
...the wheelbase will be ~48"
...the rear axle is 36" (~40" W with tires)
...king pin to king pin will be ~28" (~36" with tires)
...& overall length should be ~60"

This should give us a width to length ratio of ~2:3
...& then, this will be about the "dimensional center" of the kart
SAM_4108.JPG
The center seems ta be bit further ahead of where I was hoping for
...but, were gonna see how well it works :thumbsup:
SAM_4109.JPG
 
Top