You are using an out of date browser. It may not display this or other websites correctly.
You should upgrade or use an alternative browser.
You should upgrade or use an alternative browser.
"Goliath" Mini Tank
- Thread starter porsche930dude
- Start date
- Status
- Not open for further replies.
porsche930dude
New member
the main thing with sharpening by hand is that you dont have to take off alot. just enough to sharpen it. that way you still have a tip profile to follow. the tip itself may not be perfect but most of the time you step up from smaller bits anyway so the tip doesnt matter. If your sharpening a completely roasted bit or one that has broke off it can take a few trys to get the bit to look like something again. practice makes better
porsche930dude
New member
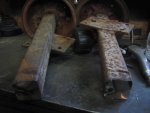
extended the axles . im probrobly going to box those bearings out as far as i can to support the drive sprockets and put less stress on the axles. i doubt they will bend since they just have drive force on them and no weight but why chance it. the rear axle was solid bar. no wonder it was so heavy ") i had to cut it in half to widen it
i had to cut it in half to widen it
http://i721.photobucket.com/albums/ww211/jeep2003/Goliath/golia010_zps4a10011f.jpg
http://i721.photobucket.com/albums/ww211/jeep2003/Goliath/golia012_zpsff88e557.jpg
i had to cut it in half to widen it http://i721.photobucket.com/albums/ww211/jeep2003/Goliath/golia010_zps4a10011f.jpg
http://i721.photobucket.com/albums/ww211/jeep2003/Goliath/golia012_zpsff88e557.jpg
Attachments
-
 golia010_zps4a10011f.jpg89.7 KB · Views: 32
 -
 golia012_zpsff88e557.jpg62.4 KB · Views: 28
Last edited by a moderator:
porsche930dude
New member
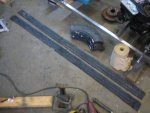
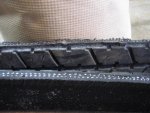
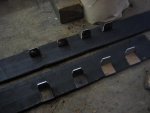
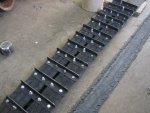
Heres how im making the tracks. to cut the tires i first cut the beads in 4 places and cut the sidewall then around the tire. I ended up with jaged wavy pokey cuts so i smoothed those out with the grinder. Funny grinding the rubber seems to wear out grinding wheels even more than grinding metal :shrug: Anyway I ended up with pie cut sidewalls that will be easy to trash so i dont have to pay a disposal fee  Also cut a few of the cleats and guides. each side will have two bolts. the outer bolt will hold the guide on the inside. Ill stagger the ends of the tires for added strength when linking them together. Ill show that part when i get to it.
Then to drive it ill cut a brake rotor in the shape of a big drive sprocket to fit down the center and drive the whole thing by locking into the cleats.
http://i721.photobucket.com/albums/ww211/jeep2003/Goliath/golia001_zps157bd94a.jpg
http://i721.photobucket.com/albums/ww211/jeep2003/Goliath/golia002_zpsaf5f3779.jpg
http://i721.photobucket.com/albums/ww211/jeep2003/Goliath/golia003_zps3c2402dc.jpg
http://i721.photobucket.com/albums/ww211/jeep2003/Goliath/golia006_zpsf31ae40c.jpg
http://i721.photobucket.com/albums/ww211/jeep2003/Goliath/golia004_zps93279a72.jpg
http://i721.photobucket.com/albums/ww211/jeep2003/Goliath/golia007_zpsfa7b11c0.jpg
http://i721.photobucket.com/albums/ww211/jeep2003/Goliath/golia008_zps2beea26d.jpg
Also cut a few of the cleats and guides. each side will have two bolts. the outer bolt will hold the guide on the inside. Ill stagger the ends of the tires for added strength when linking them together. Ill show that part when i get to it.Then to drive it ill cut a brake rotor in the shape of a big drive sprocket to fit down the center and drive the whole thing by locking into the cleats.
http://i721.photobucket.com/albums/ww211/jeep2003/Goliath/golia001_zps157bd94a.jpg
http://i721.photobucket.com/albums/ww211/jeep2003/Goliath/golia002_zpsaf5f3779.jpg
http://i721.photobucket.com/albums/ww211/jeep2003/Goliath/golia003_zps3c2402dc.jpg
http://i721.photobucket.com/albums/ww211/jeep2003/Goliath/golia006_zpsf31ae40c.jpg
http://i721.photobucket.com/albums/ww211/jeep2003/Goliath/golia004_zps93279a72.jpg
http://i721.photobucket.com/albums/ww211/jeep2003/Goliath/golia007_zpsfa7b11c0.jpg
http://i721.photobucket.com/albums/ww211/jeep2003/Goliath/golia008_zps2beea26d.jpg
Attachments
-
 golia001_zps157bd94a.jpg113.9 KB · Views: 24
 -
 golia007_zpsfa7b11c0.jpg63.9 KB · Views: 37
 -
 golia004_zps93279a72.jpg71.6 KB · Views: 32
 -
 golia006_zpsf31ae40c.jpg82.1 KB · Views: 34
 -
 golia003_zps3c2402dc.jpg65 KB · Views: 26
 -
 golia002_zpsaf5f3779.jpg80.3 KB · Views: 26
 -
 golia008_zps2beea26d.jpg65.2 KB · Views: 38
Last edited by a moderator:
Ah.. totally makes sense now.
I had the Goliath tracks in mind and couldn't figure out how to connect all the little triangles without ripping the rubber as it moves
My mind somehow got stuck on these triangles.
Now that I re-read your first post... you already said you cut a tire into two strips for the tracks...
I must have missed that earlier
Sorry!
And thanks again for clearing things up for me
'sid
Poboy kartman
Senior Moments Member
i do too but its kind of a pita to pull it out and set up. i just hand sharpen them on the bench grinder works good
I have sharpened drills (yes I know I said drill bits earlier- but being surrounded by constant misuse of terminology makes it contagious- so much so that now they actually market saber saws as jigsaws......) successfully in the past. My biggest problem is finding the right grinding wheel- not symmetry or angles.
I can also sharpen a pencil with a utility knife or sandpaper- but much prefer an electric pencil sharpener. I feel the same way about the drills. IDK- I can sharpen about 100 drills of assorted sizes in under an hour with my Drill Doctor. Maybe it's because I've used it a lot or maybe I just got a good one- but to me it's nearly as fast and easy as an electric pencil sharpener.

zbuck
New member
machinist@large
Active member
I sharpen drills for years buy hand. Then a Buddy turned me on to the Drill Doctor, I've had one for a few years and never look at hand sharpening again. I just wish I had bought the one that goes to 3/4".
The wheel itself would fit into the machine, it's the larger size collet that lets you go over 1/2".
machinist@large
Active member
For now, have a look at this


Tony, that just covered all the bases I was hoping to hit, much clearer than I would have been able to, due to them having all the illustrations at hand and in order.... And it was about a half hour after I decided to hit the rack....
The only thing I can think of to add to the links info is that a good magnifier can be a real Godsend, and wherever you set up to sharpen drills, you can almost never have to much lighting...
Good luck, and hopefully you won't add unintentional high speed steel plug making to your list of skills.....

 Pat
Patbigair49
Member
This really is a cool project the tracks are coming together nicely! Good work man!!
porsche930dude
New member
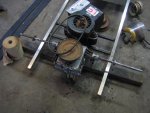
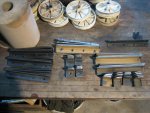
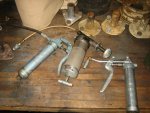
thanks guys glad you like it. Iv got some more pics for you. I got most if not all the pieces for the first track made just got to finish drilling painting and putting it together. it goes pretty quick when you get a rythem going. but i think ill take a break form it after the first one is done :laugh: also got the side pod framing welded on. you can see in the pic the grease guns i have to chose from and the headlights. I think they may actually be WWII they are marked 9-45 Dietz :shrug: Anyway its going well
http://i721.photobucket.com/albums/ww211/jeep2003/Goliath/ddddddd001_zpsc096e897.jpg
http://i721.photobucket.com/albums/ww211/jeep2003/Goliath/ddddddd002_zpsc9a9edba.jpg
http://i721.photobucket.com/albums/ww211/jeep2003/Goliath/ddddddd003_zps6e57d745.jpg
http://i721.photobucket.com/albums/ww211/jeep2003/Goliath/ddddddd005_zps33d0cfce.jpg
http://i721.photobucket.com/albums/ww211/jeep2003/Goliath/ddddddd009_zps4656f3b8.jpg
Attachments
-
 ddddddd009_zps4656f3b8.jpg102.2 KB · Views: 39
 -
 ddddddd005_zps33d0cfce.jpg79.7 KB · Views: 44
 -
 ddddddd003_zps6e57d745.jpg91.7 KB · Views: 40
 -
 ddddddd001_zpsc096e897.jpg85.4 KB · Views: 41
 -
 ddddddd002_zpsc9a9edba.jpg91 KB · Views: 42
Last edited by a moderator:
porsche930dude
New member
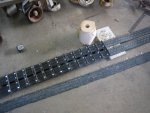
Some more
http://i721.photobucket.com/albums/ww211/jeep2003/Goliath/ddddddd010_zpsdbbcf322.jpg
http://i721.photobucket.com/albums/ww211/jeep2003/Goliath/ddddddd013_zpscb42dc28.jpg
http://i721.photobucket.com/albums/ww211/jeep2003/Goliath/ddddddd015_zps5c480666.jpg
http://i721.photobucket.com/albums/ww211/jeep2003/Goliath/ddddddd017_zpsb16db636.jpg
http://i721.photobucket.com/albums/ww211/jeep2003/Goliath/ddddddd018_zps2f442133.jpg
Attachments
-
 ddddddd010_zpsdbbcf322.jpg106 KB · Views: 34
 -
 ddddddd013_zpscb42dc28.jpg93.8 KB · Views: 28
 -
 ddddddd015_zps5c480666.jpg93.5 KB · Views: 56
 -
 ddddddd017_zpsb16db636.jpg85.9 KB · Views: 47
 -
 ddddddd018_zps2f442133.jpg87.5 KB · Views: 43
Last edited by a moderator:
firemanjim
Just kartin' around....
Love this build.....
Maybe a dumb question, but, how do you plan on connecting the ends of the track ?
Maybe a dumb question, but, how do you plan on connecting the ends of the track ?
porsche930dude
New member
im gonna weld a bit of an extention on the angle iron so i can do 4 bolts on one piece and also staple the track together like a conveyor belt. So doing that and staggering the tires 3 cleats should give it plenty of strength. ill post pics of that when i get to it
Poboy kartman
Senior Moments Member
Keep on keepin on- we can't have too many builds, pics, or guys like you on this forum.
Awesome- I'm almost speechless and that says a LOT!
Awesome- I'm almost speechless and that says a LOT!
im gonna weld a bit of an extention on the angle iron so i can do 4 bolts on one piece and also staple the track together like a conveyor belt. So doing that and staggering the tires 3 cleats should give it plenty of strength. ill post pics of that when i get to it
I'm most possibly wrong, but with an extension welded on this might get a bit jerky when that extension runs over the driven wheel...
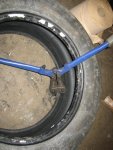
So maybe if you just cut a small section like this:

it would work without an extension; (still stapled though)
I think the load should still spread okay so that it wont rip , as long as you have at least one cross bar in between.
just an idea
'sid
This is a super build. If your jeep is anything to go by, this should turn out just as good
porsche930dude
New member
thats a good idea sid. but ill see how it works my way first. i think itll be fine. there will still be a fair amount of rubber between it to flex . ill see how it looks when im at that point
fattony
Member
This is amazing stuff. Cant wait to see it unfold. It might be a silly question but how do plan on steering it. Is it one track off,one track on?
- Status
- Not open for further replies.