Go Kart meets Quad Bike

70Cobra

Member
Messages
54
Reaction score
33
Location
NJ
Hi Guys,

I've just completed my 2nd quad meets kart surgery. On my first I cut and widened the quad front end as it was going on a Manco XTK and I also used a Spiderbox rack and pinion.

The one I have just done was a lot easier as I didn't widen it. After my first I also discovered the widening kits you can get for most quads on ebay and if I ever do a bigger kart again I will use one of those kits as opposed to cutting it down the middle.

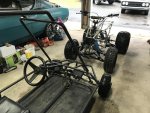
I used a Yerf Dog and a Yamaha Warrior. I used the sliding bench seat that I removed from my XTK.
 

70Cobra

Member
Messages
54
Reaction score
33
Location
NJ
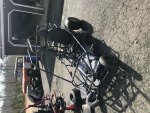
What I started with.
 

Attachments

  • B8140F82-B193-4DE1-9CA0-D05EB304E99D.jpg
    B8140F82-B193-4DE1-9CA0-D05EB304E99D.jpg
    809.6 KB · Views: 30
  • 388AD9CB-6186-45EE-B98D-CF79966FDA1C.jpg
    388AD9CB-6186-45EE-B98D-CF79966FDA1C.jpg
    701.1 KB · Views: 32
  • 644DF83A-0DEE-4E97-B801-478FDD4BDAAD.jpg
    644DF83A-0DEE-4E97-B801-478FDD4BDAAD.jpg
    406.1 KB · Views: 32

70Cobra

Member
Messages
54
Reaction score
33
Location
NJ
Well that's annoying my photo's are on their side. I will transfer photos to my computer and upload from there.

I was under a deadline to get this finished as was giving it to my daughter for her 9th birthday. It was running and stopping by her birthday but I didn't get to install the battery for the lights and horn to work. Never got fenders and body panels on either but plan to install them as have all the material for it.

She was over the moon when she saw it and has been enjoying driving it.
 

70Cobra

Member
Messages
54
Reaction score
33
Location
NJ
Dang why do people keep doing this to yerfdogs?

Because people who own them can do what they like, and in stock form I think they are pretty ordinary.

---------- Post added at 07:22 AM ---------- Previous post was at 07:12 AM ----------


Sent from my iPhone using Tapatalk

---------- Post added at 07:24 AM ---------- Previous post was at 07:22 AM ----------


Sent from my iPhone using Tapatalk

---------- Post added at 07:28 AM ---------- Previous post was at 07:24 AM ----------

Here you can see where I cut the quad. I ended up cutting all the front off the yerf.

Did a ton of measuring and moving back and forth to make sure the wheels wouldn’t hit the frame.


Sent from my iPhone using Tapatalk

---------- Post added at 07:30 AM ---------- Previous post was at 07:28 AM ----------


More


Sent from my iPhone using Tapatalk

---------- Post added at 07:34 AM ---------- Previous post was at 07:30 AM ----------

Was originally thinking of leaving the front bar on but it was going to be too much work to line up and cut it all/fish mouth the ends.


Sent from my iPhone using Tapatalk

---------- Post added at 07:36 AM ---------- Previous post was at 07:34 AM ----------

Then I laid it down on the front and angled it up. In this position the up-kick almost matches the rear section of frame as it kicks up.


Sent from my iPhone using Tapatalk

---------- Post added at 07:38 AM ---------- Previous post was at 07:36 AM ----------

Once I was happy with the position I marked up the frame and made these cuts.

No going back now!


Sent from my iPhone using Tapatalk

---------- Post added at 07:39 AM ---------- Previous post was at 07:38 AM ----------

Here it is in position.


Sent from my iPhone using Tapatalk

---------- Post added at 07:40 AM ---------- Previous post was at 07:39 AM ----------

Another angle.


Sent from my iPhone using Tapatalk

---------- Post added at 07:43 AM ---------- Previous post was at 07:40 AM ----------

Once I welded it in some I started on the steering. I cut the lower mount of the quad steering shaft out and then flipped/rotated it.


Sent from my iPhone using Tapatalk

---------- Post added at 07:44 AM ---------- Previous post was at 07:43 AM ----------

Another


Sent from my iPhone using Tapatalk

---------- Post added at 07:45 AM ---------- Previous post was at 07:44 AM ----------

Got the rough angle for it to be on the same plane as the steering shaft.


Sent from my iPhone using Tapatalk

---------- Post added at 07:47 AM ---------- Previous post was at 07:45 AM ----------

And where the tie rods would be parallel to the A arms.


Sent from my iPhone using Tapatalk

---------- Post added at 07:52 AM ---------- Previous post was at 07:47 AM ----------

In that photo the tie rods aren't quite parallel as the steering kept dropping down where I had it.

They were when I welded it up. This little cart steers like it's on rails and try as I might I have not been able to put it on it's side doing power slides.

It's really stable and balanced well which is great as I have no worries when my daughter is driving it.

---------- Post added at 07:55 AM ---------- Previous post was at 07:52 AM ----------

The axle on the yerf was rusted solid and also split so I cut it all off.

I then used the axle etc off of my Manco XTK as I'm going to use a 1.25" axle on that when I install the Polaris 250cc 2 stroke and transmission etc on it.

---------- Post added at 08:00 AM ---------- Previous post was at 07:55 AM ----------

Got these mounts from amazon. Had to cut the one sides welded spacer to fit.

Then had to die grind the inside of those spacers so the shock bolt bushings would go in.

The bushings came out of a set of old a arms from the quad used for my buggy.

A lot of work but turned out nice in the end and they are really beefy mounts.


Sent from my iPhone using Tapatalk

---------- Post added at 08:01 AM ---------- Previous post was at 08:00 AM ----------

Another.


Sent from my iPhone using Tapatalk
 

70Cobra

Member
Messages
54
Reaction score
33
Location
NJ
Got a new set of Banshee shocks from eBay. They work really nice, the cart soaks up the bumps.


Sent from my iPhone using Tapatalk

---------- Post added at 08:03 AM ---------- Previous post was at 08:03 AM ----------

Another


Sent from my iPhone using Tapatalk

---------- Post added at 08:07 AM ---------- Previous post was at 08:03 AM ----------

The rear brake lined up really well. I cut the head off one of the bolts and then welded this to the bearing hanger.

The rear bolt went through a hole that was already there. Couldn't believe how nice and easy this step was.

It's a manual disc and stops really well. I am going to install the front drum brakes as well.

---------- Post added at 08:08 AM ---------- Previous post was at 08:07 AM ----------

Brake bracket


Sent from my iPhone using Tapatalk

---------- Post added at 08:10 AM ---------- Previous post was at 08:08 AM ----------

Another


Sent from my iPhone using Tapatalk

---------- Post added at 08:15 AM ---------- Previous post was at 08:10 AM ----------

Oh yeah, the quad has a natural kick up for the front suspension/steering. This starts after the flat section that I welded to the kart.

All I did was make sure the flat section of the cart ran inline with the lower frame of the kart.

That way the steering and suspension works just as it did on the quad and keeps all the factory engineered geometry.

---------- Post added at 08:27 AM ---------- Previous post was at 08:15 AM ----------

Then I started on the front bars and the steering some more.

I used a lot from the quad, even cutting off some tabs and re using them.

If you get a decent quad for a good price you could do this fairly cheaply.

I was lucky in the roller I got had been restored and then never used. I got it for $150.

The yerf came with a brand new predator and I got that for $200.


Sent from my iPhone using Tapatalk

---------- Post added at 08:28 AM ---------- Previous post was at 08:27 AM ----------

Another


Sent from my iPhone using Tapatalk

---------- Post added at 08:29 AM ---------- Previous post was at 08:28 AM ----------

Another


Sent from my iPhone using Tapatalk

---------- Post added at 08:35 AM ---------- Previous post was at 08:29 AM ----------

I had seen a couple of guys use sprockets for the steering and thought it a great idea.

I used a larger sprocket on the quad section and this slowed down the ratio slightly which has ended up perfectly for my daughter.

I used a 18T and on the end of the steering shaft I think it was a 12T.

Steers great. I fit it up and then pulled as tight as I could and then welded the steering shaft support.

Steering input is direct and as soon as you turn the wheel the steering engages.

---------- Post added at 08:36 AM ---------- Previous post was at 08:35 AM ----------

Here it is


Sent from my iPhone using Tapatalk

---------- Post added at 08:41 AM ---------- Previous post was at 08:36 AM ----------

In that photo I have not yet installed the shaft support. It ends up as close to the end as possible for support.

Once I had all that sorted out I completed all the welding.

I got a nice set of harnesses from amazon and also an led light bar, rear brake/stop light and also a horn.

---------- Post added at 08:43 AM ---------- Previous post was at 08:41 AM ----------

Here it is finished. I’ve had a few friends comment how “MadMax” it looks which is fitting seeing I’m Australian.

Any questions let me know.


Sent from my iPhone using Tapatalk

---------- Post added at 08:44 AM ---------- Previous post was at 08:43 AM ----------

Another


Sent from my iPhone using Tapatalk

---------- Post added at 08:44 AM ---------- Previous post was at 08:44 AM ----------

And again


Sent from my iPhone using Tapatalk
 

anickode

Active member
Messages
2,296
Reaction score
72
Location
S.E. Michigan
Dang why do people keep doing this to yerfdogs?

Because there's nothing special about yerf dogs in general. They're not rare, valuable, or collectible. They're a dime a dozen, decently built, and versatile for modding.

Yerf dog is the Volkswagen beetle of go karts. Take something ordinary and make it better.
 

JTSpeedDemon

2019 Build Off Winner!
Messages
4,026
Reaction score
162
Location
Texas
Daaang 70Cobra! Looks like a mini sandrail! I'm digging it!

Any powerplant change plans?
 

70Cobra

Member
Messages
54
Reaction score
33
Location
NJ
Daaang 70Cobra! Looks like a mini sandrail! I'm digging it!

Any powerplant change plans?

Thanks mate!

Not at the moment, it's fast enough for my daughter right now. Once she get's used to the power and is comfortable I will do stage 1 mods to it.

It put's a grin on my face taking it for a blast. With the tube being 1" it's fairly light. It would make a great one seater.

At some point I'm going to add to and weld the roll cage and change it up a little.
 
Messages
6
Reaction score
0
Location
Outside of Nashville
Awesome!! This is my next planned upgrade for the Kilowatt. Hard to beat a double a arm suspension and hydraulic disc brakes. Are the shocks just a generic chinese shock, or do they have a brand name?
 

70Cobra

Member
Messages
54
Reaction score
33
Location
NJ
Did something similar! Your kart looks great, very nice fab and weld work!


Sent from my SM-N975U using Tapatalk

Thanks, your's looks pretty good too. You should do a short build log of some of the details to share your ideas.

And the easiest way I have found on getting your photo's to orientate properly is by using the "Tapatalk" app. It's free.
 
Top