Go Kart Front Axle on kids battery powered ride on (BPRO)

Status
Not open for further replies.

RxJoshRx

New member
Messages
12
Reaction score
0
First post and new to the forum- tried to do a few searches and didn’t see anything related.

I have a little girl and trying to make the steering on her Peg Perego RZR 900 12V ride on Jeep easier. Will putting a go kart steering set up make it easier or harder to steer?

I replaced the plastic tires/wheels with pneumatic rubber and have put in a larger SLA battery (23 pounds vs 8 pounds stock). By doing that, it started to cause front end sag and a pretty big toe in problem. They sent me a replacement, but has the exact same problem. The problem with the stock steering is it is made out of all plastic except where the wheel goes on. There are several fixes for this issue for power wheels, but haven’t found anything yet for the Peg Perego RZR.

I’ve ordered an ESC (electronic speed controller) for it and should be in next week- main reason I ordered is because she hates how jerky it is all the time. With the ESC it provides a variable speed gas pedal as well as a brake and coasting when the foot is off the gas and brake.

The big issue that I think I may run into, is attaching the steering shaft to the main front support- plastic covers the entire front floor of the car. May block where the pitman arm goes as well. Thought about getting a dremel tool and clearing the area for it.

I can not weld, but have talked to a few people that said they would be able to weld for me.

My thoughts were this-
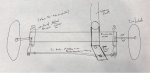
Use a 1” square steel shaft as the main support going across the front. Then possibly attaching a bicycle steering shaft to the frame and attaching a pitman arm to the bottom of that. I saw a build where someone used the bike shaft and said it made it very smooth and easier to turn. From the pitman arm attach 2 tie rods and run them to the spindles. Weld the spindle brackets onto the 1” square tube.

Only issue I think I may run into with that setup- it doesn’t provide any limits on how much the wheel would be able to turn. So may look at doing something similar to Kartfabs free steering setup.

Current steering.jpg
Here is the current set up right now. As you can see not much room to work with. 1 is the part Im calling the main support beam- plan on putting a 1" square tube in its place and supporting it on the opposite as well. 2- currently acting as the tie rods- steering shaft goes into it and rotates the wheels when wheel is turned. 3- needed to be moved over but shows the current "spindle" setup. the arrow shows what limits how much the wheel can be turned.

Steering column.jpg
Here is where the steering column goes down and to the front of the car- only about 2 inches in front of it and might be able to get about 1/2" behind it if I really needed too. The box on the left is a fuse block that runs headlights/rears, fog lights and light bar.

Bike mod.jpg
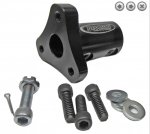
Here is the picture of the steering mod that someone did on a power wheels build.

Right now the stock steering shaft is very lightweight and just held up by the plastic dashboard. If needed I could figure out a way to add better supports to the new shaft.

Know its a lot on the first post, but any help would be greatly appreciated- even if it's- "That sounds like the worst idea ever!" Im a pretty good DIYer, but a novice when it comes to things like this.

Thanks in advance,

-RxJoshRx
 

Attachments

  • Drawing.jpg
    Drawing.jpg
    54.7 KB · Views: 5

JTSpeedDemon

2019 Build Off Winner!
Messages
4,026
Reaction score
147
Location
Texas
Go to gopowersports.com and search up "rack and pinion". Installing a rack and pinion should make steering much easier.
Reducing the weight on the front wheels will also help.

---------- Post added at 02:14 PM ---------- Previous post was at 02:13 PM ----------

And::welcome2:
 

RxJoshRx

New member
Messages
12
Reaction score
0
Go to gopowersports.com and search up "rack and pinion". Installing a rack and pinion should make steering much easier.
Reducing the weight on the front wheels will also help.

---------- Post added at 02:14 PM ---------- Previous post was at 02:13 PM ----------

And::welcome2:

Anywhere have a good diagram about exactly how it pieces together? I’ve looked around at several places and see the kits, etc, but would probably need to buy different tie rods since the steering wheel is not in the center. Will need one around 5-6” and one 17-18”.

I originally thought about using another model of the Peg Perego line up that uses rack and pinion, but not sure how well they would match up since the body is different widths.

Any recommendations on trying to piece it together or buying an all in one kit?

Thanks,

-RxJoshRx
 

JTSpeedDemon

2019 Build Off Winner!
Messages
4,026
Reaction score
147
Location
Texas
I would get the bare rack and pinion, some female tie rod ends, and some threaded rod with the same thread as the tie rod ends to start off with(buy more threaded rod than you think you'll need).
Then you can cut the rods to size, make a little adapter to the rack and pinion, attach the tie rod ends, mount it all up, and it should work.
If someone says something that contradicts what I just said, take their advice(unless it doesn't sound very well thought out)
 

RxJoshRx

New member
Messages
12
Reaction score
0
Is there a recommendation or standard as far as the size I should get vs the width of the “car” or the tires?

Seeing sizes all over the place- I will still need to get the spindles and weld those to a solid frame, correct? As far as mounting the rack and pinion each, if I put a steel beam the length of the rack and bolted it to that, I wouldn’t need to weld anything with with the actual rack, correct?
 

Hellion

Disc brakes are for cowards
Messages
5,371
Reaction score
714
Location
Location: Location:
An ambitious project.

You could utilize a typical go kart front end with spindles and the direct steering linkages
but they are kind of inherently stiff. You'd have to have it loose (with decent "play" between
the parts) and/or very well lubricated.

A larger steering wheel would also reduce steering effort to some degree.
*Having the front tires pumped to maximum inflation will also reduce steering effort.


I am not familiar with this ride on toy. Would love to see more photos so I and the forum
can see what your dealing with as far as sizes and what room you have to spare. Obviously,
you need to go small.

:useless:
 

RxJoshRx

New member
Messages
12
Reaction score
0
Here are a couple pictures of the side view and front of the Jeep. As you can tell got a little too big on the roll cage I built as well as a bit too much light for the light bar. Haha

The last picture shows the 24V addition of the RZR. It’s about 2.5-3” wider but uses a rack and pinion I believe. The hard part about that one would be I have leading link and that one is set up as a trailing link system for the spindles. Also, not sure how much it would cause the front wheels to stick out compared to the back.

The Peg Perego Gaucho Rock’in addition also uses a rack and pinion and is 1/2” shorter (wide) compared to ours. Use to be all steel but think they may have changed it to a plastic combination and not sure if it would well with the added weight.

9C03A32E-1D64-4867-B0B8-02985EF18512.jpeg

2EA6F56D-B501-481B-95B1-8D2B839DCA5A.jpeg

5FB507BE-E7E0-41C3-A8A4-CC4D13BF4705.jpg

Thanks,

RxJoshRx
 

Hellion

Disc brakes are for cowards
Messages
5,371
Reaction score
714
Location
Location: Location:
You really went all-out on this conversion. That IS a bit too much light. Less is more man, less is more.

That’s an ugly roll cage, not gonna lie. :ack2: :D

I did a brief search on Peg Perego and read that a few had a rack and pinion steering setup.
If you can acquire that rack and pinion from another toy and retrofit it to yours, I think that would be the way to go.

Like I said you need a wheel. I think about the smallest one can get is 10” diameter. I see you have a T handlebar thingamabob that doesn’t look very optimal. You’re adding all this weight; tires and steel rims....maybe get your daughter into some upper body strength training? :eek:
 

RxJoshRx

New member
Messages
12
Reaction score
0
You really went all-out on this conversion. That IS a bit too much light. Less is more man, less is more.

That’s an ugly roll cage, not gonna lie. :ack2: :D

I did a brief search on Peg Perego and read that a few had a rack and pinion steering setup.
If you can acquire that rack and pinion from another toy and retrofit it to yours, I think that would be the way to go.

Like I said you need a wheel. I think about the smallest one can get is 10” diameter. I see you have a T handlebar thingamabob that doesn’t look very optimal. You’re adding all this weight; tires and steel rims....maybe get your daughter into some upper body strength training? :eek:


First time on a project like this and thought the light bar wouldn’t put out nearly that amount of light. :oops:

And in my head the roll bar seemed like a good idea- going to tinker around with it and try to put 45s at the front to get some angle toward the back instead of just being up and down. Bad thing is they are all glued- so be a lot of cutting and wasted pieces.

But think I’m going to see what I can find out of the other front axles. Only thing about the one axle is it is meant for a ride on that is about 2-3” wider than the one we have- not sure if that would cause a big issue or not. Other thing is both are set with the trailing links and currently this one has the spindles in the front or forward facing.

And I say it’s for my little girl- but she just likes the lights. Building it more for my son who should be good to drive in in 6-7 months. Might as well let them have fun on this and then move on to bigger better things that this forums has much advice on.

Thanks for the help.
 

Hellion

Disc brakes are for cowards
Messages
5,371
Reaction score
714
Location
Location: Location:
Just giving you a hard time...or some honest critique. ;)

It's a great idea. Most of these Barbie Jeeps and stuff don't have much of a shelf life--the kid outgrows them because they're sort of one dimensional and Mickey Mouse. But you add real tires and more power to the thing and the projected use is only limited by whether the kid can still fit inside or not.
 

RxJoshRx

New member
Messages
12
Reaction score
0
No I appreciate it. It doesn’t look as ridiculous in person, but for some reason thought it looked better when I dry fit everything together. ����*♂️ It’s the furniture grade PVC so it won’t shatter with the UV rays from the sun- but about 3-4x the cost of regular cost of Schedule 40 PVC.

When I measured the back tires from outside to outside it was around 32-33”. Measuring the fronts they came to 36”. Think I’m going to go with the Gaucho rack and pinion and see if I can rig something up with it to get it to work. Maybe down the road get a small rack and pinion and weld some spindles on a metal square shaft.

Oh and I measured the steering wheel that came on it originally, it was around 7-7.5”. I put on the make shift T-bar to act more like a four wheeler- people said their kids had an easier time steering those at first. Think I’ll get a 10” or slightly larger and see if that makes it a bit easier.

Hopefully the ESC kit comes next week and can start on the wiring of that- they said expect at least 4-6 hours to wire everything and get it installed. I’ll post pics of that when I get a chance to start working on it.
 

Functional Artist

Well-known member
Messages
4,434
Reaction score
1,724
Location
Toledo, Ohio

RxJoshRx

New member
Messages
12
Reaction score
0
I did a brief search on Peg Perego and read that a few had a rack and pinion steering setup.
If you can acquire that rack and pinion from another toy and retrofit it to yours, I think that would be the way to go.

So I had a longer and better explanation but somehow it all got deleted.

But I ordered a rack and pinion set up for the Peg Perego Gaucho Rock’in edition since the cars were the same width. Crossed my fingers it was going to be an easy job- of course it won’t be at all.

Where the steering shaft, that has the pinion gear attached, comes down it is a good 2” off from the center of the rack where it needs to be. There might be one tooth that is on the track or close to it.

So leaves me with a few options:

1. Scrap the whole thing and send it back.
2. Move the steering whee over 2” to the right- worst idea I think since it will destroy the dash and move the wheel away from the driver.
3. Try to modify it to work.
4. Scrap this one and go with a manual rack and pinion.
5. Try and find a double U joint that can take a 5/8” shaft on both ends and each head turn 90 degrees in opposite directions.

I like 5 the best if they make a U joint that is even capable of fitting those specs. Hard part would be finding one that is only 2” wide from the center of both heads. Anyone know of any that might fit this? Most are much longer or are only single jointed that would be this small.

NEWB question of the day- do both tie rods on a rack and pinion have to be the same length? If I would modify this one and leave the rack on the bar it came with, I could slide it over to where the steering shaft is and then just make 2 new tie rods. But doing this would make one about 2-3” longer than the other. I’m guessing this is an absolute NO, but thought I would ask anyway.

Any other suggestions would be awesome!

96A106EA-4655-4E6B-B1C4-FF8FF1786A90.jpg
How it should go.

DCEC0E51-7086-4791-BB13-F10E80F27D0B.jpg

Where mine comes down and hits

FDFBECED-1387-42EA-89B7-17A03AD0DF30.jpg

Not a lot under the car to work with as far as space goes.
 

Hellion

Disc brakes are for cowards
Messages
5,371
Reaction score
714
Location
Location: Location:
I post mainly with a computer and use something called Lazarus form recovery; a browser extension--it saves what you type.

NEWB question of the day- do both tie rods on a rack and pinion have to be the same length? If I would modify this one and leave the rack on the bar it came with, I could slide it over to where the steering shaft is and then just make 2 new tie rods. But doing this would make one about 2-3” longer than the other. I’m guessing this is an absolute NO, but thought I would ask anyway. ......

Nope, they do not have to be the same length. There's plenty of two seat go karts, for example that have the steering wheel on the left and the left tie rod is shorter than the right--just on account of where the steering column is mounted.

Does this new rack and pinion setup look beefy enough to handle your steel wheels and tires?
 

RxJoshRx

New member
Messages
12
Reaction score
0
I post mainly with a computer and use something called Lazarus form recovery; a browser extension--it saves what you type.


Nope, they do not have to be the same length. There's plenty of two seat go karts, for example that have the steering wheel on the left and the left tie rod is shorter than the right--just on account of where the steering column is mounted.

Does this new rack and pinion setup look beefy enough to handle your steel wheels and tires?

Been mainly posting on my phone and a pain to post pics. Haha

The new rack is all metal except the rack, pinion gear, and the spindles. So IMO I think it should be strong enough. And I think that redoing the tie rods would probably be the easiest fix. So When I do the redo the tie rods I may try to reinforce some of the other plastic parts. Don’t necessarily want to put new spindles on since I would need to weld those and don’t have a welder.

As far as making the tie rods, I have either thought about making them out of 3/8” threaded rod or have seen others use 1/4” turnbuckles. Any suggestions on what might be best? I’ve also seen some 4-5” inch ones that are “traditional” but run $15-20 instead of $3-4 that I could make.

Oh and got a notice that the ESC kit won’t be shipping until 9/2 now. At least I hope to maybe be able to get started on it next week. Have to take the car apart to do it. Planning on adding some steel braces when I put it back together to reinforce. Well see...
 

RxJoshRx

New member
Messages
12
Reaction score
0
I would go with what I know, standard 3/8" thread tie rods, but you might be able to get by with 1/4" rod...don't know if they make components in that. [/URL]

So things have been going slow- work/life has been hectic and never a dull moment.

But finally was able to make some progress on the rack and pinion. Purchased 1/4” tie rods at first, but seemed to flimsy- went back and got the 3/8” and are much sturdier. Trick is going to be making sure I have the bolt tight enough that there isn’t a large amount of play but not so thought that it causes the steering to lock up/tough to steer.

Cut some steel plates and put on the plastic center to give it a bit more structure.

Now the tricky part- attaching it to the frame. I think I’m going to be able to get by with only needing to cut a bit of the under side in a few places and hopefully won’t have to adjust the steering shaft any for it to match up. If I have to adjust it down some, I will look for a universal joint that can accept a 5/8” shaft on both sides and play around with it some to get it to function.

But the ends of the support stick out further than the body frame- plus have a very limited amount of area to be able to attach the frame- had to cut several inches off the plastic rack and pinion to be able to get it to line up with the steering shaft. I think what we are planning to try and do is attach 2 L brackets to the inside of the wheel hub, cut smaller brackets and build our own square U brackets. I’ll put the bolt right next to the main axle support to brace it from moving back and forth and attach those using 6” fully threaded 3/8” hex bolts. May put another brace on the top of the axle support and bolt there to try and keep it from moving as well. I’ll put some type of steel plate or bar on the inside of the car for the L brackets to attach to.

You think that would provide enough support or try to rip the inside of the car apart? I could put a few bolts through the bottom of the support and into the car on several spots, but just no the driver side since that would interfere with the rack from sliding.

The blue lines on the last photo show the bracket size for the home made square U brackets. Drilled out the 7/16” original hole for it to be able to accept a 3/8” bolt. Will use on of the original holes and drill a second hole where needed to “sandwich” the frame.

CB2D7777-46AF-4FC9-BB23-45FE91633F80.jpg

3CC37267-DE26-4C7D-8B9A-A78DE43D03E5.jpg

E18A43D6-668F-4026-985E-5BD5306C1110.jpg

74F519A8-A4DE-4704-85F7-82889D371AFE.jpg
 

RxJoshRx

New member
Messages
12
Reaction score
0
Also, you think something like this would work ok to be able to attach a larger steering wheel- would let me get away with not welding anything.

From bmikarts-


306A4B14-772A-4D20-AC77-C7ED06B14B41.jpeg

306A4B14-772A-4D20-AC77-C7ED06B14B41.jpeg
 

Attachments

  • 1B5342A4-0C32-4B50-8096-5B5EEB4A134A.jpeg
    1B5342A4-0C32-4B50-8096-5B5EEB4A134A.jpeg
    158 KB · Views: 1

RxJoshRx

New member
Messages
12
Reaction score
0
Like I said you need a wheel. I think about the smallest one can get is 10” diameter. I see you have a T handlebar thingamabob that doesn’t look very optimal. You’re adding all this weight; tires and steel rims....maybe get your daughter into some upper body strength training? :eek:

Ordered an 11 inch steering wheel today along with that steering wheel hub assembly and a few shaft lock collars.

I’ve got one side bolted on and it feels solid. Used 6” L- bracket to tie into- 3 5/16” bolts to hold each one in place. But a steel plate down on both sides and also has an L-bracket I cut in half to tie into on the other side. Put a nylon lock but on it and won’t budge.

Working on the other side now- nice thing is it pretty much lines itself up based on where the other bolts are in place already. Put one of the tires on and could move the steering T-bar with my pinky.

Problem I’ve ran into though- going to have to trim back some plastic for the rack to be able to slide to the right- hits part of the frame right now. Thinking about just trimming some off the rack since the part that is hitting doesn’t serve a purpose that I can tell.

Going to try and tackle the ESC kit Friday. :surrender: we shall see how that goes.

3F2FDA62-49F4-474B-9046-4CF6065FFC81.jpg

5966FFE3-6F44-4BE7-803E-41D9CCE88BFE.jpg

F98259F0-A615-4141-82C7-56C0EE36D34A.jpg

2E94D862-84A0-4D2D-95B5-FF089152099B.jpg
 

RxJoshRx

New member
Messages
12
Reaction score
0
I would go with what I know, standard 3/8" thread tie rods, but you might be able to get by with 1/4" rod...don't know if they make components in that range.

Just ideas, parts sources....https://www.bmikarts.com/Go-Kart-Steering-Tie-Rods

Finishing up the last few things- but she took it out and the turning is 100 times easier. Held up and didn’t have any tires fall off or collapse. Haha

Got the scooter controller installed and moved the aftermarket battery to the back as well. Then put the original batter back in the front and running the lights off that one now. Wired the bolt meter and the USB charger to the main battery so I can keep and eye on needing to recharge it.

It came with a charger port- was able to desolder a 24V schumacher adapter and resolder it to the 12V adapter I have. Put an in line fuse on it to be safe.

Redid the “box” roll cage into something that looks a bit more realistic- still not as good as I had hoped, but can’t complain to much- without going to a real roll cage, won’t be able to get the round corners that look right.

2D68DB51-7743-4C5B-B682-5C667EF59B90.jpg

A0CF4DEA-2BEC-4397-9B8A-06ADB0729A51.jpg

1E1A7E6D-6D71-48DF-BED6-931D11FA45A1.jpg

8767B827-1FAA-4788-83EB-EC65049CFB8C.jpg

Thanks for all the help and suggestions.

-RxJoshRx
 
Status
Not open for further replies.
Top