Full Suspension Big Block Mini-Buggy Build

TNThomas

Well-known member
Messages
386
Reaction score
369
Location
Washington
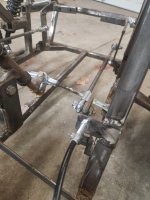
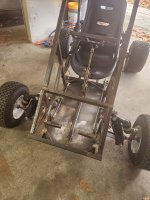
Got the new steering yoke mounted. Steers a lot easier now. I also increased the front tire size from 16" to 18" (same width, so the extra size shouldn't have affected steering effort much anyway). I did this to gain more ground clearance under full suspension compression, as it would still occasionally bottom out.
View attachment 135942
View attachment 135943
Even with the front tires being the same size as the rear, I still have a 2" difference in ground clearance from the back of the main frame to the front (it's sitting "nose down"). This means that I could go even larger with the front tires if I wanted to even if I kept the back tires the same and keep the frame in a nose down position. Many quads and crosskarts actually have very slightly taller front tires than rear as well, so this would actually be OK. For now, I'm keeping the tires the way they are.
Steering wheel looks great, and big tires look good too, keep it coming! I had a saggy front end too so I added duel shocks on each side. Essentially a steel rod with threads on the end for the top, pic for ideas.
 

Attachments

  • 16747948014298364094619651050232.jpg
    16747948014298364094619651050232.jpg
    2.3 MB · Views: 8

SquidBonez

Active member
Messages
502
Reaction score
114
Location
New Jersey, USA
20230129_144640.jpg
Got the pedals in place. I still need to weld on the brackets and design some sort of pedal stops for both "resting" position and fully depressed position, the latter probably being adjustable. For the return action I'm going to add a spring on each pedal to assist in returning to idle/no brakes. I do not think the throttle linkage on the engine is anywhere near strong enough to return to idle once the pedal is connected. The master cylinder might be strong enough to return to the "no brakes" position, but I'm still adding return springs on both just to be safe.
 

SquidBonez

Active member
Messages
502
Reaction score
114
Location
New Jersey, USA
20230130_181657.jpg
Pedals are in, but it's already obvious there's some tweaking to be done. First and foremost is the pedal return stops. They are way too flimsy, and gradually bend up as the pedals hit them when they return. They're also just super ugly. I need to cut them off and design a new form of stop that is stronger. The other problem is the return springs. They work, but they need to be stronger. I'm probably just going to double up the springs. I'm more than likely going to redesign the pedals themselves as well, since I don't like the lean they have and they don't keep my feet in well enough.
 
Last edited:

TNThomas

Well-known member
Messages
386
Reaction score
369
Location
Washington
Good images and thanks for sharing the "mistakes." Just tossing an idea out there: what of you ditched the pedals and hooked your throttle and brake up to your custom handlebars? You could run two levers, just like the FL design you went off of. One for gas and one for a brake. Possibly even using a master cylinder from a front motorcycle (its attached to the lever). These guys have a similar setup to the FL Honda, but look a little closer, they used big "flippers". I think one is a clutch, but same logic and very close to your spacial orientation, they hace a vid of making the throttle setup somewhere on their channel:

If you do mount any cables to the handlebars, just be sure to leave alot of slack in the line to allow for sharp turns and minimal cable binding. You could probably run the lines down, between your legs, and under the seat.
 

SquidBonez

Active member
Messages
502
Reaction score
114
Location
New Jersey, USA
Good images and thanks for sharing the "mistakes." Just tossing an idea out there: what of you ditched the pedals and hooked your throttle and brake up to your custom handlebars? You could run two levers, just like the FL design you went off of. One for gas and one for a brake. Possibly even using a master cylinder from a front motorcycle (its attached to the lever). These guys have a similar setup to the FL Honda, but look a little closer, they used big "flippers". I think one is a clutch, but same logic and very close to your spacial orientation, they hace a vid of making the throttle setup somewhere on their channel:

If you do mount any cables to the handlebars, just be sure to leave alot of slack in the line to allow for sharp turns and minimal cable binding. You could probably run the lines down, between your legs, and under the seat.
I toyed with the idea but I wanted standard "car" controls for this build. The FL250/FL350 actually had hand controls as well believe it or not.
 

SquidBonez

Active member
Messages
502
Reaction score
114
Location
New Jersey, USA
New pedals are in and the new stops are done. No more bending.
20230208_163528.jpg
Also put the engine on the swingarm for the first time. Sort of weird seeing it with an engine on it!
20230208_163516.jpg
 

SquidBonez

Active member
Messages
502
Reaction score
114
Location
New Jersey, USA
Guess who's back?!
20230923_152253.jpg
I've finally finished moving into my new house and setting up to the point where I can get back to work. This new workshop is so much nicer than the 1/2 of a 1 car garage I was working out of. I also have a new work schedule which gives me more free time, so this hopefully will be the home stretch.
20230923_130325.jpg
As for updates, I made a new redneck "stinger pipe" out of black iron gas pipe. My dad recently got a Duromax 420cc swapped golf cart that has a similar setup and I liked the Mad Max/improvised look. Might not be the best for flow but makes designing pipes really easy. Plus my existing muffler works perfectly on it. Besides that I've been cutting tie rods to the proper length. Once I decided to widen the track width my tie rods were barely long enough to work. Now they have more than enough threads to make sure they stay together.
 

SquidBonez

Active member
Messages
502
Reaction score
114
Location
New Jersey, USA
20231013_212340.jpg
20231013_145257.jpg
Brakes are done. To anyone using MCP braking systems, here are a few tips:

- Replace the plastic master cylinder cap with the billet aluminum one they sell. The plastic one strips out super easily.

- Definitely buy the bleeding kit from BMI Karts or whatever other vendor sells it. It's just a bottle with an o-ring and a cap for the master cylinder that has a hole in it. One you squeeze the bottle it forces brake fluid through the lines rather than having to pump the brakes. Makes it much easier.

- I reccomend going with clear nylon brake lines as they're very easy to work with and you can see if you have any bubbles in your system (you can see the difference between when the system is filled in the first pic vs when it's empty in the second pic). They are also very lightweight.

- I replaced the stock fittings in the caliper with some 90° fittings. Not required but definitely cleaner looking.
 

TNThomas

Well-known member
Messages
386
Reaction score
369
Location
Washington
View attachment 142914
View attachment 142915
Brakes are done. To anyone using MCP braking systems, here are a few tips:

- Replace the plastic master cylinder cap with the billet aluminum one they sell. The plastic one strips out super easily.

- Definitely buy the bleeding kit from BMI Karts or whatever other vendor sells it. It's just a bottle with an o-ring and a cap for the master cylinder that has a hole in it. One you squeeze the bottle it forces brake fluid through the lines rather than having to pump the brakes. Makes it much easier.

- I reccomend going with clear nylon brake lines as they're very easy to work with and you can see if you have any bubbles in your system (you can see the difference between when the system is filled in the first pic vs when it's empty in the second pic). They are also very lightweight.

- I replaced the stock fittings in the caliper with some 90° fittings. Not required but definitely cleaner looking.
 

TNThomas

Well-known member
Messages
386
Reaction score
369
Location
Washington
View attachment 142914
View attachment 142915
Brakes are done. To anyone using MCP braking systems, here are a few tips:

- Replace the plastic master cylinder cap with the billet aluminum one they sell. The plastic one strips out super easily.

- Definitely buy the bleeding kit from BMI Karts or whatever other vendor sells it. It's just a bottle with an o-ring and a cap for the master cylinder that has a hole in it. One you squeeze the bottle it forces brake fluid through the lines rather than having to pump the brakes. Makes it much easier.

- I reccomend going with clear nylon brake lines as they're very easy to work with and you can see if you have any bubbles in your system (you can see the difference between when the system is filled in the first pic vs when it's empty in the second pic). They are also very lightweight.

- I replaced the stock fittings in the caliper with some 90° fittings. Not required but definitely cleaner looking.
Great info! Im doing my MCP setup next week.
 

SquidBonez

Active member
Messages
502
Reaction score
114
Location
New Jersey, USA
Great info! Im doing my MCP setup next week.
Big emphasis on the master cylinder cap. Had a bit of a panic moment at 8:30 PM on a week night because the cap stripped out and I was afraid of leaving the system open to the air for very long (brake fluid absorbs moisture in the air). Managed to find a plumbing fitting at home depot that fit while I'm waiting for the new cap...only to find out that DOT 5 brake fluid is the only fluid that REPELS water, not absorbs it...so it would have been fine to leave it open anyway LOL.

Learn from my mistakes so you don't have to.
 

SquidBonez

Active member
Messages
502
Reaction score
114
Location
New Jersey, USA
Are those compression fittings on the brake lines? With the little brass compression sleeve? I didn't know those work on brake lines.
Yep, they are. They're even sold as "brake line fittings". However they are not recommended for street automotive use, but I have read of people using them on everything from go karts to V8 powered rock bouncers.
 

SquidBonez

Active member
Messages
502
Reaction score
114
Location
New Jersey, USA
The final stretch is here! Floor pan is in, brakes are bled and working, axle keys are installed, engine is in, and the chain is connected. All that's left now is a throttle stop on the gas pedal, a kill switch, a fuel line and a little bit of gasoline. Maiden voyage coming soon.
20231122_170210.jpg
20231122_122553.jpg
20231122_170027.jpg
The chain I'm using is DOD 420 gold chain from GoPowerSports. Supposed to be stronger than your standard 420 chain. Sprocket ratio is 5.4:1, which is on the high side but considering this has 18" tires (actually closer to 17" inflated), 440cc, and a 40 series (that starts out with a 2:1 reduction in low gear) it should be just fine.
 
Last edited:
Top