Free BRIGGS 3.5HP Engine

Status
Not open for further replies.

propain37

New member
Messages
60
Reaction score
0
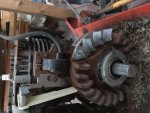
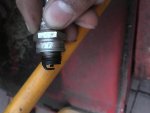
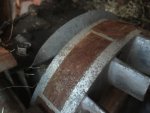
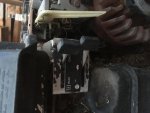
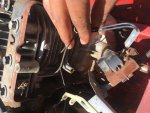
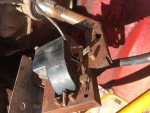
Well my neighbor was getting rid of some stuff and I got a free lawnmower. It has a briggs 3.5hp engine on it and it’s a horizontal shaft engine. I tried it out and it won’t run. The engine won’t spark since that’s the first thing I checked after looking at some stuff online. Anyways, here are some pictures I have of the engine.
 

Attachments

  • IMG_5509.jpg
    IMG_5509.jpg
    402.3 KB · Views: 11
  • IMG_5513.jpg
    IMG_5513.jpg
    306.6 KB · Views: 6
  • IMG_5511.jpg
    IMG_5511.jpg
    368.1 KB · Views: 4
  • IMG_5510.jpg
    IMG_5510.jpg
    348.4 KB · Views: 8

JTSpeedDemon

2019 Build Off Winner!
Messages
4,026
Reaction score
162
Location
Texas
Where are you?
Also, this should probably be in the For Sale or Trade section, mods?
I am interested, but it depends on where you are.
 

Hellion

Moderator
Messages
8,880
Reaction score
3,886
LOL I don't think he's trying to sell it, Speedy. He's just saying how much he paid ($0). :D

How did you test for spark?
You used the recoil starter, right?
 

propain37

New member
Messages
60
Reaction score
0
yeah. sorry for the title, should've put something better. But to answer Hellion's question, I did use the recoil starter to try and check for spark. If there is a way to change the title, I can do it but I don't know how
 

Hellion

Moderator
Messages
8,880
Reaction score
3,886
Does it have points ignition or the more modern Magnetron?

If points, you have to pull the flywheel and clean the points, usually, because they get oxidized.
I think they stopped using points ignition after 1981/1982...
 

propain37

New member
Messages
60
Reaction score
0
It has a magnetron. And I would also trade for an 8hp because more power, but I am not located in your state.
 

Hellion

Moderator
Messages
8,880
Reaction score
3,886
Well if it doesn't work it doesn't work, they're not serviceable parts. Could be a bad spark plug too. Sometimes they just go bad. Try another and test.

Otherwise, buy a new Magnetron and drive on.

EDIT: be on the lookout for classic mini bike fans to trade with. The early bikes were supplied with Briggs or Tecumseh flatheads, usually 3, 4, or 5 HP.
 

propain37

New member
Messages
60
Reaction score
0
I think I’ll try buying a new spark plug since magnetrons are quite expensive and for me, it’s not worth spending money on an engine that doesn’t make that much power.
 

Hellion

Moderator
Messages
8,880
Reaction score
3,886
I think I’ll try buying a new spark plug since magnetrons are quite expensive and for me, it’s not worth spending money on an engine that doesn’t make that much power.

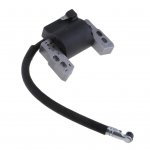
A little more expensive than a spark plug, true, but I just picked up a new magnetron for a 5 horse Briggs for $10.99, free shipping.

It's the new style and...made in China just like everything else. :eek:
 

Attachments

  • s-l1600.jpg
    s-l1600.jpg
    57.2 KB · Views: 2

Hellion

Moderator
Messages
8,880
Reaction score
3,886
it'll still crank out quite a bit if tweaked a bit...

That's the truth. The Magnetron armature that came on a craigslist 5 HP Briggs 'Bubba Special' I bought recently looks like a 3 HP type or something, because the legs of the armature were made for a much smaller flywheel... plus the legs were drilled (badly) to fit the block's mounts.

It doesn't hold anywhere near the proper air gap but still throws a good spark...:wai:
 

propain37

New member
Messages
60
Reaction score
0
I removed the flywheel by loosening the nut with a wrench and hammer. How would I re torque the flywheel cause it’s not a nut
 

Hellion

Moderator
Messages
8,880
Reaction score
3,886
Hi propain37.

There is a special socket you can buy that fits the "ears" on the starter clutch nut but I just pad the teeth of a pair of extra large channel loc pliers, immobilize the flywheel with the padded rubber handles of another pair of pliers and just wrench it tight.

It's totally Bubba but it works. Standby for a video showing the same.

VIDEO:
Overly long video but it shows a guy shearing his flywheel key at about 1:38 and then disassembly at 4:08 using pliers large enough to encompass the starter clutch and just his other hand holding the flywheel from turning. Then at 6:30 he's putting the flywheel nut/starter back on using two pliers. I usually brace the pliers that hold the flywheel against the floor.

I pad the jaws of the pliers so I don't mangle the softer aluminum of the starter clutch assembly.

The required 55-60 ft lbs of torque is easy for me to 'feel' with my hands.

https://www.youtube.com/watch?v=c1JypRv80ys

---------- Post added at 03:33 PM ---------- Previous post was at 03:08 PM ----------

Hellion does that coil you showed have the tab for the air deflector, and not to jack your thread but is the air deflector really even needed?

Yes, there is an issue with the newer coil where you cannot re-attach the OEM air deflector and one guy noted this on an Amazon review and gave it less than 5 stars just because of that.

It was either him or another guy that said he attached the air deflector to the new coil with JB Weld or something--just glued it right on. I bet you could drill holes for the deflector in the new coil. I have not looked at it closely....

As to whether the air deflector is absolutely necessary, that's a good question. I wonder if the Briggs Raptor guys use it (looking at it from a high performance perspective)?


P.S. I rebuilt and sold an old Sears garden tiller with a 5 HP just recently that was lacking the air deflector and the sheet metal wall that is tack welded to the left side of the blower housing. Both of those work in conjunction to keep the air flowing up and over the cylinder head and not bleeding off elsewhere.

I didn't test it extensively but a decent amount of air was blowing over the top of the cyl head and it didn't overheat.
 
Last edited:

propain37

New member
Messages
60
Reaction score
0
Well I watched the video and from what I've read around, won't the pressure the second wrench is applying on the flywheel eventually damage the flywheel. I'm just asking cause I don't want a blown up flywheel
 

propain37

New member
Messages
60
Reaction score
0
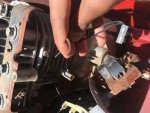
So I started to remove the coil to see the model number and it looks as though the stripped wire wasn’t attached to anything. The plug was attached to the coil but I removed it for the photo. Also, the wires on the coil seem fine or are they busted. Where should the stripped wire go. And there isn’t an off switch. It’s the throttle which has an off position of that makes sense. It’s connected to the lawnmower handle.
 

Attachments

  • IMG_6200.jpg
    IMG_6200.jpg
    304.4 KB · Views: 2
  • IMG_6201.jpg
    IMG_6201.jpg
    280.7 KB · Views: 1
  • IMG_6199.jpg
    IMG_6199.jpg
    291.8 KB · Views: 1

Hellion

Moderator
Messages
8,880
Reaction score
3,886
...won't the pressure the second wrench is applying on the flywheel eventually damage the flywheel. I'm just asking cause I don't want a blown up flywheel

It shouldn't, actually, if you're gentle. I jam the handles of the pliers in between cooling fins that are not adjacent to each other so it spaces out the force applied to it. I'm definitely not banging on it by any means.

There's also another tool meant for immobilizing the flywheel-- it is a big, unwieldy metal 'cradle' and it also has 'fingers' that fit between the cooling fins and it does the same thing as far as I'm concerned. You may not want to buy these specialized tools unless you become a total Briggs nut. Here's the tool, or one like it:

https://cometkartsales.com/750-067-Briggs-3hp-Flywheel-Holder.html

So I started to remove the coil to see the model number and it looks as though the stripped wire wasn’t attached to anything. The plug was attached to the coil but I removed it for the photo. Also, the wires on the coil seem fine or are they busted. Where should the stripped wire go. And there isn’t an off switch. It’s the throttle which has an off position of that makes sense. It’s connected to the lawnmower handle.

That stripped wire is typically the kill wire. The other wire is unneeded and can be snipped off with cutters right at the junction.

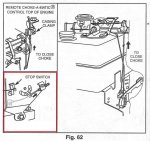
The kill wire was typically installed into a tab under the gas tank that grounded out the magneto (and the spark) when the throttle was lowered all the way to SLOW and a little past it. That's the OFF switch. A small lever on the governor/throttle control engages the metal tab and completes the circuit. Very simple. See illustration in RED.

The Stop Switch is just a little metal and plastic holder for the kill wire.


Ummm, the "air deflector " is part of the govenor.

Not on what I was referring to. OldStrattonMan was asking about the 5 HP and the stationary air deflector that those engines have. The 5HP horizontal engines also have an internal, geared governor and not the "air vane"/pneumatic governor of which you speak. He was hijacking the thread and even said so. Pay attention! :rolleyes:
 

Attachments

  • Briggs Kill Switch.jpg
    Briggs Kill Switch.jpg
    126.6 KB · Views: 4
Status
Not open for further replies.
Top