First kart build, lots of trial and error!

Status
Not open for further replies.

mysteryboy28

New member
Messages
1,582
Reaction score
10
Location
Lansing, MI
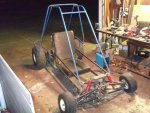
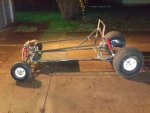
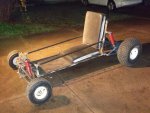
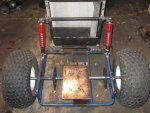
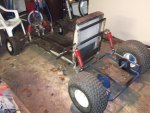
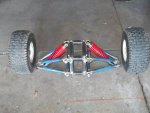
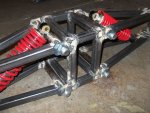
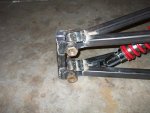
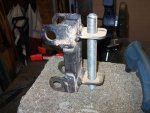
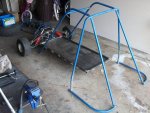
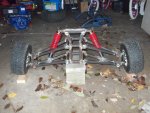
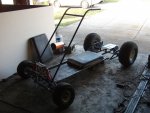
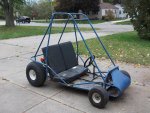
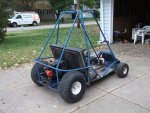
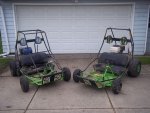
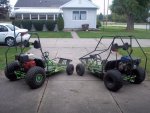
Having wanted a go-kart since I was a kid, and finally getting one at the age of 39 (then 2, then 3) - I'm now embarking on trying to build my own. Using mostly new metal for the frame and steering/suspension, and the rear assembly from another kart (as well as tires and other odds and ends) here is my progress. I'm learning as I go, especially that it pays to measure everything several times before cutting and welding. I have a cheap little 90 amp flux-core welder, which out of worry that I'm not making my welds strong enough, I'm over-welding everything (better safe than sorry?). I've gone through several spools of welding wire (I think I'm on spool number 8?), at $13-15 per spool. Eek. Next purchase: a real MIG welder.
 

Attachments

  • 1.jpg
    1.jpg
    112.2 KB · Views: 100
  • 3.jpg
    3.jpg
    95.5 KB · Views: 151
  • 4.jpg
    4.jpg
    101 KB · Views: 134
  • 6.jpg
    6.jpg
    99.1 KB · Views: 126
  • 7.jpg
    7.jpg
    136.1 KB · Views: 158
  • 8.jpg
    8.jpg
    117.2 KB · Views: 134
  • 9.jpg
    9.jpg
    131 KB · Views: 136
  • 11.jpg
    11.jpg
    106.5 KB · Views: 118
  • 12.jpg
    12.jpg
    124.1 KB · Views: 119
  • 14.jpg
    14.jpg
    111.3 KB · Views: 151

TorqueRanger

New member
Messages
257
Reaction score
0
Alot of your welds seam to just float on the metal and I see no preparation of the metal for welding..
 

mysteryboy28

New member
Messages
1,582
Reaction score
10
Location
Lansing, MI
I agree. The welder just doesn't want to do what I want it to do. As for prepping the metal... it's all new metal. What should I be doing to prep it better? It's not greasy, dirty, or rusty.
 

Rust Addict

Complete Hack
Messages
27
Reaction score
0
Just a thought on your welds. Try grinding the edges of the metal with a 4.5 inch right angle grinder. The chamfer or thinned out edges on the metal before you weld butt joints gets you a weld you can trust after you grind it flush. If you not doing this before welding, don't flush up your welds afterwards or you could have some weld breakage.
 

TorqueRanger

New member
Messages
257
Reaction score
0
I agree. The welder just doesn't want to do what I want it to do. As for prepping the metal... it's all new metal. What should I be doing to prep it better? It's not greasy, dirty, or rusty.

Well clean your metal because body oils and everything that touchs the surface can contaminate the weld .. All metal comes with some kind of coating on it in order to prevent flash rust and just plan rust.
 

mysteryboy28

New member
Messages
1,582
Reaction score
10
Location
Lansing, MI
I'll try to apply some of the techniques you guys are suggesting, but I really think I just need a higher-powered welder.

Meanwhile I made some more progress on the kart. Got the rear axle assembly attached, although i dinged the heck out of the side of it trying to pound the axle back into place. I think it's just cosmetic, not going to affect the integrity of the assembly. It was pulled off of the blue kart in the pictures.

Also here's a couple of pics of my first 2 go-karts. Manco Dingos with 11hp Honda and Honda clone motors. Lots of fun, but spent a lot of time fixing them!
 

Attachments

  • 18.jpg
    18.jpg
    100.7 KB · Views: 75
  • Blue front.jpg
    Blue front.jpg
    152.3 KB · Views: 84
  • Blue back.jpg
    Blue back.jpg
    149 KB · Views: 75
  • green front.jpg
    green front.jpg
    250.9 KB · Views: 78
  • green back.jpg
    green back.jpg
    284.4 KB · Views: 79

fowler

New member
Messages
5,463
Reaction score
16
Location
Bullsbrook West Aus
unless u are useing tube with 1/4 inch wall thickness then it should be fine

u should blow holes in the tubeing

try slowing down when u weld
or turning the apms up and wire speed down
 

kyjohn

New member
Messages
37
Reaction score
0
Location
Paintsville, Ky
Make sure you have a big enough outlet for your welder, If your not getting enough current to the plug in on your welder it won't weld right. Dont use extention cords unless they are large enough to supply enough current to the welder also. Some people don't know this and end up getting cold welds. Just a thought...:thumbsup:
 

mysteryboy28

New member
Messages
1,582
Reaction score
10
Location
Lansing, MI
I figured using an extension cord wouldn't be good for the welder. Running off the 110 circuit in my garage, maybe it's getting a weaker connection than it should? I totally plan on getting a better welder for my next project! Although if it's a 220 I have no idea where I'll plug it in. Maybe build the go-kart in my basement? Lol.
 

kyjohn

New member
Messages
37
Reaction score
0
Location
Paintsville, Ky
I figured using an extension cord wouldn't be good for the welder. Running off the 110 circuit in my garage, maybe it's getting a weaker connection than it should? I totally plan on getting a better welder for my next project! Although if it's a 220 I have no idea where I'll plug it in. Maybe build the go-kart in my basement? Lol.
If you get a 220 welder just run you a dedicated 220 volt circuit
for it, it's not hard to do at all. Just make sure the power is off on your breaker box.
 

mysteryboy28

New member
Messages
1,582
Reaction score
10
Location
Lansing, MI
Put the old roll-cage on temporarily just to get some ideas. Starting to look like a real go-kart now! :)
 

Attachments

  • Go-kart roll-cage.jpg
    Go-kart roll-cage.jpg
    114.9 KB · Views: 78

mysteryboy28

New member
Messages
1,582
Reaction score
10
Location
Lansing, MI
Rear suspension installed! Need to add a couple of cross-braces, you can see where I clamped a piece on to see where it would go.
 

Attachments

  • DSCF1005.jpg
    DSCF1005.jpg
    108.1 KB · Views: 63
  • DSCF1012.jpg
    DSCF1012.jpg
    112.3 KB · Views: 53

mysteryboy28

New member
Messages
1,582
Reaction score
10
Location
Lansing, MI
Engine mount is on the swingarm. I basically chopped the back part off the old blue go-kart, attached that to the new go-kart with the "hinges" and shocks.
 

Attachments

  • swingarm.jpg
    swingarm.jpg
    119.2 KB · Views: 54
  • swingarm 2.jpg
    swingarm 2.jpg
    107.4 KB · Views: 50
Status
Not open for further replies.
Top