Finally some progress

Status
Not open for further replies.

Doc Sprocket

*********
Messages
15,677
Reaction score
142
Location
Ontario, Canada
That looks phenomenal! The frame gussets in the frontend are top-drawer, and the diamond plate flooring takes it up a notch. Nice build!

What's the problem with the divorced reservoir- mounting? Because I would think that it would be preferable, in that you can mount the master however you like, and yet keep the reservoir level, no?
 

rgvkid

Charlie Don't Surf!
Messages
267
Reaction score
1
Location
Los Angeles, Anaheim
Thanks man. I wasn't able to work on the kart today, I had to get some seals for the brake caliper. Dust seals were shot! Had to go to my friends Motorcycle shop, which was another $15 bucks plus 4 hours of travel and chit chat time, to get a Seal rebuild kit. But I'll be working on it tomorrow. Should be ready for paint on Monday.

The divorced Resevoir is just another mount and plumbing to have to worry about. On the master cylinder, the inlet spout is fixed in one direction. So, you have to worry about the reservoir mount is located in connection with the inlet on the master. Plus the reservoir has to be mounted above the master cylinder or there will be plumbing issues.
 

anderkart

Moderator
Messages
6,426
Reaction score
359
Location
Surprise Arizona USA
I've seen remote reservoirs on race karts, they just mounted them up at the top of the steering column hoop and routed the line under your left leg. Even if the line had to back go uphill for a bit near the master cylinder, gravity would force it on through.
 

rgvkid

Charlie Don't Surf!
Messages
267
Reaction score
1
Location
Los Angeles, Anaheim
Thats exactly where i mounted the res. Im heading to the shop now to work on the kart. Im hoping i'll be able to get it on a test ride today. Hoping i don't have problems with the engine tuning. I'll be sure to post pics.

My lil kodak camera shoots video but im not sure how to upload video yet. I can upload video to my comp via USB but haven't tried uploading video yet to a site. I'll give it a try in the next few days
 

rgvkid

Charlie Don't Surf!
Messages
267
Reaction score
1
Location
Los Angeles, Anaheim
Made some progress last night. On the home stretch.

I rebuilt the brake caliper but had a tough time bleeding the lines. Im hoping the rotor isn't to thin for the caliper to grab tight enough. I think it should be okay.

I mounted the throttle linkage, I think im going to make some new pedals, for the bigger kids:D, to bring them forward a lil bit to keep the tie rods from rubbing on shins. But i Think its still a lil long for my girlfriends daughters reach. I think im going to weld a sleeve on the current pedals to mount another pedal which will shorten the distance.

I made a header to bring the exhaust back a bit and out of the way of the gas tank and flying hair. I started the engine and it seems to be running okay but still not sure how much power it will have pushing the kart. I still have the 6.5 clone as a sawp if the 3.5 briggs isn't adequate.

When i test started the engine, the vibration started to twist the header off, Im gonna try tapping the jam nut tighter or maybe mounting a spring to keep it from turning. I was thinking of welding a plate to just screw in teh header but then i would need a gasket.

Today im gonna get the header and air filter situated, setup the rear sprocket and clutch, and Mount the kill switch, Hopefully take it for a test drive and shoot some video. :wai:
 

Attachments

  • Ks Kart21.JPG
    Ks Kart21.JPG
    68.1 KB · Views: 24
  • Ks Kart20.JPG
    Ks Kart20.JPG
    76.8 KB · Views: 25
  • Ks Kart19.JPG
    Ks Kart19.JPG
    70.3 KB · Views: 21
  • Ks Kart18.JPG
    Ks Kart18.JPG
    65.6 KB · Views: 36
  • Ks Kart17.JPG
    Ks Kart17.JPG
    71 KB · Views: 32
  • Ks kart16.JPG
    Ks kart16.JPG
    71.8 KB · Views: 29
  • Ks kart15.JPG
    Ks kart15.JPG
    65.6 KB · Views: 30
  • Ks kart14.JPG
    Ks kart14.JPG
    81.8 KB · Views: 34
  • Ks Kart13.JPG
    Ks Kart13.JPG
    46.5 KB · Views: 33

Doc Sprocket

*********
Messages
15,677
Reaction score
142
Location
Ontario, Canada
Man that's sweet! With regards to the "thin" brake disc, clamping will likely be ok. I might be concerned about a thin disc warping. Also- as the pads wear, are the pistons going to extend too far and blow the seals out? That is a possibility when using a disc much thinner than stock. To avoid that problem, change them well before they're actually worn out.
 

anderkart

Moderator
Messages
6,426
Reaction score
359
Location
Surprise Arizona USA
Man your doing some cool awesome work here, I was just going to suggest some heel-chocks would be a cool feature to add after you get your pedals all situated. Just any non-slip ledge the driver can hook their heels on and push against would really help keep-em in that seat better. (pushing against them also transfers a little more weight to the front tires...)
 

rgvkid

Charlie Don't Surf!
Messages
267
Reaction score
1
Location
Los Angeles, Anaheim
Thanks guys.

Toystory, The pads are a little low but i think they'll be fine for a awhile. I'll get some knew pads soon which im sure will help alot. I do have to keep a feel for any warping. I might drill some vents in it to keep it cooler.

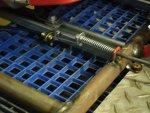
AnderKart, Thats a great tip on the heel chocks. I have just the idea on how to make some.

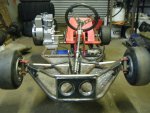
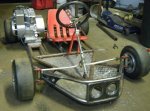
Okay, so heres the status. I was able to get it all together and start her up. I put in some gas, granted its been in the can since thanksgiving, It started up pretty quick and was able to take it for a 4-5min test drive. WooHoo! :wai: Was that a blast! I was really surprised at the Pep the lil 3.5HP has. Theres no need to up the engine up to the 6.5 clone i have. I might even have to put an adjustable stop on the gas pedal for when the kids ride it.
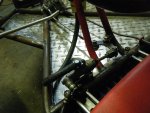
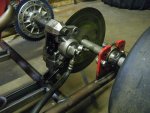
The steering was Very Responsive, kinda scary responsive at first. I had to stop and bleed the brakes some more. Once i did that, the brakes worked great! Locked up when you wanted. Might put a spring on the brake pedal just to keep a bit more pressure on the foot then just the back pressure on the master cylinder.
So unfortunately, after a few times around the parking lot, the 3.5 briggs started to bog down. I was running it without the filter on because i hadn't made the adapter yet. After it died I pulled the rope a few times and played with the adjusting screw all the way in and all the way out. I couldn't tell if it was making a difference. It would start for a bit and sound fine but when i gave it gas it would just bog down then would take a few turns to start up again. I made the adapter plate and mounted the filter then tried it again. Would run for a bit then bog down again. Took the filter off and pulled the plug. The plug was a bit damp so wiped it then scotch brite and put it back in. It started up again after a few turns, i could feel good vaccum pressure on the air inlet, then i noticed it started blowing smoke back out the air inlet before it would stall.

If its blowing smoke out of the carb inlet, does that mean its getting to much gas?

I pulled out the adjustment screw and scotch brite it, it looked pretty dirty. Also, I gave the carb a thorough cleaning and changed the fuel pump seal before i even started the Kart build.

Hopefully i can get it figured out by tomorrow. Im anxious to get a better and longer test drive. That thing was a blast for about 5 min.
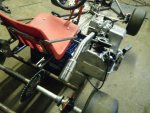
 

redsox985

Active member
Messages
4,092
Reaction score
11
Location
PA
Is that a Briggs flatty 5hp or a KT100? I would love a KT100 on a race kart. They can sound awesome with the right pipe.
 

anderkart

Moderator
Messages
6,426
Reaction score
359
Location
Surprise Arizona USA
Man last time we had symtoms like that it ended up just needing a new spark plug. Cant hurt to start there.

Hey if your front wheels are set toe out, your steering will be all twitchy like that. Try setting it about 1/16' toe-in. If your front end has any slop, give it more toe-in to compensate.
 

rgvkid

Charlie Don't Surf!
Messages
267
Reaction score
1
Location
Los Angeles, Anaheim
Okay, so I put in a new spark plug, cleaned the gas tank again with pebbles in it and shook it around to get as much rust out. The tank looked pretty clean. I recleaned the carb and all the ports again and im still having the same problem. Once i started it up it sounds okay for a bit and it wants to tug forward. If i jump on it and give it throttle it will bog and there won't be any power behind it. I played with the set screw all the way in, 1/2 turn, 1 turn, 1.5 turns and so on and still the same. For some reason i cant get it to idle any lower, it feels like the lever is all the way closed when when i push on it and the screw will actually come off of the adjustment choke. I'll try putting in another fuel pump gasket tomorrow and see what happens. It looked okay to me the second time i cleaned the carb out.

I'll try and post a video of it.
 

rgvkid

Charlie Don't Surf!
Messages
267
Reaction score
1
Location
Los Angeles, Anaheim
I'll give it a try. I just realized today that it had 2 gaskets on it from the carb to the engine. I must have not pulled the old one off when i put the new one in.
 

rgvkid

Charlie Don't Surf!
Messages
267
Reaction score
1
Location
Los Angeles, Anaheim
Yes the brake worked great! It'll feel better once i get new pads. There are 2 bolts holding the caliper to a mount welded to the chassis.
 

anderkart

Moderator
Messages
6,426
Reaction score
359
Location
Surprise Arizona USA
It'll feel better once i get new pads.

Many race karts use metal shims between the brake pads and Calipers piston. These shims are only added to compensate as the pads wear down. If your worried your rotor is too thin, I was thinking you could save some $$$ and just make some shims as long as your old pads still have some lining remaining. These thick sheet metal shims would just need to be shaped and installed just like your pads backing plates.
 

rgvkid

Charlie Don't Surf!
Messages
267
Reaction score
1
Location
Los Angeles, Anaheim
Great tip anderkart. Theres still some meat on the pads but the shims would help it be a bit more responsive.

I still want to try the Toe tip on the front steering as soon as i can get the engine problem figured out. Currently the alignment is set exactly the same in front of tire and back of tire, So what your saying is that the front should be about 1/16-1/8 In comppared to the rear of the tire?
 

anderkart

Moderator
Messages
6,426
Reaction score
359
Location
Surprise Arizona USA
Yep, more toe-in will make it track strait and predictable, but slightly lower turning ability.
More toe-out will Increase steering ability but make it wander, twitchy and unpredictable.
 
Status
Not open for further replies.
Top