You are using an out of date browser. It may not display this or other websites correctly.
You should upgrade or use an alternative browser.
You should upgrade or use an alternative browser.
Dirtbox Venom mini-buggy upgrade/rebuild!
- Thread starter mysteryboy28
- Start date
- Status
- Not open for further replies.
mysteryboy28
New member
i got em from these guys, 25 minutes from my house, cheaper than you can find them online!
http://fcmason.thomasnet.com/viewitems/sprockets/50-chain-weldasprocket?
another good source is these guys. a little pricier, but still a good source.
http://www.surpluscenter.com/powerTrans.asp
i don't use hubs for the 10 tooth sprockets, just weld them straight onto the hex shaped sled jackshaft. a perfect fit after i lightly grind the edges of the hex off.
Not a bad idea really. I have been building jackshafts with weldable hubs welded to the shaft, I guess if I find a 10 tooth sprocket with a 1" id I could just skip the hub. Thanks for the idea. Just might save me $4.i got em from these guys, 25 minutes from my house, cheaper than you can find them online!
http://fcmason.thomasnet.com/viewitems/sprockets/50-chain-weldasprocket?
another good source is these guys. a little pricier, but still a good source.
http://www.surpluscenter.com/powerTrans.asp
i don't use hubs for the 10 tooth sprockets, just weld them straight onto the hex shaped sled jackshaft. a perfect fit after i lightly grind the edges of the hex off.
mysteryboy28
New member
got a few things done.
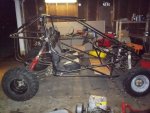
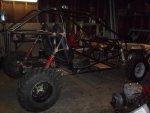
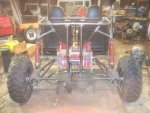
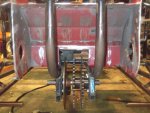
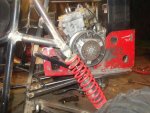
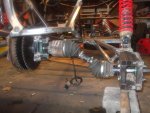
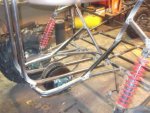
modified the brake caliper bracket so that it would mount properly and be able to grab the rotor with the full surface of the brake pads (was crooked otherwise, butting up against the frame, only grabbing with about 70% of the pads). had considered using the sled brake (leaving it in-tact on the motor), but opted to go the safer route and have a real brake on the axle (drive spool) instead. i also wanted to avoid the expense of running brake line all the way back to the rear caliper, but i think i may have a cost-effective and efficient solution - using the original setup of a 1/4" steel rod running from the brake pedal back to the master cylinder next to the seat, then a hose from that to the caliper. i'll find a way to run front brakes off their own master cylinder.
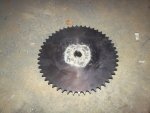
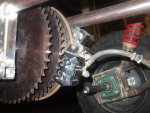
welded the 2 50 tooth sprockets to the weld-a-hubs.
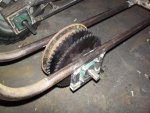
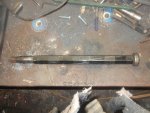
bored out the splines on the rear hubs to 1 inch to accomodate the keyed axle. welded the hubs onto the axles. polished up the axles good so they'd slide into the bearings. still need to trim off the excess, so they only protrude about 1 3/8" for the CV joint hubs to attach to.
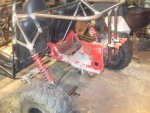
put the 25 inch tires on. one of them has a lovely air leak, which i'm sure is just a bad seal. a trip to an ATV-friendly Belle Tire will take care of that.
plenty of ground clearance for the sprockets and rotor! a good 12 inches!")
modified the brake caliper bracket so that it would mount properly and be able to grab the rotor with the full surface of the brake pads (was crooked otherwise, butting up against the frame, only grabbing with about 70% of the pads). had considered using the sled brake (leaving it in-tact on the motor), but opted to go the safer route and have a real brake on the axle (drive spool) instead. i also wanted to avoid the expense of running brake line all the way back to the rear caliper, but i think i may have a cost-effective and efficient solution - using the original setup of a 1/4" steel rod running from the brake pedal back to the master cylinder next to the seat, then a hose from that to the caliper. i'll find a way to run front brakes off their own master cylinder.
welded the 2 50 tooth sprockets to the weld-a-hubs.
bored out the splines on the rear hubs to 1 inch to accomodate the keyed axle. welded the hubs onto the axles. polished up the axles good so they'd slide into the bearings. still need to trim off the excess, so they only protrude about 1 3/8" for the CV joint hubs to attach to.
put the 25 inch tires on. one of them has a lovely air leak, which i'm sure is just a bad seal. a trip to an ATV-friendly Belle Tire will take care of that.
plenty of ground clearance for the sprockets and rotor! a good 12 inches!
Attachments
-
 100_0349.jpg78.4 KB · Views: 33
 -
 100_0351.jpg112 KB · Views: 32
 -
 100_0355.jpg116 KB · Views: 40
 -
 100_0356.jpg85.7 KB · Views: 41
 -
 100_0360.jpg108 KB · Views: 34
 -
 100_0373.jpg93.5 KB · Views: 57
 -
 100_0371.jpg108.5 KB · Views: 60
 -
 100_0368.jpg74.6 KB · Views: 39
greaser
new here
looks great yep that should be enough clearance for where i will be running, how much sag do you think it will have with the motor in? Did you get the rad yet?
fowler
New member
looking pretty bad ***
Amped
New member
Its looking fantastic. Could we see some more pics of the rearend set up (close up). I like the 2x chain.
mysteryboy28
New member
looks great yep that should be enough clearance for where i will be running, how much sag do you think it will have with the motor in? Did you get the rad yet?
got the radiator 2 days ago (thanks!).
mike's buggy had about 3 inches of droop, but i hadn't adjusted the spring tension on his rear shocks (the harbor freight spring compressors wouldn't work right on 'em) to give it a little more lift. if the shocks droop more than desired, a quick trip to a service place will get em adjusted. however, keep in mind that these aren't $300 Fox Air 2.0 shocks, and you'll probably want to upgrade 'em down the road.
your front shocks are feeling a little soft (with some room to adjust the spring tension, which i CAN do with the spring compressor) - but i kind of like it. lol. when i climb in the buggy it barely sags in front, and it will make the front suspension very responsive. we'll see once everything else gets loaded up.

mysteryboy28
New member
Its looking fantastic. Could we see some more pics of the rearend set up (close up). I like the 2x chain.
what parts would you like to see close-ups of? i've posted quite a few... also did you know that if you click on an image and when it opens up you click on it again - it goes full screen? and when you click the full screen image it can zoom in even more!
greaser
new here
Ok cool yeah the softer front usually makes it a lot easier to handle in the bumps as long as it doesnt bottom but if it has adjustment left it should be good.
mysteryboy28
New member
hacked the big plastic sprockets off the sled jackshaft. there were 4 of them, 2 with 2 metal rings, and 2 with 1. sawzall with a nice long blade eventually did the trick.
i'll need to have the hex jackshaft machined down to 1 1/8", but will need to pull the bearing off the end first so i can slip the 10t sprockets on after it's machined down. the yamahas weren't this much of a pain in my arse. lol.
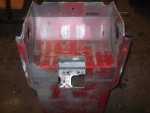
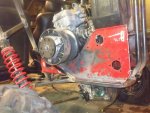
cut out a section of the bottom of the motor mount for the sprockets and rotor to have clearance. trimmed off another inch off the rear of the motor mount so that it would fit nicely in the motor cage, with some room to slide back and forth for chain tension adjustment.
whipped up a couple of pieces to make a mount for the brake caliper mounting bracket on the frame. tacked it in place (maybe a little more than tacked, lol). the pads sit great on the rotor, and the rotor spins freely without any warped grabby weirdness.
i'll need to have the hex jackshaft machined down to 1 1/8", but will need to pull the bearing off the end first so i can slip the 10t sprockets on after it's machined down. the yamahas weren't this much of a pain in my arse. lol.
cut out a section of the bottom of the motor mount for the sprockets and rotor to have clearance. trimmed off another inch off the rear of the motor mount so that it would fit nicely in the motor cage, with some room to slide back and forth for chain tension adjustment.
whipped up a couple of pieces to make a mount for the brake caliper mounting bracket on the frame. tacked it in place (maybe a little more than tacked, lol). the pads sit great on the rotor, and the rotor spins freely without any warped grabby weirdness.
Attachments
-
 DSCF4346.jpg78.2 KB · Views: 34
 -
 DSCF4349.jpg99.5 KB · Views: 31
 -
 DSCF4350.jpg77.2 KB · Views: 29
 -
 DSCF4352.jpg95.2 KB · Views: 36
 -
 DSCF4355.jpg90 KB · Views: 40
 -
 DSCF4360.jpg110.9 KB · Views: 29
 -
 DSCF4359.jpg109.3 KB · Views: 32
 -
 DSCF4358.jpg99.2 KB · Views: 42
 -
 DSCF4356.jpg100.4 KB · Views: 37
greaser
new here
Boy that motor and jack shaft mount almost looks like it was made for it. She is coming along well now.
mysteryboy28
New member
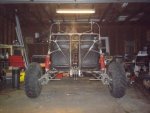
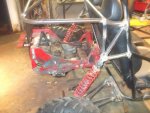
motor mount frame fabbed up and tacked in place. my original idea of making it adjustable for chain tension just wasn't practical with the design of the sled motor mount (2 angles, narrow lip requiring several small bolts to secure it to the buggy, etc.). so we'll see how the chain tension turns out, and slap on a tensioner if needed.
hacked up my first go-kart to salvage some 1" square tube. planning on completely rebuilding that go-kart in the spring for my landlord, with the yamaha phazer 480 56hp motor. will probably make it look like a mini single seater Venom. that thing will fly, especially compared to the little 13hp motor it'll be replacing.
hacked up my first go-kart to salvage some 1" square tube. planning on completely rebuilding that go-kart in the spring for my landlord, with the yamaha phazer 480 56hp motor. will probably make it look like a mini single seater Venom. that thing will fly, especially compared to the little 13hp motor it'll be replacing.
Attachments
-
 DSCF4363.jpg95.2 KB · Views: 43
 -
 DSCF4367.jpg99.2 KB · Views: 38
 -
 DSCF4369.jpg104.3 KB · Views: 41
 -
 DSCF4370.jpg102.7 KB · Views: 37
greaser
new here
Exenos you are right congratulations. Ok now I am getting excited again so hurry up so I can come rip up that place next door to you.
Last edited:
Amped
New member
Looks awesome. Very well thought out. How many hours do you have in a venom start to finish?
exenos
Project Nut
Boy it didnt sag at all but I suppose the motor and mount prob only weigh 40 some pounds huh. Ok now I am getting excited again so hurry up so I can come rip up that place next door to you.
That engine will weigh around 85lbs if not more, my 650 tipple weighs 100 even and my 500 fan is 80lbs and liquids weigh more. Your going to have some stiff suspension there.
mysteryboy28
New member
Looks awesome. Very well thought out. How many hours do you have in a venom start to finish?
too many! especially for what i got paid for 'em.
mysteryboy28
New member
That engine will weigh around 85lbs if not more, my 650 tipple weighs 100 even and my 500 fan is 80lbs and liquids weigh more. Your going to have some stiff suspension there.
actually, once everything is loaded it's pretty soft.
exenos
Project Nut
Eh, a 670 is around 100lbs+ . The only real extra weight in a tipple is from the heavier crank, and even then that's not much. You might have 10-15lbs max on top of a comparable twin.
mysteryboy28
New member
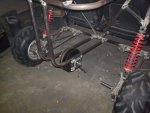
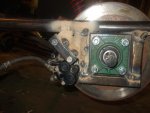
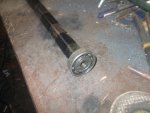
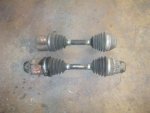
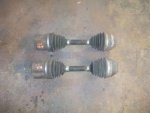
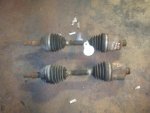
spent a few hours working on the CV axles, and mounting the trailing arm bearings inside the arms rather than outside.
got 3 of the bearings to cooperate, the last one will need to be trimmed down a bit to fit properly. this allows the tires to sit in further, so that they come close to lining up with the front tires, and also allows the CV axles to be over an inch longer.
i hate welding the axles with the boots on after shortening them, but it's such a pain to remove the boots with all that grease inside them. so i weld till the rubber just starts melting, then run to the outdoor faucet (spicket?) and spray it down to cool it off. an interesting sight if anyone might be watching - to see some guy charge across his driveway wearing a welding helmet, gloves, and carrying a CV axle, to turn on his hose.
oh, and now i've got a nice cold going on. started with a sore throat last night, then woke up feeling like my throat had been through a meat grinder, followed by some coughing and some mucus, to now having full blown snotty nose and body aches. we'll see where this goes... wish my kids would leave their germs at school! or maybe it was my wife? this is my second cold in a few months. i'm about ready to live in a bubble...
Attachments
-
 DSCF4384.jpg92.5 KB · Views: 48
 -
 DSCF4382.jpg74.1 KB · Views: 29
 -
 DSCF4380.jpg82.3 KB · Views: 23
 -
 DSCF4375.jpg105.7 KB · Views: 25
 -
 DSCF4374.jpg78.3 KB · Views: 27
 -
 DSCF4385.jpg97.1 KB · Views: 35
- Status
- Not open for further replies.