You are using an out of date browser. It may not display this or other websites correctly.
You should upgrade or use an alternative browser.
You should upgrade or use an alternative browser.
Diamonite Electrathon America Racer
- Thread starter Functional Artist
- Start date
Edwin Spangler
Well-known member
- Messages
- 464
- Reaction score
- 438
You make me want to get into FG... I cant imagine how long it would take to get to this level. I should start.
Functional Artist
Well-known member
Wonderful!You make me want to get into FG... I cant imagine how long it would take to get to this level. I should start.
Tryin' ta inspire others...is (1) of the main reasons that I do alot of this stuff
...& I really enjoy designin' & makin' & showin' folks how ta do stuff...too

&
I really don't need 20+ karts...either
...but, that's a whole other story
Yes...do it!
Come up with "a plan"
...start a thread
...& show us what ya come up with

Functional Artist
Well-known member
Flipped 'er over ta work on the other side

More flangette establishers

More fillet(s)

Closer up(per) view of a curved fillet

Closer up(per) view of a junction fillet

* I kinda "got ahead of myself"
...& drilled 1/4" holes along the perimeter flanges
...so, I "ran" a strip of packing/box tape over 'em

Then gave everything a coat of the PVA


More flangette establishers

More fillet(s)

Closer up(per) view of a curved fillet

Closer up(per) view of a junction fillet

* I kinda "got ahead of myself"
...& drilled 1/4" holes along the perimeter flanges
...so, I "ran" a strip of packing/box tape over 'em

Then gave everything a coat of the PVA

Denny
Canned Monster
Cheap old modeling clay works good to seal the flanges too. And it’s easy to remove!
Functional Artist
Well-known member
Hey Denny,Cheap old modeling clay works good to seal the flanges too. And it’s easy to remove!
Yup, I've seen clay fillets used in many videos (a lot of "rolling snakes")
...& folks using wax for making fillets too (more rolling of material)
I just figured "shooting" fillet material outta a gun would be quicker & more efficient
...& Latex caulk is really easy to find
I was able to just use my finger (to curve the fillets)
...easily cleans up with plain 'ol soap & water
...only costs ~$2.50 a tube
...& whatever fillet material I use, would be coated with PVA

Functional Artist
Well-known member
Did anyone notice the big 'ol scratch/gouge in this pic?

Or the sloppiness of this fillet?

Or on this (4) way junction

Well...I have found that many minor/superficial "issues" like these, can/will be filled in/covered up by/with the PVA (barrier cream)
...so, in this situation "good enough outweighs the need to be perfect"
I have also, found that some "issues" can just be "covered up" with plastic packing/box tape
...like this "screw hole"

Had ta cut more FG cloth
CSM "pile" is on the left
1708 "pile" is on the right

Tools

I went ahead & gave (2) non-adjoining sections
...(3) layers of FG cloth
I layed down a layer of CSM first
...& then, layed a couple of layers of the stronger 1708, on top
Left rear

Right front


Or the sloppiness of this fillet?

Or on this (4) way junction

Well...I have found that many minor/superficial "issues" like these, can/will be filled in/covered up by/with the PVA (barrier cream)
...so, in this situation "good enough outweighs the need to be perfect"
I have also, found that some "issues" can just be "covered up" with plastic packing/box tape
...like this "screw hole"


Had ta cut more FG cloth
CSM "pile" is on the left
1708 "pile" is on the right

Tools

I went ahead & gave (2) non-adjoining sections
...(3) layers of FG cloth
I layed down a layer of CSM first
...& then, layed a couple of layers of the stronger 1708, on top

Left rear

Right front

Functional Artist
Well-known member
After caulking ALL of the "new" seams ta make fillets
...& taping the bolt holes
...I gave the LAST (2) sections a coat of the PVA

So far I've used about 1/2 gallon of the PVA on this "plug" mold
...& just by "bagging" the cup & brush, I've been able to use them for this whole project

I went thru ALL (3) gallons of the resin that I originally bought for this project
...but, "if" ya remember, I used some of this resin, ta make (2) floorboards
...& (2) mini-hoods, this summer
So, I ordered a couple more gallons

Still had plenty of 1708 FG cloth
...but, the (2) gal package w/30' of 1708 cloth
...wasn't much more than just buying (2) gallons of resin
So now, we gots lots more cloth too
Pre-cut...some more cloth (CSM & 1708)

Mixed up some more resin

Gave the last (2) sections (3) layers...too

...& taping the bolt holes
...I gave the LAST (2) sections a coat of the PVA

So far I've used about 1/2 gallon of the PVA on this "plug" mold
...& just by "bagging" the cup & brush, I've been able to use them for this whole project

I went thru ALL (3) gallons of the resin that I originally bought for this project
...but, "if" ya remember, I used some of this resin, ta make (2) floorboards
...& (2) mini-hoods, this summer
So, I ordered a couple more gallons

Still had plenty of 1708 FG cloth
...but, the (2) gal package w/30' of 1708 cloth
...wasn't much more than just buying (2) gallons of resin
So now, we gots lots more cloth too
Pre-cut...some more cloth (CSM & 1708)

Mixed up some more resin

Gave the last (2) sections (3) layers...too

Master Hack
Well-known member
Dang! thats alotta work! Makes my lazy azz want to avoid FG! Scrap tubing, is the material of choice here at MTL!
!
!
Functional Artist
Well-known member
Hey T,Dang! thats alotta work! Makes my lazy azz want to avoid FG! Scrap tubing, is the material of choice here at MTL!
!
I was/have been kinda intimidated (at first)
...but, once ya "wrap your head around it"
...&/then, do it a few times
...it kinda "grows on ya"

All of this was required just ta make the mold
...& its a "good size mold"

...& needed ta be HEAVY DUTY

See why, I did some practice pieces (floorboards & mini-hoods) first
...& DIDN'T make molds for them...just went ahead & made 'em

Now, I should be able ta make a couple of monocoque/bodies "off of/out of it"

...& they should only require a couple of layers overall
...or like, maybe 3 to 4 layers, in certain areas, that may need re-enforcement
I gave ALL (4) sections a couple more layers (5-6 total...just like the top sections)
...&...I'ma finally DONE
More pics

Tail sections

Another view

Flange junction

Closer up(per) view

Other side

Master Hack
Well-known member
Its that smell, that fiberglass smell, it smells like.... oh shyt who cares what it smell like!
its that buzz, that fiberglass buzz....
its that buzz, that fiberglass buzz....
Functional Artist
Well-known member
Functional Artist
Well-known member
ezcome-ezgo
G'me sumthin to write on
Now you just need a 6 foot deep hole and a term life policy. You'll be all set.
Functional Artist
Well-known member
The fastest way to Heaven...is in a Racecar CasketNow you just need a 6 foot deep hole and a term life policy. You'll be all set.

Functional Artist
Well-known member
Functional Artist
Well-known member
Hey,
Why ya got that saw out? (in the last pic)
...are ya makin' another "plug" for a mold?
Nope!
Does anyone remember, earlier this summer, when I mentioned that I was thinkin' about/planning on, installing a steel roof on my house?
...well, that time, has come
To get started, I took another YouTube How to "crash course"
...this time in "how to install a steel panel roof"?
Then, I purchased
...~100 (1' x 4') wooden boards (firring strips)
...(10) 16' steel panels
...(10) 12' steel panels
...(10) pieces of steel ridge cap
...total ~$1,700.00


*Back story
About 10 years ago I/we did a complete tear off
...& installed a new asphalt shingle roof
They were supposed to be 20 year shingles
...but, after only ~10 years we are having issues
...& can't see/find any visible issues
So, I'm going to "cap" this roof with steel panels
...& it should/hopefully, be good-n-solid for years to come
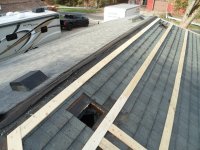
Step (1) laying down some wood

Why ya got that saw out? (in the last pic)
...are ya makin' another "plug" for a mold?
Nope!
Does anyone remember, earlier this summer, when I mentioned that I was thinkin' about/planning on, installing a steel roof on my house?
...well, that time, has come
To get started, I took another YouTube How to "crash course"
...this time in "how to install a steel panel roof"?
Then, I purchased
...~100 (1' x 4') wooden boards (firring strips)
...(10) 16' steel panels
...(10) 12' steel panels
...(10) pieces of steel ridge cap
...total ~$1,700.00


*Back story
About 10 years ago I/we did a complete tear off
...& installed a new asphalt shingle roof
They were supposed to be 20 year shingles
...but, after only ~10 years we are having issues
...& can't see/find any visible issues
So, I'm going to "cap" this roof with steel panels
...& it should/hopefully, be good-n-solid for years to come

Step (1) laying down some wood


Denny
Canned Monster
Want to borrow my nail gun?
Functional Artist
Well-known member
Hey Denny,Want to borrow my nail gun?
I'm not using many nails on this project
...but, thanks for the offer

To create the strongest foundation
...& gain the highest wind (uplift) resistance
...the 1" x 4" x 8' boards, are screwed down with 2 1/2" deck screws
...driven thru the roofing & wooden sheeting, directly into the rafters
...& NOT just into the plywood sheeting
Also, gonna reduce the amount/number of "holes" in the roof
...by eliminating these POS Aluminum roofing vents

According to the instructions
...to vent the roof, ~2" of the sheeting (&/or any shingles) should be cut away/out
...on each side, of the peak, of the roof
...so, ~4" wide, along the entire ridge line
But I'm not gonna do that just yet
...because with the amount of labor required (mainly by me)
...& the cost (also, supplied by me)
...this project will (have ta) be a spread out
...&/or a continuing "work in progress"
So, I'ma gonna try-n-do-it in "sections"

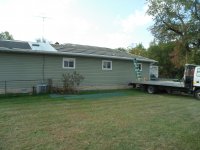
...& this is the side with a leak
Installed wood in the "old vent holes"
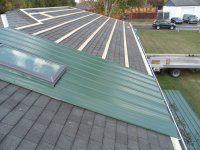
...&/also, covered the areas with some of the roofing (repurposing cap material) that had to come off
...& started installing some of the steel panels too

Closer up(per) view

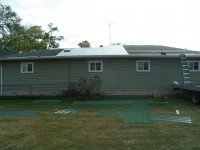
Got a few more panels "in place"
...then, comes the "screwing"
Lots & lots of screws


