Damien

Status
Not open for further replies.

Functional Artist

Well-known member
Messages
5,320
Reaction score
2,782
Location
Toledo, Ohio
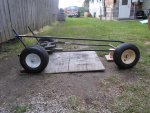
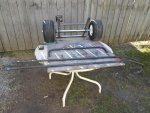
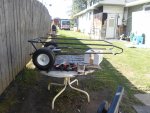
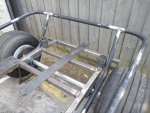
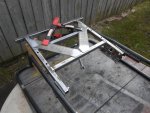
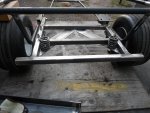
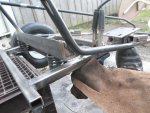
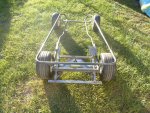
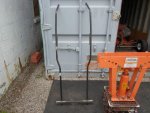
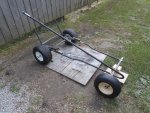
I put the frame in the bender & "tweaked" the rear just a bit (don't wanna over do it)

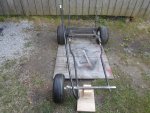
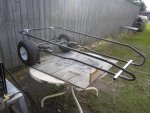
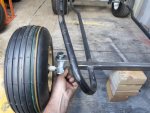
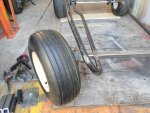
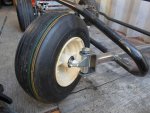
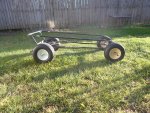
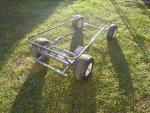
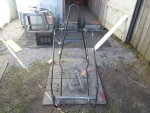
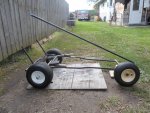
Then, I reassembled the frame & swing arm & "propped a front tire against the axle stub for measurement/test purposes.

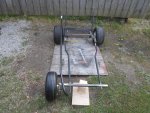
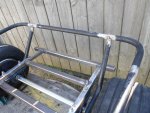
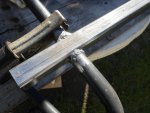
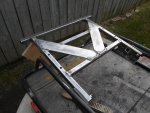
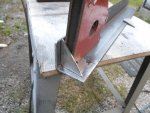
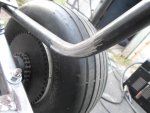
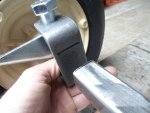
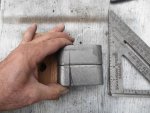
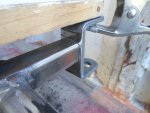
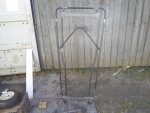
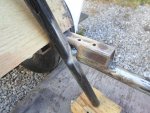
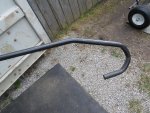
To make the top rail I measured & marked a piece of pipe @ 10 1/2" (to cut off excess), 16" (spot for max bend) & 26" (spot for mild "kick down" bend) :cheers2:

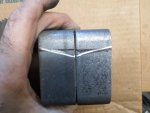
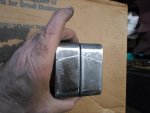
After bending I cut the excess off @ 10 1/2" then slid it onto the alignment stub.

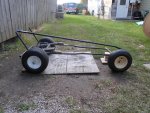
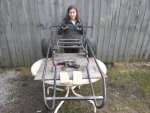
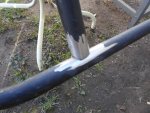
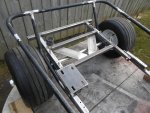
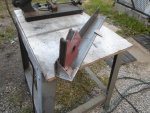
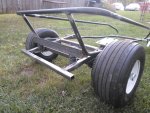
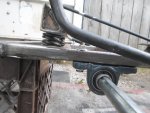
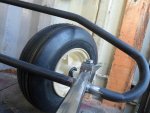
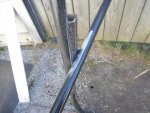
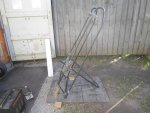
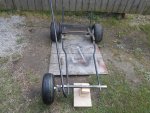
First, standing straight up @ ~90* (but we don't want it that way)

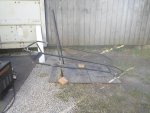
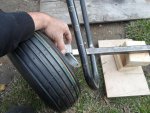
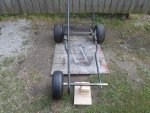
Then, I tilted it outward to ~ a 45* angle. (being sure the tire does not hit/rub)

Yea, that looks better :thumbsup:

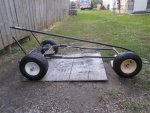
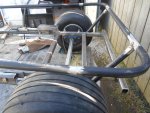
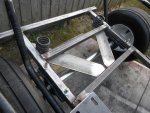
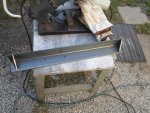
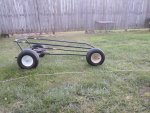
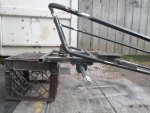
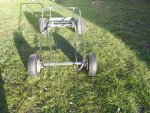
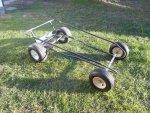
Now, lets see if we can bring it down a bit. (close to where the rear kick ups of the lower frame rail ends)

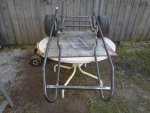
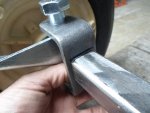
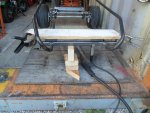
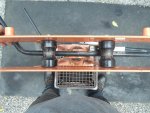
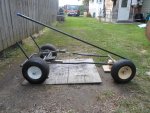
I put 'er in the bender @ the 26" mark (making sure it was square with the bender) & then put a nice little bend in 'er. (~10 pumps) :2guns:
 

Attachments

  • SAM_2376.jpg
    SAM_2376.jpg
    334.3 KB · Views: 7
  • SAM_2377.jpg
    SAM_2377.jpg
    307.9 KB · Views: 7
  • SAM_2401.jpg
    SAM_2401.jpg
    587.7 KB · Views: 8
  • SAM_2400.jpg
    SAM_2400.jpg
    584.6 KB · Views: 7
  • SAM_2399.jpg
    SAM_2399.jpg
    418.1 KB · Views: 7
  • SAM_2398.jpg
    SAM_2398.jpg
    517 KB · Views: 7
  • SAM_2396.jpg
    SAM_2396.jpg
    599.8 KB · Views: 8
  • SAM_2402.jpg
    SAM_2402.jpg
    540.7 KB · Views: 8
  • SAM_2404.jpg
    SAM_2404.jpg
    306.5 KB · Views: 7
  • SAM_2414.jpg
    SAM_2414.jpg
    521.4 KB · Views: 6

Functional Artist

Well-known member
Messages
5,320
Reaction score
2,782
Location
Toledo, Ohio
First I tried (5) pumps, then (10) pumps & finally ~13 pumps was the winner. :thumbsup:

Looks good from a top view too. :2guns:

Next, I gotta make another one & then a rollbar/seatback. :cheers2:
 

Attachments

  • SAM_2411.jpg
    SAM_2411.jpg
    506.3 KB · Views: 7
  • SAM_2410.jpg
    SAM_2410.jpg
    569.5 KB · Views: 6
  • SAM_2409.jpg
    SAM_2409.jpg
    544.9 KB · Views: 6
  • SAM_2407.jpg
    SAM_2407.jpg
    502.7 KB · Views: 7
  • SAM_2406.jpg
    SAM_2406.jpg
    558 KB · Views: 7
  • SAM_2413.jpg
    SAM_2413.jpg
    442.2 KB · Views: 5
  • SAM_2412.jpg
    SAM_2412.jpg
    516.3 KB · Views: 6
  • SAM_2415.jpg
    SAM_2415.jpg
    235.1 KB · Views: 7

Functional Artist

Well-known member
Messages
5,320
Reaction score
2,782
Location
Toledo, Ohio
I did some (lots) more bendin' :thumbsup:

Then, some assemblin'& measurin' & markin' & trimmin' & tweakin' & adjustin' & cleanin' & smoothin' & tackin'

My little Desteny gave me a hand :cheers2:
('cause some stuff is just too difficult to be clamped) :ack2:

After everything was "tack'ed", I did a lot of double check measurin' & eyein'

Yup, everything looks good so, I took 'er back apart again (for like the 40th time) & welded everything up good :2guns:
 

Attachments

  • SAM_2420.jpg
    SAM_2420.jpg
    359 KB · Views: 13
  • SAM_2418.jpg
    SAM_2418.jpg
    422.4 KB · Views: 6
  • SAM_2428.jpg
    SAM_2428.jpg
    392.7 KB · Views: 6
  • SAM_2427.jpg
    SAM_2427.jpg
    452.3 KB · Views: 6
  • SAM_2421.jpg
    SAM_2421.jpg
    229.7 KB · Views: 6
  • SAM_2431.jpg
    SAM_2431.jpg
    456.6 KB · Views: 8
  • SAM_2436.jpg
    SAM_2436.jpg
    373.5 KB · Views: 7
  • SAM_2439.jpg
    SAM_2439.jpg
    371.5 KB · Views: 9
  • SAM_2444.jpg
    SAM_2444.jpg
    429.1 KB · Views: 7
  • SAM_2447.jpg
    SAM_2447.jpg
    388.6 KB · Views: 7

Functional Artist

Well-known member
Messages
5,320
Reaction score
2,782
Location
Toledo, Ohio
Yup, it looks like a "sleigh", but all of our joints are nice-n-tight (ha, ha, I said joint) :lolgoku:

Then, I noticed I forgot to slide the upper spring striker/mount/bar/thing, on the rear uprights. :censored: :censored:

We'll get back to that :thumbsup:

The springs are to mount even with the bottom of the battery box & we need a lower support for the batteries, so we'll go "dual purpose"

A couple of 1/8" x 2" metal strips, welded on angles, will be strong, light weight & dual purpose :2guns:
 

Attachments

  • SAM_2469.jpg
    SAM_2469.jpg
    390 KB · Views: 4
  • SAM_2468.jpg
    SAM_2468.jpg
    405.3 KB · Views: 5
  • SAM_2467.jpg
    SAM_2467.jpg
    424.5 KB · Views: 4
  • SAM_2456.jpg
    SAM_2456.jpg
    283.6 KB · Views: 4
  • SAM_2453.jpg
    SAM_2453.jpg
    378.5 KB · Views: 6
  • SAM_2470.jpg
    SAM_2470.jpg
    383.8 KB · Views: 5
  • SAM_2471.jpg
    SAM_2471.jpg
    331.3 KB · Views: 5
  • SAM_2472.jpg
    SAM_2472.jpg
    360 KB · Views: 6
  • SAM_2473.jpg
    SAM_2473.jpg
    343.5 KB · Views: 6

Functional Artist

Well-known member
Messages
5,320
Reaction score
2,782
Location
Toledo, Ohio
Springs

This ones not a "hard tail", we have a springer :thumbsup:

I made a new spring "striker bar" & added a couple of small braces. :cheers2:

I mounted the springs onto the spring mounts & prepped the frame for welding.

Next, I propped up the frame (to the proper height), lined the spring striker bar & welded 'er on good-n-solid. :2guns:
 

Attachments

  • SAM_2479.jpg
    SAM_2479.jpg
    283.9 KB · Views: 2
  • SAM_2480.jpg
    SAM_2480.jpg
    334 KB · Views: 2
  • SAM_2477.jpg
    SAM_2477.jpg
    289.8 KB · Views: 2
  • SAM_2476.jpg
    SAM_2476.jpg
    429.7 KB · Views: 2
  • SAM_2475.jpg
    SAM_2475.jpg
    504.4 KB · Views: 2
  • SAM_2485.jpg
    SAM_2485.jpg
    253.2 KB · Views: 2
  • SAM_2484.jpg
    SAM_2484.jpg
    334.9 KB · Views: 3
  • SAM_2483.jpg
    SAM_2483.jpg
    265.9 KB · Views: 2
  • SAM_2481.jpg
    SAM_2481.jpg
    233.3 KB · Views: 2

Functional Artist

Well-known member
Messages
5,320
Reaction score
2,782
Location
Toledo, Ohio
Here are more pics (with suspension) from a few different angles :thumbsup:

The springs should only "give" ~1" but, we have lots more clearance above the rear wheels.

The front wheel is just "propped" there for "the look" & checking the "stance" of the kart :cheers2:
 

Attachments

  • SAM_2492.jpg
    SAM_2492.jpg
    402.4 KB · Views: 3
  • SAM_2491.jpg
    SAM_2491.jpg
    436 KB · Views: 5
  • SAM_2488.jpg
    SAM_2488.jpg
    277.9 KB · Views: 3
  • SAM_2487.jpg
    SAM_2487.jpg
    296.8 KB · Views: 4
  • SAM_2486.jpg
    SAM_2486.jpg
    378.6 KB · Views: 3
  • SAM_2493.jpg
    SAM_2493.jpg
    386.5 KB · Views: 4

Functional Artist

Well-known member
Messages
5,320
Reaction score
2,782
Location
Toledo, Ohio
Mounting the spindle mounts

Once we know where the rear is gonna be, we can set up the front.

I sat the front of the kart up on a stack of 2" x 4"s, till I had it at a nice stance.
The frame in the rear was ~6" off of the ground & the front was ~4"

With the frame "sloped downward" like this, the front axle was on an angle too, so we'll have to "overcompensate" just a bit to figure the "proper inclination". :thumbsup:

I started with the right spindle mount, set/marked it (with a sharpie) square at first (just as a reference)
Then, I marked it @ ~85* & marked the left "to match", but opposite :cheers2:

Put 'em in the vise (one at a time) & used the "handy dandy" cut-off tool to "permanently scar 'em".
This way I could clean them up, for proper welding & still see my lines :2guns:
 

Attachments

  • SAM_2500.jpg
    SAM_2500.jpg
    204.3 KB · Views: 3
  • SAM_2499.jpg
    SAM_2499.jpg
    230.7 KB · Views: 3
  • SAM_2498.jpg
    SAM_2498.jpg
    233 KB · Views: 3
  • SAM_2497.jpg
    SAM_2497.jpg
    297.7 KB · Views: 4
  • SAM_2496.jpg
    SAM_2496.jpg
    330.2 KB · Views: 3
  • SAM_2501.jpg
    SAM_2501.jpg
    244.6 KB · Views: 5
  • SAM_2505.jpg
    SAM_2505.jpg
    402.7 KB · Views: 3
  • SAM_2508.jpg
    SAM_2508.jpg
    235 KB · Views: 3
  • SAM_2511.jpg
    SAM_2511.jpg
    223 KB · Views: 3
  • SAM_2514.jpg
    SAM_2514.jpg
    215.1 KB · Views: 3

Tpdingo

Member
Messages
902
Reaction score
8
Location
Bellmore, NY
Once we know where the rear is gonna be, we can set up the front.

I sat the front of the kart up on a stack of 2" x 4"s, till I had it at a nice stance.
The frame in the rear was ~6" off of the ground & the front was ~4"

With the frame "sloped downward" like this, the front axle was on an angle too, so we'll have to "overcompensate" just a bit to figure the "proper inclination". :thumbsup:

I started with the right spindle mount, set/marked it (with a sharpie) square at first (just as a reference)
Then, I marked it @ ~85* & marked the left "to match", but opposite :cheers2:

Put 'em in the vise (one at a time) & used the "handy dandy" cut-off tool to "permanently scar 'em".
This way I could clean them up, for proper welding & still see my lines :2guns:

Great job so far, I'm loving this build. No more of the got milk? posters, gotta go for the got kingpin angle? posters.
Also...plus 100 dad points for having Desteny help you.:thumbsup:
 

Functional Artist

Well-known member
Messages
5,320
Reaction score
2,782
Location
Toledo, Ohio
Great job so far, I'm loving this build. No more of the got milk? posters, gotta go for the got kingpin angle? posters.
Also...plus 100 dad points for having Desteny help you.:thumbsup:

Thanks & yup, we got kingpin angle :thumbsup:

Desteny's always been my helper buddy. :wai:

But, I've noticed as she gets closer to a teenager, I now get the 3rd degree (a lot)

...how long is this gonna take?

...am I gonna get dirty?
...is there gonna be fire?...or sparks? :smiley_omg:

I give the same answers every time

...it's gonna take as long as it's gonna take

...if it ain't dirty, it ain't fun
...you got a problem with fire? :lolgoku:
 

Functional Artist

Well-known member
Messages
5,320
Reaction score
2,782
Location
Toledo, Ohio
Let's get'em welded on :thumbsup:

I started on the right side, held the bracket at the line, double checked the angle & tack'ed 'er on

To help line up the left side, (we have a line, but just to be sure) I clamped a short board to the top of the right (tacked) spindle bracket & also propped it up with a couple pieces of pipe.
Yup, it's pretty close to our line :cheers2:

Then, I tacked 'er down, unclamped the board & double checked everything. (angles, forward & backward turning radius & height clearance.
Yup, looks good so far, so I went ahead & welder 'er on good. :2guns:
 

Attachments

  • SAM_2522.jpg
    SAM_2522.jpg
    232.5 KB · Views: 4
  • SAM_2521.jpg
    SAM_2521.jpg
    223.7 KB · Views: 4
  • SAM_2518.jpg
    SAM_2518.jpg
    359.3 KB · Views: 4
  • SAM_2516.jpg
    SAM_2516.jpg
    289.1 KB · Views: 5
  • SAM_2515.jpg
    SAM_2515.jpg
    286.2 KB · Views: 4
  • SAM_2523.jpg
    SAM_2523.jpg
    380.6 KB · Views: 5
  • SAM_2525.jpg
    SAM_2525.jpg
    369 KB · Views: 6
  • SAM_2526.jpg
    SAM_2526.jpg
    338 KB · Views: 8
  • SAM_2527.jpg
    SAM_2527.jpg
    362.7 KB · Views: 6
  • SAM_2528.jpg
    SAM_2528.jpg
    271.2 KB · Views: 5

Functional Artist

Well-known member
Messages
5,320
Reaction score
2,782
Location
Toledo, Ohio
I like your attention to detail! There is lots that people can learn from this thread

Thanks :thumbsup:

Yup, details make a big difference
…& sometimes (1) little detail can even make ya or break ya :cheers2:

Here are some pics after installing the front spindles & wheels.

First one kinda looks like a bath tub on wheels :smiley_omg:
 

Attachments

  • SAM_2538.jpg
    SAM_2538.jpg
    908 KB · Views: 5
  • SAM_2537.jpg
    SAM_2537.jpg
    891 KB · Views: 7
  • SAM_2536.jpg
    SAM_2536.jpg
    839.1 KB · Views: 6
  • SAM_2535.jpg
    SAM_2535.jpg
    801.4 KB · Views: 4
  • SAM_2534.jpg
    SAM_2534.jpg
    718 KB · Views: 5
  • SAM_2539.jpg
    SAM_2539.jpg
    794.3 KB · Views: 4
  • SAM_2540.jpg
    SAM_2540.jpg
    861.8 KB · Views: 5

Tpdingo

Member
Messages
902
Reaction score
8
Location
Bellmore, NY
Everything looks great...except one thing. What is with the mismatches wheels. I want them all WHITE! Did you rob parts again for test fitting?

Although it does kinda look like a bathtub on wheels for people who lay down the entire time. :lolgoku:
 

Functional Artist

Well-known member
Messages
5,320
Reaction score
2,782
Location
Toledo, Ohio
Everything looks great...except one thing. What is with the mismatches wheels. I want them all WHITE! Did you rob parts again for test fitting?

Although it does kinda look like a bathtub on wheels for people who lay down the entire time. :lolgoku:

Tryin' to keep 'er light. (thinkin' outside of the box)

The front wheels are composite (some kinda rugged plastic) wheel barrow wheels.
They only weigh a couple of lbs. & are $6.95 ea.
https://www.surpluscenter.com/Wheel...0-6-Carlisle-Wheel-Tire-Assembly-1-116259.axd

I use them on the Torsk kart with no issues. :2guns:
 

Tpdingo

Member
Messages
902
Reaction score
8
Location
Bellmore, NY
Tryin' to keep 'er light. (thinkin' outside of the box)

The front wheels are composite (some kinda rugged plastic) wheel barrow wheels.
They only weigh a couple of lbs. & are $6.95 ea.
https://www.surpluscenter.com/Wheel...0-6-Carlisle-Wheel-Tire-Assembly-1-116259.axd

I use them on the Torsk kart with no issues. :2guns:
Oh ok.

May I request something?
Can you put some white paint on like the front wheels?
I doubt the difference is going to I've the difference between painted and unpainted will be any more than negligable.
 

Functional Artist

Well-known member
Messages
5,320
Reaction score
2,782
Location
Toledo, Ohio
Oh ok.

May I request something?
Can you put some white paint on like the front wheels?
I doubt the difference is going to I've the difference between painted and unpainted will be any more than negligable.

Yup, shouldn't be a problem. :thumbsup:

These wheels come ready to go right out of the box.

But, they come with rounded wheelbarrow style tires & bushings, instead of bearings.
I guess most wheelbarrows don't do over 10 MPH. :lolgoku:
 

Tpdingo

Member
Messages
902
Reaction score
8
Location
Bellmore, NY
I guess most wheelbarrows don't do over 10 MPH. :lolgoku:
Challenge Accepted.:roflol:

Ok I came up with an idea that I think it would be totally sick if you did, but it's totally up to you.
Ever see the Razor Spark scooter? The ones with the spark cartidge on the back that is nothing more than an oversized lighter igniter. Anyway, you should mount two carts right behind the back tires and make some kind of lever to let the carts down.
Damien sparkin' in style! :cool:
 

Functional Artist

Well-known member
Messages
5,320
Reaction score
2,782
Location
Toledo, Ohio
Now for the operator compartment.

We need to maximize the space we have to work with, so we'll start at the rear & work our way forward.

I sat the motor on the motor mount (slid all of the way forward) so I could mark where to mount "my signature" roll/bar seatback, leaving ~1/2" of extra clearance space. (just to be sure) :thumbsup:

I set the angle of the seat back @ ~80* (tilted toward the rear) & made sure that the overall height will be ~40" when done & with the wheels on.

After a couple of tack's & some double checkin' I took 'er all apart again.

Once it was a bare frame, I went ahead & welded 'er on good. :2guns:

* We'll use a little bit of them bars (hangin' down) to connect the floor pan & then trim off the excess. :cheers2:
 

Attachments

  • SAM_2554.jpg
    SAM_2554.jpg
    345.8 KB · Views: 3
  • SAM_2552.jpg
    SAM_2552.jpg
    330.9 KB · Views: 3
  • SAM_2553.jpg
    SAM_2553.jpg
    436.9 KB · Views: 3
  • SAM_2550.jpg
    SAM_2550.jpg
    272.5 KB · Views: 6
  • SAM_2549.jpg
    SAM_2549.jpg
    327 KB · Views: 3
  • SAM_2555.jpg
    SAM_2555.jpg
    276.1 KB · Views: 3
  • SAM_2557.jpg
    SAM_2557.jpg
    363.8 KB · Views: 3
  • SAM_2559.jpg
    SAM_2559.jpg
    480.4 KB · Views: 3
  • SAM_2558.jpg
    SAM_2558.jpg
    403.3 KB · Views: 3
Status
Not open for further replies.
Top