Budget build-off kart for work

Status
Not open for further replies.

anickode

Active member
Messages
2,296
Reaction score
54
Location
S.E. Michigan
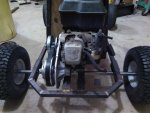
The course is a 1 mile circuit on a mix of asphalt, packed gravel, and grass. Lots of turns, but none that are super tight. Certain legs of the course are uphill, topping out at a 40% grade for 200 yards. That's the main reason we decided torque converter, otherwise we'd all have to gear for like a 15- 20mph top speed to be able to climb.
 

anickode

Active member
Messages
2,296
Reaction score
54
Location
S.E. Michigan
I redid the seat this evening. Got rid of that worthless closed cell foam and switched to some 3" thick foam rubber cushion. Softest go kart seat ever. It's so comfy to sit on, I might just put this frame in the living room in front of the TV and start over again on the kart. :roflol:

As easy as it is to make a seat, I couldn't justify ever purchasing one. At least not for a yard kart that just uses a simple foam-over-plywood seat. This one took 20 minutes. Granted it looks like it took 20 minutes, but with a little more time, and some better cloth such as a hunk of vinyl from the craft store, professional looking results are well within the reach of the hobbyist, at a significantly lower cost. Just keep an eye out for old sofa cushions. Cheap foam mattress toppers are a great source for foam too, and provide enough material to make many seats.
 

Attachments

  • IMG_20170904_213253.jpg
    IMG_20170904_213253.jpg
    294.1 KB · Views: 6

anickode

Active member
Messages
2,296
Reaction score
54
Location
S.E. Michigan
In the spirit of the budget build, I am going to forego spending $50+ on an axle. Instead, I pulled a chunk of 1" OD by .250 wall seamless a-513 steel off the rack. (Same stuff my spindles are made with) I will hand cut keyways for the sprocket, brake, and wheels, and tap 9/16" threads into the bore for wheel retaining bolts. The tolerances on this stuff are very good, and even though it's hollow, it should be stronger than a cheap 1" mild steel axle. I'll probably hot blue it to help prevent rusting. I thought about paint, but it would make assembly/disassembly difficult.
 

anickode

Active member
Messages
2,296
Reaction score
54
Location
S.E. Michigan
A bit of Emery cloth and some scotch Brite, and it's a beautiful axle.

Got the mounts squared up and tacked in place.
 

Attachments

  • IMG_20170913_205948.jpg
    IMG_20170913_205948.jpg
    254.8 KB · Views: 12

bob58o

SuckSqueezeBangBlow
Messages
9,659
Reaction score
1,731
Location
Chicago-town USA
I'd go for sabotage. Loosen up the ignition ground. Widen the valve lash. Petroleum Jelly coating the inside of the air filters. You know, good clean fun.
 

anickode

Active member
Messages
2,296
Reaction score
54
Location
S.E. Michigan
I love it when things work out. Fits so nicely you'd almost think I had a plan.
 

Attachments

  • IMG_20171018_205751.jpg
    IMG_20171018_205751.jpg
    255.4 KB · Views: 17
  • IMG_20171018_205817.jpg
    IMG_20171018_205817.jpg
    211 KB · Views: 15

anickode

Active member
Messages
2,296
Reaction score
54
Location
S.E. Michigan
Last of the store-bought parts on the way from MFG supply (sprocket and hub)

Have yet to build:

Brakes
Pedals
Floor pan
 

anickode

Active member
Messages
2,296
Reaction score
54
Location
S.E. Michigan
Bolted on some noise this evening. Stock muffler just wasn't going to do.

I have a tendency to save any bits of metal with interesting bends that pass through my shop, which works out real nice for slapping together fast cheapo headers. Diameter goes from .810 (dead nuts identical to stock) for the first bend (the shiny bit) to .875 for the middle section, then to 1.05 for the last part. It's about the same diameter increases as the rat wagon has, but a shorter overall length.

Or, for those who are curious, it goes from chair leg to rototiller handle to futon frame. The diameters and wall thickness stacked up nicely. Just gotta strip the current paint off and shoot it with some BBQ black. I will probably header wrap the first bit that is near the gas tank. Either that, or make a heat shield.

I really prefer the sound of a long header, and something about the 3 step diameter just gives it a hellacious beastly sound, compared to just a straight pipe of equal length.
 

Attachments

  • IMG_20171023_221426.jpg
    IMG_20171023_221426.jpg
    272.1 KB · Views: 23

anickode

Active member
Messages
2,296
Reaction score
54
Location
S.E. Michigan
<iframe width="560" height="315" src="https://www.youtube.com/embed/0Eex1cNaXsE" frameborder="0" gesture="media" allowfullscreen></iframe>

Let's see if that works.

---------- Post added at 05:34 PM ---------- Previous post was at 05:34 PM ----------

Ehhh nope.

---------- Post added at 06:23 PM ---------- Previous post was at 05:34 PM ----------

Well since I seem to be useless at embedding videos here's a link...

https://youtu.be/0Eex1cNaXsE

Sprocket came in... Couldn't resist, so I put it on, cut a chain, clamped the motor down, and gave it a spin.

Sorry about the vid... My phone is built for durability, not A/V quality
 
Status
Not open for further replies.
Top