Briggs 5Hp L Head Build Thread!!!

Status
Not open for further replies.

OldStrattonMan

New member
Messages
40
Reaction score
6
Location
Baton Rouge Cajun Baby
I've decided to do a mild build on a 130202-0523-01 Briggs that I got from my uncle that was just sitting in the shed. My little boy has begged me for 2 years now wanting a minibike so I thought now is the perfect time to do it. The engine is in great shape just a little surface rust on the shroud, still has the original cross hatch in the bore and just overall a well cared for little engine. My plans are to do a complete restoration and rebuild of the little guy. A few things to note I'll be doing is re-ringing, stock ARC Billet rod, dyno 94ss cam, bigger springs, intake and exhaust port and polish, trim the eyes down. I'm a well rounded mechanic but I will say I'm learning more everyday about this little engine, so I'm gonna ask yall to hang around for the ride and on the same note I'm sure I'll need some good help from you guys. Let's get this thing started. Pics will come soon, I'm still waiting on a few things to really dive into it so alot of painting will take place first.:2guns:
 

Hellion

Moderator
Messages
8,880
Reaction score
3,889
A nice, dirty, rusty, disorganized (and disassembled) 'before' pic is always nice. So don't hit the painting stage just yet.

When you run across one that was maintained well, it's always shocking when you see the insides--almost zero wear-tear. :eek:
 
Last edited:

OldStrattonMan

New member
Messages
40
Reaction score
6
Location
Baton Rouge Cajun Baby
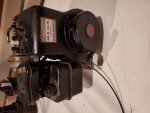
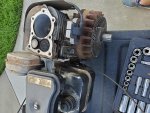
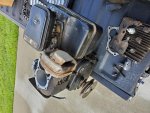
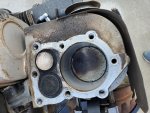
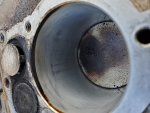
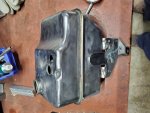
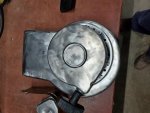
Here is some photos showing the state it's in. Like I said for being 40 years old to me it's in fabulous shape, sure there is some carbon build up but looks to me like it was kept in very good shape and always maintained. Tomorrow I'm going to start dismantling this baby and strip it down to metal and start painting. I do have a question to ask though and that is do yall think it is fine to sand blast the head and block with low pressure to speed up the process. I have access to a parts washer and pressure washer to clean it up but just not sure if it's a good idea or not. And if someone can please tell me why all my photos are sideways I have no clue why it's doing that.
 

Attachments

  • 20190519_000710.jpg
    20190519_000710.jpg
    169.1 KB · Views: 17
  • 20190518_181839.jpg
    20190518_181839.jpg
    495.7 KB · Views: 13
  • 20190518_181850.jpg
    20190518_181850.jpg
    485.9 KB · Views: 11
  • 20190518_181832.jpg
    20190518_181832.jpg
    422.9 KB · Views: 15
  • 20190518_181826.jpg
    20190518_181826.jpg
    316 KB · Views: 19

Hellion

Moderator
Messages
8,880
Reaction score
3,889
Ow, my neck! Those pics... :p

Did you use a mobile phone to take the pics? Otherwise, it's obvious you took the pics in portrait orientation, and while we've bashed the subject to death and described remedies for it or what to do, I don't remember what it was. I don't have that problem.

I have heard of people sandblasting the blocks clean but I have never done it.
Actually they didn't use sand, but glass beads or something else less harsh. I think you have to avoid things like the spark plug hole and other threaded areas so as not to degrade the threads.

These blocks get DIRTY and sorta dirt stained especially in the cooling fins and I hate it, but oh well.
 

Hellion

Moderator
Messages
8,880
Reaction score
3,889
My thing is to have all the cooling fins unpainted/bare aluminum and as clean as possible, thinking that they are more optimal for cooling than painted.

I went hog wild and sanded or filed off all the casting 'flash' and burrs left on the block on one of mine. There's almost no limit to what you can do.
 

Texan

Senor Member
Messages
461
Reaction score
11
Location
Deep In The Heart of Texas
If you sand or glass bead blast your engine (exterior only of course) it will come out looking clean & uniform, but....the aluminum surface will have a gritty surface.

This is ok if you are going to paint it, but not if you want to leave the aluminum bare.

The gritty surface attracts dirt & oil and allows them to embed themselves in all the microscopic nooks and crannies the blasting has created.

I would suggest using walnut shell media if you are going to blast it.
 

JTSpeedDemon

2019 Build Off Winner!
Messages
4,026
Reaction score
162
Location
Texas
Uhmm, are you going to put a billet flywheel on there? I know they're expensive, but with a billet rod and heavier valve springs, I'm kinda worried about your son's safety...
I assume you'll remove the governor.
 

Kentucky Boy

Member
Messages
611
Reaction score
49
Location
Bowling Green, KY
If it’s in good shape and well maintained why are you putting new rings in? Are the original ones bad? Have you measured the ring gap? Is it smoking? Not sure what year that is but if it has a kool bore ive read a lot of info about not honing them. If it’s a kool bore you will need chrome rings.
 

OldStrattonMan

New member
Messages
40
Reaction score
6
Location
Baton Rouge Cajun Baby
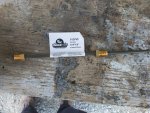
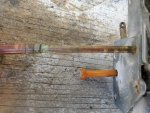
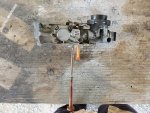
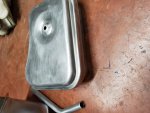
So I started busting this thing apart and when I got the carburetor off I sprayed some cleaner down the longer pickup tube and notice I had a crack in the upper metal portion. So I found out today that you can only purchase the plastic part with the screen, the metal part is not available. So I dug into it some and found out that 3/16 brake tubing will fit. So if anyone that is following this build along make sure to check your pickup tube for a hairline crack, if not fixed it will not run right when the tank gets to about half full. All you need to do is grab some pliers and twist it out, it is just basically press fit in. More pics and content will come as I put it together
 

Attachments

  • 20190523_095832.jpg
    20190523_095832.jpg
    656.9 KB · Views: 10
  • 20190523_095804.jpg
    20190523_095804.jpg
    546 KB · Views: 11
  • 20190523_095737.jpg
    20190523_095737.jpg
    636 KB · Views: 11

OldStrattonMan

New member
Messages
40
Reaction score
6
Location
Baton Rouge Cajun Baby
JT SpeedDemon yes I think I am going to bite the bullet and buy one I've read to many bad things and you are right I don't want to put my boy in any danger at all. And yes sir the governor is coming out

---------- Post added at 04:54 PM ---------- Previous post was at 04:50 PM ----------

KentuckyBoy I'm am putting new rings just because I'm doing a complete rebuild, no it probably doesnt need it but I'm doing it anyway. And the stock rings are not chrome and when you look up the part for this engine it shows steel rings. People say you can't hone them but it is perfectly fine it's just all in the prep and cleanup before installing the new stuff. So don't listen to people saying you can't hone a koolbore it's done all the time. This is a 1979 model 130202
 

Dingocat

Broke
Messages
722
Reaction score
171
Location
NE Ohio
I stole one off another carburetor I had, it ran fine until I got the debris out of the crack lol. it was on my dingo which had the 2nd worst gas tank I've seen. It could have been the reason they parked it.
 

Hellion

Moderator
Messages
8,880
Reaction score
3,889
Stay away from ethanol gasoline in any concentration, Dingocat ^^ :ack2:

...So I dug into it some and found out that 3/16 brake tubing will fit...

There's a YouTuber called Taryl Fixes All that has done a fabulous video on how to fix Pulsa-Jet carbs and mentions the use of that same tubing. I suspect that's where you got that from. :thumbsup:
 

OldStrattonMan

New member
Messages
40
Reaction score
6
Location
Baton Rouge Cajun Baby
You are very correct sir, I've learned a few tricks from that ol dude. Randy that is a very good article and just further shows that its perfectly fine to hone a kool bore block, but I will say I want be doing anywhere close to the precision that guys does, I'm just gonna do a simple hone job and let er rip.
 

OldStrattonMan

New member
Messages
40
Reaction score
6
Location
Baton Rouge Cajun Baby
Started pulling parts off today to prep for paint, what I did was bought some paint stripper in a spray can and that really helped get most of the paint off. I would spray the stripper on let it sit for about 5 mins and then take it to the parts washer to clean it off, if you don't have access to a parts washer a regular wire brush works well also and just clean it afterwards in a bucket or outdoor sink. Then I used a cup style wire wheel on a die grinder to really bring it down to shiny metal, ohh and did I mention I absolutely hate doing the prep work for painting it takes forever and sometimes is tedious work and boring. For some reason in my lifetime I have never been very good at painting things and I think its because I would skimp out of the prep work and do a half butt job, but I am really going to take my time with this and really clean the surface before I start laying primer and paint down. I've always tried to rush things because I'm antsy but I'm putting heart into this one. I went with VHT engine enamel for my paint choice so hopefully it will do an ok job I'm sure others will say there is better options out there but again I really think it boils down to the prep job. Hopefully by the end of next week alot of my parts will start coming in so we can start the fun stuff. Hope everyone enjoys there weekend and I'll see yall back early next week with some more fun stuff.

:cheers2:
 

Attachments

  • 20190522_075509.jpg
    20190522_075509.jpg
    322.7 KB · Views: 7
  • 20190522_154326.jpg
    20190522_154326.jpg
    340.3 KB · Views: 7
  • 20190522_075518.jpg
    20190522_075518.jpg
    418.9 KB · Views: 6
Status
Not open for further replies.
Top