Baja 200 update

Status
Not open for further replies.

Hellion

Murderator
Messages
9,094
Reaction score
4,077
But if I'm not taking it to top speeds, it shouldn't self destruct, right?

It's just a risk that's not worth taking for some. The governor may very well last the life of the engine...


chancer

ɔ ɥ ɐ u ɔ ǝ ɹ
Messages
9,358
Reaction score
93
Location
COMFORT, TEXAS
Naw it wont self destruct if you are taking it easy.
All these warnings are 100% true. But most guys remove the governor for the sole purpose of achieving max RPMs and speed. So lazy, Dumb, young guys bypass the linkages to go fast and break their engine. Unless you are holding that thing WFO alot, you will probably be fine.
I NEVER tell anyone to do this.

BTW: The plastic gov, gear is made to run at 3600 RPM, Stock valve float is 5300-5500 (depending) so Valve float would not save the Gov gear from breaking.
The engine itself is not harmed... yet. It is the piecesof the internal gov gear when Broken that will break the engine internals.

Now guys will probably yell at me for typing this bad advice.
 

Poboy kartman

Senior Moments Member
Messages
12,461
Reaction score
69
Location
White Settlement Texas
But if I'm not taking it to top speeds, it shouldn't self destruct, right?

Then why alter the governor? I've said this before...but it's not how LONG you run an engine above the breaking point...it only takes ONE REVOLUTION! Sooo...let's review...the forces at a certain revolution are constant....and once they exceed the ability of a component to withstand them (governor gear)...they break....they dont ask for a break...rest up...and go again....

So....go ahead...roll the dice...what do we know?

Keep this in mind...at 3600 rpm...that engine is making 4 cycles per minute 3600 times....sooo..60 cycles per second...but...really they usually break on the power stroke...so that means you have 1/4 of 60 cycles per minute to keep from exceeding that threshold.

Have you got any idea how slow human reactions are?
 

Bbqjoe

Banned
Messages
3,455
Reaction score
67
Location
Location, Location
Ok, so I got the carb adjusted as per instructions. The only problem is that when I lean it left, or put it on it's kickstand (left side) the motor idles way down and dies.

Float adjustment maybe?
 

bob58o

SuckSqueezeBangBlow
Messages
9,646
Reaction score
1,857
Location
Chicago-town USA
Low Oil Sensor should be removed when you pull the plastic piece o crap governor gear out.


Do both at same time. Easy. Tons of Youtube videos.

If it is the carb killing the engine, then I have no ideas. Sorry
 

mckutzy

Well-known member
Messages
8,353
Reaction score
110
Location
bc, canada
You might need to put a pad on the foot of the kickstand..... if that doesnt help the sputtering... then other issues are a foot...
 

chancer

ɔ ɥ ɐ u ɔ ǝ ɹ
Messages
9,358
Reaction score
93
Location
COMFORT, TEXAS
There was much discussion on this thread about, Governor Removal. Partial and complete.
Joe decided on linkage only.
The gear Broke internally and bits of plastic got into the Compression release, making it very hard to pull start.
Luckily he took it apart and found the issue before further damage.

Always Remove The Gov Comletely!
 

Bbqjoe

Banned
Messages
3,455
Reaction score
67
Location
Location, Location
It takes 10 minutes. Remove the **** gear!!!!
It takes about 5 seconds to remove the gov the easy way. It takes about an hour to pull the engine off and apart.

---------- Post added at 05:11 PM ---------- Previous post was at 05:07 PM ----------

Naw it wont self destruct if you are taking it easy.
All these warnings are 100% true. But most guys remove the governor for the sole purpose of achieving max RPMs and speed. So lazy, Dumb, young guys bypass the linkages to go fast and break their engine. Unless you are holding that thing WFO alot, you will probably be fine.
I NEVER tell anyone to do this.

BTW: The plastic gov, gear is made to run at 3600 RPM, Stock valve float is 5300-5500 (depending) so Valve float would not save the Gov gear from breaking.
The engine itself is not harmed... yet. It is the piecesof the internal gov gear when Broken that will break the engine internals.

Now guys will probably yell at me for typing this bad advice.

Bad Chancer! Bad, bad Chancer! :mad: :)
 

aham2003

Member
Messages
219
Reaction score
1
Location
Cleveland, Tn
And that 5 seconds will cost you an engine. You that busy of a man that you dont have an hour that it takes YOU to accomplish? Most can have the engine off, governor out, and back on the bike/kart in 15-20 minutes.
 

Bbqjoe

Banned
Messages
3,455
Reaction score
67
Location
Location, Location
And that 5 seconds will cost you an engine. You that busy of a man that you dont have an hour that it takes YOU to accomplish? Most can have the engine off, governor out, and back on the bike/kart in 15-20 minutes.

You misunderstood me. What I was trying to say, is once you have the engine off and open, it takes about 5 seconds to remove the gov from the flywheel side, as compared to folks who go at it with screw drivers and pliers to break it apart.

I suppose if it was a contest I could dismantle in 15 minutes. I like to take my time and be careful.

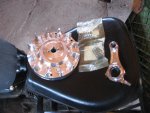
I'm getting ready to order billet flywheel androd.
 

aham2003

Member
Messages
219
Reaction score
1
Location
Cleveland, Tn
You misunderstood me. What I was trying to say, is once you have the engine off and open, it takes about 5 seconds to remove the gov from the flywheel side, as compared to folks who go at it with screw drivers and pliers to break it apart.

I suppose if it was a contest I could dismantle in 15 minutes. I like to take my time and be careful.

I'm getting ready to order billet flywheel and rod.

Then its a perfect time to get the gear out. :cheers2:
 

Poboy kartman

Senior Moments Member
Messages
12,461
Reaction score
69
Location
White Settlement Texas
Looks good to me....but why not just talk to DynoCams???

They know more about cams than I do....and they'll know which 18 lb. springs to avoid with the Hemi.
 

Bbqjoe

Banned
Messages
3,455
Reaction score
67
Location
Location, Location
Ok here's the Latest.
The new tank is installed, but you already knew that.

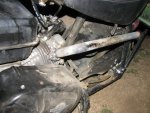
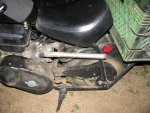
Today's edition called for a straight pipe mod.
I found a piece of steel in my scrap pile and made a flange. I then found a length of 18"steel tubing that which was threaded on both ends. It's either 1" or 3/4 depending on what you want to call it.I welded the pipe to the flange, then marked it for the bike.

I bent the pipe using oxy acetylene, but first I filled it with sand to help keep the pipe from creasing during the bend. It worked about 75% as good as I figured it would.
I didn't use anything to measure with, just my eye. I'd say it came out perfect for the rough in.

I took it for a ride as is, and it was hideously loud. Not cool loud, but like firecrackers in your ears loud. It had some rumble, but mostly a sharp CRACK. I figgered if I kept it that way, I'd need to use shooting muffs to ride it.

After a discussion with Chancer the motor rater, I decided to take a wack at some kind of muffler to tone it down a bit.
I saw some pictures and got an idea.

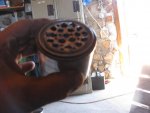
I took a very small paint can and drilled a mess of holes in it, stuffed in some steel wool, capped it and mounted it to the pipe using large electrical nuts on either side.
It worked way too well. So I pulled the steel wool out and tried again. It was poppier (new word, get over it) but still lacked any bad BUNNY sound.

I had a few other ideas. While rummaging through the pile again, I found a piece of chrome pipe that slid perfectly over the plumbing!
Tada, no worries about paint or how it will look. I cut the required piece I needed off of it.
After doing such and holding two pieces, I realized the piece that was going back into the pile had a nice curve to it, and I asked myself what the chicken am I doing?
here's a perfectly good bent pipe!

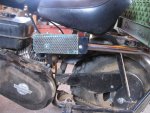
I slid the chrome on, and tacked it with a few welds. I then painted the incoming end with some BBQ paint. (Good to 1700°) I have no idea how hot exhaust is right at the manifold, but I think this will do.

I mounted the pipe, and reused the original heat shield, with a few minor mods. One was a cut, and the other was applying some silicone hot pad with high temp RTV. Both work really well, although the pad looks like cute Kittens. But it will keep my dogs from getting burned when they jump up.

I also made a video for you guys to catch how horsing bad bunny this set up sounds.

Next week these parts are going on/in the engine along with a mamba jr cam.
Stay tuned.
 

Attachments

  • IMG_3772.JPG
    IMG_3772.JPG
    75.5 KB · Views: 4
  • IMG_3773.JPG
    IMG_3773.JPG
    70.3 KB · Views: 5
  • IMG_3776.JPG
    IMG_3776.JPG
    44.5 KB · Views: 4
  • IMG_3777.JPG
    IMG_3777.JPG
    50.9 KB · Views: 3
  • IMG_3775.JPG
    IMG_3775.JPG
    106.6 KB · Views: 4
  • IMG_3778.JPG
    IMG_3778.JPG
    69.7 KB · Views: 4
  • IMG_3781.JPG
    IMG_3781.JPG
    73.3 KB · Views: 5
  • IMG_3779.JPG
    IMG_3779.JPG
    58.2 KB · Views: 3
Status
Not open for further replies.
Top