ARC Rod Bearing Replacement

JTSpeedDemon

2019 Build Off Winner!
Messages
4,026
Reaction score
147
Location
Texas
So I've got pretty much all the parts I need to start building the Raptor that Flyinhillbilly sent me, but I've got one critical question before I start:
How do I replace the rod bearings? I've got fresh ones, but I don't know how to get the old ones out without prying on them and I'm not about to start doing that unless I know what I'm getting into.
 

Attachments

  • IMG_0527.JPG
    IMG_0527.JPG
    2.1 MB · Views: 14

karl

Well-known member
Messages
2,363
Reaction score
546
Location
North east Ohio
Shoud be able to do it with your fingers. Each babbit has a locating notch.

Push down on the other side, without a notch, and try to spin them out.
 

ThunderKart79

Member
Messages
87
Reaction score
18
Location
N.C.
If you can’t get them out with your fingers then there’s a good chance that the rod will have to be replaced
 

JTSpeedDemon

2019 Build Off Winner!
Messages
4,026
Reaction score
147
Location
Texas
Stupid question, but you do have the rod cap off right? They should be easy to change with your fingers.
haha of course I do! Just gotta get around to it, We had to replace our mower today and just a bunch of stuff getting in the way.
 

madprofessor

"Loose Cannon Creations"
Messages
2,899
Reaction score
888
Location
Jacksonville, Florida
I've got the OCD bad, but dat don't make me wrong.............The rod bearings have to mate to the rod, and that's really hard to do properly with the rod on the crank in the case.
Besides, $65 for an ARC billet rod, .020" overlength if you prefer it, comes with new bearings, and very detailed instructions on multiple alternating inch/lbs. to the rod cap with a string gauge inserted, and removal after that, measuring the flattened string gauge, and then if it's in spec the alternating retightening to final torque, all with the rod locked in a vise!
I wouldn't go through the work and gaskets to crack the case without doing everything right while I'm at it. A seized bearing at 5K rpm will remind you of that, especially if a piece of the rod is embedded in your backside.
 

Denny

Canned Monster
Messages
8,241
Reaction score
4,463
Location
Mayberry, Indiana
Mad, he’s only a kid. He will do fine, bearings are not hard to put in. Flyinhilbilly would not set him up with junk. He is a stand up guy and quite knowledgeable. You weren’t around for his nitro fueled mini bike. Kids aren’t rich they have to save money for parts. It takes time, relax.
 

madprofessor

"Loose Cannon Creations"
Messages
2,899
Reaction score
888
Location
Jacksonville, Florida
Thanks for tugging the reins Denny, made me picture my own kid.
Y'all tell me and JT both, what should be done differently when you have a used rod and new bearings? On the other hand, correct what I think stays the same..................This might be helpful to JT.................
First thing, slobbin' break-in motor oil all over everything, not just a finger wipe, across the rod's and the rod cap's surfaces, both sides of both bearing halves, and crankshaft journal. (I personally swear by Royal Purple Break-in Oil.) This after having picked out the old bearing noticing which side has the notch in the corner, to put the new one in correctly on the first try.
Use a 1/4" drive torque wrench with a 1/4" drive 12-point socket, instead of fighting a bigger 3/8" drive wrench and/or an adapter between socket and torque wrench. Folks get it done all the time, but for me just isn't worth the fight to make it fit. And 3/8" torque wrench reads out in foot/lbs. (14.2), while 1/4" torque wrench reads out in the (170) inch/lbs. you need for the rod cap.
Make all tightening with torque wrench in 20 inch/lbs. increments, alternating back and forth between the bolts. Tighten to 100 inch/lbs., then back off completely (without letting rod cap loosen), then alternate by 20's to final torque of (170) inch/lbs.
Anythin' y'alls can learn me diffrint?
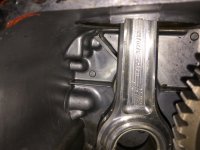
 

Denny

Canned Monster
Messages
8,241
Reaction score
4,463
Location
Mayberry, Indiana
The way you or I would do it and the way a 14 or so year old kid is going are like apples and bowling balls. His tool box does not go as deep or is as big as my 3 roll boxes are. When it comes time he will ask the questions and we will help him as best we can. We have had 50 plus years of buying tools. He has not.
 

madprofessor

"Loose Cannon Creations"
Messages
2,899
Reaction score
888
Location
Jacksonville, Florida
I completely understand having to work with only whatever tools you can fit in your pockets. My hope is that his efforts to do the job will be influenced by knowing what he could do with an unlimited toolbox. So much harder of a job without the right tools, but hopefully understanding what tools and actions he's replacing with the things he's got to work with will give him a good idea how to go about it with the limited inventory.
And I still hope to learn something about mating up new bearings to used rods.
 

JTSpeedDemon

2019 Build Off Winner!
Messages
4,026
Reaction score
147
Location
Texas
Just for closure, I finally managed to get the bearings out of the rod! They were a little stubborn so I took my smallest pin punch and smallest hammer and tapped them out (the correct direction) and they came loose rather easily! Then I managed to get the camshaft out and test fit the lower end. Still have to do the full clearancing/cleanup etc sometime, but now it's actually coming together a bit! I have a 4 day weekend off school this week so I will probably be able to get it all put together! Biggest IF right now is if the bearings I ordered fit right, according to the measurements I took with my calipers. If the clearances check out, well then, it's go time. 🤠
 

Denny

Canned Monster
Messages
8,241
Reaction score
4,463
Location
Mayberry, Indiana
It, you could go to Auto Zone or Advanced auto parts and get some plasitgage clean crank, bearings and rod real good and dry and assemble with a thin ribon of plastigage across journal and torque nuts. Then remove nuts and caps and check plastigage width with package to know oil clearance. If ok oil up everything and reassemble.
 

madprofessor

"Loose Cannon Creations"
Messages
2,899
Reaction score
888
Location
Jacksonville, Florida
Auto Zone or Advanced auto parts
Don't let the counterman hand you the wrong plastigauge. There's a measurement scale on both sides of the sleeve containing the plastigauge threads, and they are different ranges of measurement. ARC Racing calls for .0025 - .0035 oil clearance on their billet rods at 170 in./lbs. of torque on the rod bolts. Get the scale that measures in that range, and it will have the right threads inside. Here's the ARC instructions for their rods, and their video link of how to do it..................
6256 Billet Rod, HF Predator +.020 3.328" X 1.191" X .709" - ARC Racing
 

JTSpeedDemon

2019 Build Off Winner!
Messages
4,026
Reaction score
147
Location
Texas
It, you could go to Auto Zone or Advanced auto parts and get some plasitgage clean crank, bearings and rod real good and dry and assemble with a thin ribon of plastigage across journal and torque nuts. Then remove nuts and caps and check plastigage width with package to know oil clearance. If ok oil up everything and reassemble.
Don't let the counterman hand you the wrong plastigauge. There's a measurement scale on both sides of the sleeve containing the plastigauge threads, and they are different ranges of measurement. ARC Racing calls for .0025 - .0035 oil clearance on their billet rods at 170 in./lbs. of torque on the rod bolts. Get the scale that measures in that range, and it will have the right threads inside. Here's the ARC instructions for their rods, and their video link of how to do it..................
6256 Billet Rod, HF Predator +.020 3.328" X 1.191" X .709" - ARC Racing
Yep I still have a bunch of green Plastiguage left over from the Raptor rod install I did on the Hothead!If I'm uncertain with the combination of the caliper measurements and Plastiguage, I'll order some other sizes of Plastiguage. Given that this should be a 10K RPM capable engine, I'm not taking any shortcuts!
 

madprofessor

"Loose Cannon Creations"
Messages
2,899
Reaction score
888
Location
Jacksonville, Florida
That 10K rpm would be one wound up tight spingizzy. How long a rod and what head (hemi/non) are you using? Getting larger valves milled in, or using a race-readied head already modified?
 

JTSpeedDemon

2019 Build Off Winner!
Messages
4,026
Reaction score
147
Location
Texas
That 10K rpm would be one wound up tight spingizzy. How long a rod and what head (hemi/non) are you using? Getting larger valves milled in, or using a race-readied head already modified?
Ah, this is the Raptor that Flyinhillbilly sent me. It's a flathead :roflol:
It has a Wiseco piston and longer ARC rod. Pretty sure the valves are a bit bigger than stock, it's been ported and polished, bored out a bit, etc.
It's a sweet piece.

Also ran into a bump in the road. It seems my journal and bearing measurements were off or I made some mistake, because the 0.002" under rod bearings I got have only 0.001" of oil clearance. :smiley_omg:
Placing an order for the standard size rod bearings right now.
 

JTSpeedDemon

2019 Build Off Winner!
Messages
4,026
Reaction score
147
Location
Texas
Ok I just finished checking the clearances. According to the red Plastiguage, it's halfway between 0.002" and 0.003", which puts it at 0.0025", which is literally EXACTLY where I want it! Now I just gotta put the thing together!
 
Top