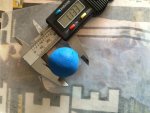
Finished checking the volume of the combustion chamber. Again.
This time, I am more confident than my previous measurements.
18 +/- 0.25 cc / ml
I love my measuring skills. It got smaller! (or stayed the same)
---------- Post added at 03:56 AM ---------- Previous post was at 03:30 AM ----------
1. Finish Polishing the exhaust. - Clean Head
2. Check P2V clearance - Clean Head
3. Decide on Gasket Thickness 0.027" or 0.045" (Will use 0.027" if P2V allows)
4. Lapp Valves - Clean Head
5. Install 26lb springs
6. Drain Oil
7. Open and Clean Crank Case
8. Inspect, Clean, Lubricate crank, cam, lifters....
9. Replace Side Cover Gasket with new one, Attach Side Cover, Fill with Oil.
10. Remove Flywheel, Check Flywheel key, Re-Attach Flywheel
11. Set Coil Gap to .030"
12. Seal Head with Head Gasket
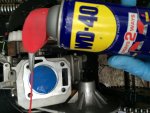
13. Attach Carb Adapter with Gaskets
14. Attach studs to Carb Adapter
15. Attach Carb to carb adapter with new gasket
16. Attach Air Filter to Carb
17. Fan Shroud/ Recoil Starter
18. Gas tank
19. Exhaust Pipe- new gasket
20. Throttle Plate
21. Throttle Linkage
21. Set Valve Lash
22. Valve Cover - New Gasket
23. Torque Converter
24. Chain
25. Brakes
26. Jet the Carb
27. Do Wheelies
28. Remove Engine
29. Add Two Engines
30. Do Bigger Wheelies!
31. Check for Valve Seal
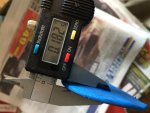
32. cc combustion chamber - 18cc's
Hopefully when I get up I will check if these valves are sealing with the stock springs. If they seal with the 10.8, they should seal with the 26lb. If you can dodge a wrench, you can dodge a ball.
Then on to P2V clearance. I've moved the piston up 0.020 and the valves down 0.037". I've added ~0.050" lift to the stock cam. I want to take 0.018" off the gasket (0.027 vs 0.045").
That perhaps is bringing the valves 0.125" closer than stock (depending on valve event timing).
If I can use the 0.027" gasket, I will be at 11.11: 1 compression and how can you not like the way 11.11:1 looks on paper?
Maybe I can find some 111.1 octane fuel?
If the 0.027" gasket does't leave enough clearance, the 0.045" gasket will put me at 10.32:1. Maybe I can get away with premium?
If the 0.045" doesn't leave enough clearance, then....?????????? Hmmmm? It better!
So my gasket and fuel choice will depend on my P2V measurement.
 ar3910x.jpg107.9 KB · Views: 5