A tale of two Dingo's

Status
Not open for further replies.

Whitetrashrocker

Inmate #952016
Messages
4,511
Reaction score
3,496
Location
Southern New Mexico
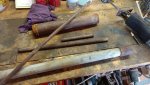
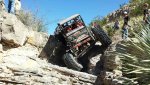
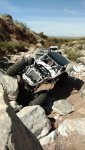
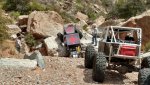
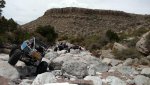
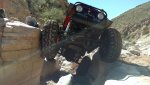
So here's pics of the rock crawling we do.

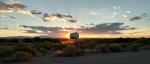
The event was called Chile Challenge. It was the 25th year this past event. I got to meet people from all over that traveled to wheel in my backyard. Canada, Mexico, had some from Germany and South Africa even. And of course the East Texans some from Ohio and on and on.

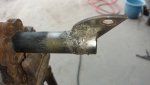
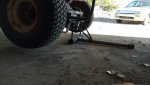
They have trails from 1 to 10. We take the extreme rigs out to the 11 and 12 trails. Be prepared to break something. It WILL happen.

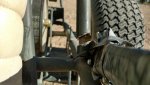
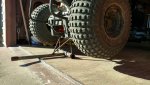
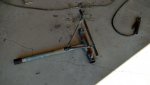
The black buggy pointing 12oclock broke his drive shaft and holds up progress till it's fixed. No one left behind.

You can see the webpage at www.chilechallenge.org
Or just you tube Chile Challenge and see others uploads.
 

Attachments

  • 20141017_134659.jpeg
    20141017_134659.jpeg
    143.6 KB · Views: 9
  • IMG_20160423_102004357.jpg
    IMG_20160423_102004357.jpg
    385.6 KB · Views: 10
  • IMG_20160423_120744811_HDR.jpg
    IMG_20160423_120744811_HDR.jpg
    463 KB · Views: 8
  • IMG_20160423_135011192.jpg
    IMG_20160423_135011192.jpg
    404.8 KB · Views: 8
  • IMG_20160924_112824604.jpg
    IMG_20160924_112824604.jpg
    284.5 KB · Views: 8
Last edited:

Whitetrashrocker

Inmate #952016
Messages
4,511
Reaction score
3,496
Location
Southern New Mexico
Well it's inevitable. Her comes the cracking frames.
This is on #1 with the homemade fuel tank on the header hoop. There is only one rear bar for support and I think the combination of weight, lack of support and I'm sure terrain beat it.

Instead of hauling it to town to use the real welders I decided to break out the stick. 7014 rod and about 80amps. Not pretty but not bad for what it is. I figured it not a super structural weld. It won't cause a crash.....:roflol:
 

Attachments

  • IMG_20161029_153622232_HDR.jpg
    IMG_20161029_153622232_HDR.jpg
    168.1 KB · Views: 12
  • IMG_20161101_171646747.jpg
    IMG_20161101_171646747.jpg
    150.3 KB · Views: 12

Whitetrashrocker

Inmate #952016
Messages
4,511
Reaction score
3,496
Location
Southern New Mexico
While #1 is in the shop, I've been zooming on #2. The cvt wasn't opening up all the way at idle and was lurching on me. So I took it off and gave it a good cleaning and dry lube.

I can hear the gravel going round inside. I gotta get some belly pans on. I just polished this up only a few hours ride time ago.

How often do you guys R&R your torque converters?
 

Attachments

  • IMG_20161105_161316130.jpg
    IMG_20161105_161316130.jpg
    202.4 KB · Views: 3
  • IMG_20161105_161254896.jpg
    IMG_20161105_161254896.jpg
    247.2 KB · Views: 3

Whitetrashrocker

Inmate #952016
Messages
4,511
Reaction score
3,496
Location
Southern New Mexico
So after running my self over and getting drug about 10 feet I decided to make a quick cam over lift for my carts.

I wish I had it on video. I had the cart pointed into my garage. Engine running, while ever so slightly holding the throttle cable on the carb to keep the idle up. It had fallen out of adjustment and would not idle. The slide was dropping too far and choking the engine out. No big deal I said as I squatted over the back tire.

I un threaded the top of the carb to get to the adjustment screws. When the last thread was letting loose I hear the engine get a little lean from the now open top. I was still holding the top plate on but a good seal was not there. The rpm upped just enough to engage the clutch. Well I have a hand full of carb and squatting over the tire which decided to climb my leg.
I dive for the steering wheel kill switch. Cause remember safety first!

My arm was a little short with my leg under the rear end by now and I franticly grab some frame as to stay with the kart. Managing to run over a catch pan full of antifreeze from a previous project i haven't picked up from yet, and making a bigger mess.

I managed to find the kill switch but it was just as the nose was about to take out the wall.
I wasn't hurt but a tiny scratch on my pinky.

Sat back and laughed to myself cause no one was there to laugh at me.

Anyway. I don't have the good shop here and I'm stuck with a cracker box welder and a shoebox full of misc. old rods.

I found some scrap pipe and solid rod.
Go ahead and laugh at my welds. I could have gotten better results with coat hangers. Lol. Tig or wire feeds are so much better. This make me feel like a noob again.....
 

Attachments

  • IMG_20161115_110627191.jpg
    IMG_20161115_110627191.jpg
    313.5 KB · Views: 5
  • IMG_20161115_113635387.jpg
    IMG_20161115_113635387.jpg
    241 KB · Views: 5
  • IMG_20161115_113652060_HDR.jpg
    IMG_20161115_113652060_HDR.jpg
    424.7 KB · Views: 6
  • IMG_20161115_120355604.jpg
    IMG_20161115_120355604.jpg
    165.9 KB · Views: 5

Whitetrashrocker

Inmate #952016
Messages
4,511
Reaction score
3,496
Location
Southern New Mexico
...
 

Attachments

  • IMG_20161115_144251501_HDR.jpg
    IMG_20161115_144251501_HDR.jpg
    320.9 KB · Views: 5
  • IMG_20161115_144145443.jpg
    IMG_20161115_144145443.jpg
    227.5 KB · Views: 4
  • IMG_20161115_144028302_HDR.jpg
    IMG_20161115_144028302_HDR.jpg
    171 KB · Views: 5
  • IMG_20161115_144021226.jpg
    IMG_20161115_144021226.jpg
    181.4 KB · Views: 4
  • IMG_20161115_140828667.jpg
    IMG_20161115_140828667.jpg
    650.9 KB · Views: 4

Whitetrashrocker

Inmate #952016
Messages
4,511
Reaction score
3,496
Location
Southern New Mexico
Yeah yeah yeah. It got too cumbersome. Same as the jack behind it.
This is easier to carry to the cart out in the rocks if it's not in the shop or lean-to.
 

Attachments

  • IMG_20161115_161305883.jpg
    IMG_20161115_161305883.jpg
    254.4 KB · Views: 3

Whitetrashrocker

Inmate #952016
Messages
4,511
Reaction score
3,496
Location
Southern New Mexico
Took the head off my blowed up engine. Stripped and ready for some port n polish. And gonna take off an undecided amount for some added compression.
Have a .036 head gasket and will reuse it. Thinking on somewhere between .025 and .050 off the head. With out doing the math it should get me up closer to 10:1 compression.
Still got some more measurements to make but at least the ball is rolling somewhere.
 

Attachments

  • IMG_20161120_132750678.jpg
    IMG_20161120_132750678.jpg
    253.2 KB · Views: 3
  • IMG_20161120_132827242.jpg
    IMG_20161120_132827242.jpg
    239.9 KB · Views: 2

Whitetrashrocker

Inmate #952016
Messages
4,511
Reaction score
3,496
Location
Southern New Mexico
Did some measuring today. Got a valve lift of .3125 and a total valve to piston travel of .406.

That gives me .084 of clearance.

I'm guessing, cause I can't find any data on this engine, but I should leave .050 for swell and valve bounce.

So I only get to shave .030 off the head.
Hope fully this should get me close to 10:1

Anybody wanna do some math for me? I've got numbers....
 
Last edited:

Whitetrashrocker

Inmate #952016
Messages
4,511
Reaction score
3,496
Location
Southern New Mexico
Today I found some more time to tinker.
Started the p&p. There was an edge on the long radius side I took out and rounded out the inside nicely. In the pic there some more to take out of the corners which I did after the pic was took.
And a few of the untouched exaust to compare the sharp inside radius.

Should have time to run to town and mill off a little this coming week.
 

Attachments

  • IMG_20161126_181303798.jpg
    IMG_20161126_181303798.jpg
    182 KB · Views: 5
  • IMG_20161126_181256496.jpg
    IMG_20161126_181256496.jpg
    124.7 KB · Views: 6
  • IMG_20161126_181233203.jpg
    IMG_20161126_181233203.jpg
    230.4 KB · Views: 5
  • IMG_20161126_181224188.jpg
    IMG_20161126_181224188.jpg
    239.3 KB · Views: 6
  • IMG_20161126_172406535.jpg
    IMG_20161126_172406535.jpg
    207.4 KB · Views: 6

Whitetrashrocker

Inmate #952016
Messages
4,511
Reaction score
3,496
Location
Southern New Mexico
A little more tinkering tonight.
Exhaust is open and shiny.
 

Attachments

  • IMG_20161127_174339315.jpg
    IMG_20161127_174339315.jpg
    168.3 KB · Views: 3
  • IMG_20161127_174120843.jpg
    IMG_20161127_174120843.jpg
    117.1 KB · Views: 3
  • IMG_20161127_174143884_HDR.jpg
    IMG_20161127_174143884_HDR.jpg
    165.8 KB · Views: 3

bob58o

SuckSqueezeBangBlow
Messages
9,646
Reaction score
1,826
Location
Chicago-town USA
Ok so for Piston to Valve Clearance. I measure with modeling clay. I Spray some WD40 on the piston and valves and cylinder wall so it doesn't stick as much. I use a bunch of clay. I normally start with too little and end up using too much.
http://www.enginelabs.com/engine-tech/engine-blueprinting-how-to-check-piston-to-valve-clearance/

I think 0.050" is probably the minimum I'd want for Piston to Valve Clearance. I have 0.065" Intake and maybe 0.085" Exhaust Clearance on my 212cc. Some automotive info I've read says 0.080" intake / 0.100" exhaust plus additional 0.030" with aluminum rod (like in the link above) I THINK 0.050" is OK for the intake. I wouldn't go closer however.

For Piston to head clearance, 0.030" is fine. 0.020" is probably the minimum. So you should be fine with your 0.036" gasket (unless your piston pops out 0.016" above the deck surface).


---------- Post added at 04:22 AM ---------- Previous post was at 04:04 AM ----------

In the message you mentioned 0.312 valve travel. Not sure if this is the actual valve lift (seems like a huge cam, I'll have to go back and read... Is it the stock cam?) or just an arbitrary number based on your measuring point.

It just seems like a big valve lift to me? And honestly I'm tired and will reread your measuring method again.
 

Whitetrashrocker

Inmate #952016
Messages
4,511
Reaction score
3,496
Location
Southern New Mexico
The phone books are here, the phone books are here!!

Not really. Just got a few sprockets. As a recap I have a 9t on the JS and 54t on the axle. I ordered up 2 8t sprockets at $13 each. Not bad considering if I were to do the rear I'd have to get a new hub and sprockets to fit at a cost of close to $80.

The buttdyno test came back and I was not impressed.

The top end fell off as expected but wow, did it fall. I didn't get a GPS speed but I could tell I lost quite a bit.
The bottom end didn't seem to gain much. It felt to accelerate about the same. I'm mean I wasn't expecting to get thrown back in the seat. I was hoping for more tire spin.
The only real difference I noticed was doing donuts. The engine didn't bog down as bad and kept pulling.

This was on #1. 9hp vanguard, 18" rears and no govna.
It's gonna be a few days till I can get the same done to #2. Work is sporadic and the weather has turned. It's hard to get a good day and be home at the same time.

Perhaps I'll do a head swap on #1 and leave #2 alone for a while. I doubt it.

Update on the head.

I ended up taking off .030 off and did not cc'd the head. I was just cutting to make tolerances. I'm sure what ever the compression ratio is gotta be better than a measly 8.5:1. Perhaps I'll measure the milled head before I install it and then measure the removed one.

Sorry no cool pics so here's a view from my yard.
 

Attachments

  • IMG_20161207_101010.jpg
    IMG_20161207_101010.jpg
    150.1 KB · Views: 3
Status
Not open for further replies.
Top