A tale of two Dingo's

Status
Not open for further replies.

Whitetrashrocker

Inmate #952016
Messages
4,745
Reaction score
3,903
Location
Southern New Mexico
Just figured I'd pass along what I learned today.

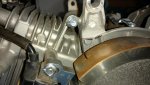
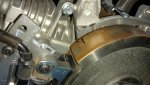
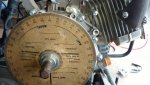
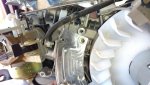
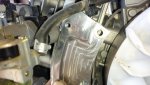
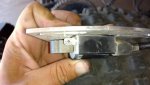
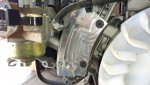
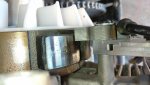
I took the fan shroud off #2 to look at the coil. Yup, it's different all right. Looks like the timing bracket will fit.

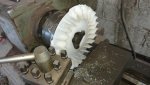
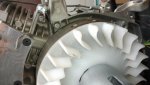
So now, it looks like I have a reason to put the 301 on the table. A little clay work and then off to the mill for some much needed compression, P&P, and perhaps a straight pipe exhaust. We'll see how the carb holds up. Might drill the jet a little.

And in dragracing news I get to tear down the alky again. Can't get a set of rings to seat in. Gonna try a different brand cause Total Seal has gone to the birds. We've tried several styles and they all fail after a few passes.
Any advice from my fellow alkys?
 

Whitetrashrocker

Inmate #952016
Messages
4,745
Reaction score
3,903
Location
Southern New Mexico
As in an added lube during a run or a break in type.
Tried the powder stuff you rub on the cylinder during install but haven't noticed any difference.
New sleeves, pistons and rings bleed off tests 30psi at TDC and 80 at BDC. Guess I'll find more tomorrow as I get it tore down.
 

Ognib

bingo spelled backwards
Messages
151
Reaction score
0
Location
kc
Dig your FED. Sorry to hear about your ring seal issues.
How hard is the ring material & what kind of cylinder prep are you doing?
 

Whitetrashrocker

Inmate #952016
Messages
4,745
Reaction score
3,903
Location
Southern New Mexico
Dig your FED. Sorry to hear about your ring seal issues.
How hard is the ring material & what kind of cylinder prep are you doing?

it's a rear not front but lol. No foul.:cheers2:

Got it all tore down today. It's always a different outlook. Just put in new sleeves and pistons. The skirts are short and causing the piston to rattle. Rings walked around. Seems like the sleeves are tapered but need measuring. The Pistons are narrower up top, tapered also. It's an alky thing. They dont want too tight of a clearance but it seems to make the piston wobble and the rings never seat right.

Also I think they messed up on the Pistons cause we gave them all kinds of build specs and the valves just kissed them. Can see the print in the aluminum but its sooooo close. Gonna pull a few valves to check for straightness. Gonna rering it and a thicker gasket looks to be the plan as of now :popcorn:

As far as rings it not my call I just put them on. They have been from Total Seal and we've tried several styles. The only ones that worked​ well, they don't make any more.
The sleeves get wet honed. But we have had 3 races on this build and the cross hatching is still there. There's a little verticle scratching but it always does that. It's not bad.
 

Whitetrashrocker

Inmate #952016
Messages
4,745
Reaction score
3,903
Location
Southern New Mexico
A few minutes on #2. Started the install of the bracket, well it still is not bolt on!

Took the back plate and it hits the intake. There's no moving that, as it's part of the head. Made a few marks and took out some aluminum.
 

Attachments

  • IMG_20170520_180138655.jpg
    IMG_20170520_180138655.jpg
    217.4 KB · Views: 8
  • IMG_20170520_181556274.jpg
    IMG_20170520_181556274.jpg
    189.7 KB · Views: 5

Whitetrashrocker

Inmate #952016
Messages
4,745
Reaction score
3,903
Location
Southern New Mexico
Still not enough.

And then I realized the adjustable side might need some material removed. Held the coil in place and noticed the ground pin hits before the housing sets. A washer will fix this but the ad said hours of research and design........
 

Attachments

  • IMG_20170520_181544948.jpg
    IMG_20170520_181544948.jpg
    216.6 KB · Views: 2
  • IMG_20170520_181620873.jpg
    IMG_20170520_181620873.jpg
    165.1 KB · Views: 3

Whitetrashrocker

Inmate #952016
Messages
4,745
Reaction score
3,903
Location
Southern New Mexico
I had to come in the AC and have a beer. Gotta love custom stuff! :mad2:

Got enough hogged out of the back plate and mounted.

Front plate needs clearance. I didn't want to remove that much around the slide adjustment screws so I decided I'd take as much out of the edge of the intake. I just barely got in to the threads and stopped there. I had to take the rest off the slide.

Not bad for a little whittling.

Ok coil come here. Put some washers between it and the bracket. Tighten up the screws and look at this.

Seriously guys?

The fan hits and the coil is half off the magnet!

I can cut the fan down but what a pain in the butt. Could leave it off but then I'd have to monitor engine temps.:popcorn:

And the mag/coil alighnment. I guess it will work but not getting full field might make for a weak spark.

Any input on this issue?
 

Attachments

  • IMG_20170524_143220187.jpg
    IMG_20170524_143220187.jpg
    169 KB · Views: 6
  • IMG_20170524_143405309.jpg
    IMG_20170524_143405309.jpg
    213.5 KB · Views: 6
  • IMG_20170524_154113349.jpg
    IMG_20170524_154113349.jpg
    233.3 KB · Views: 9
  • IMG_20170524_153312819.jpg
    IMG_20170524_153312819.jpg
    198.1 KB · Views: 8
  • IMG_20170524_151543726.jpg
    IMG_20170524_151543726.jpg
    143.5 KB · Views: 9

gman3850

Member
Messages
405
Reaction score
4
Location
gilbert az
Well considering these are built to for the gx390/420/460 motors that have a taller deck hieght, not really surprised that these don't fit the 301cc
 

Whitetrashrocker

Inmate #952016
Messages
4,745
Reaction score
3,903
Location
Southern New Mexico
Nowhere did I see anything about what engines it fits.

Now I feel that the average Joe would have issues and would send it back for not fitting. But I guess that if your messing with timing you should have a little skills under your belt.

I spun the engine last night and had a timing light. It has enough mag field to fire the plug. I'm gonna have to make my own marks on the flywheel though.

I'm debating on whether to mark the wheel and put it back together or take off 6 more bolts and start head work.

Decisions decisions.
 

Ognib

bingo spelled backwards
Messages
151
Reaction score
0
Location
kc
This is the "juice" in modifying stuff & scratch building...figuring it out & making it work.
 

Ognib

bingo spelled backwards
Messages
151
Reaction score
0
Location
kc
There's an old saying..."the difficult I can do immediately...the impossible takes just a bit longer". :)
 

Whitetrashrocker

Inmate #952016
Messages
4,745
Reaction score
3,903
Location
Southern New Mexico
So if I bolt this on, will the timing be as they say?

I bet not!

So I don't have a degree wheel. No big deal.
I put the coil on as stock and set the air gap. I took some baling wire and made a pointer at the flywheel. Then plug my timing light to a battery charger and clipped the inductor on the spark plug wire. Removed the plug to get rid of compression. Used my electric drill to turn the crank at speed and the other hand working the light.

Made some visual reference and marked the wheel. Did a strobe test to verify my mark was on.
This is what I'll call Zero for now. I have been searching for the factory timing advance setting for this engine, but come up empty. I'm guessing somewhere about 25-30°?

That's not important now though. Just reference the point of spark.

I then remove the coil and add the adjustable bracket. Set it at 0°(as marked on it).
I do my 2 handed tricks, and again sight reference and recheck my marks.

Looky here. It not the same. So I adjust a few degrees and re check.
To get the stock timing back I had to go to 2-1/2° as marked on the slider.

I'm gonna say the most of this is from the mis alighnment of the coil/magnet.

The next thing is to check the tolerances of their marks.
I'm gonna have to borrow pops newer light that had the built in advancement settings.
 

Attachments

  • IMG_20170525_141941095.jpg
    IMG_20170525_141941095.jpg
    269.9 KB · Views: 8
  • IMG_20170525_142813869.jpg
    IMG_20170525_142813869.jpg
    300.5 KB · Views: 8

Whitetrashrocker

Inmate #952016
Messages
4,745
Reaction score
3,903
Location
Southern New Mexico
Fan fits now and won't rub the coil.

Made a piston stop out of an old spark plug, tapped the inside and ran a bolt in side. Easy peasy.

Borrowed dads degrees wheel. Found my stock timing to be at 23°btdc. Gonna make some flywheel marks. Checked the marks on the bracket and they are actually on. Amazing!
 

Attachments

  • IMG_20170529_165530833.jpg
    IMG_20170529_165530833.jpg
    154.5 KB · Views: 4
  • IMG_20170529_161153604.jpg
    IMG_20170529_161153604.jpg
    182.5 KB · Views: 5
  • IMG_20170529_161227243.jpg
    IMG_20170529_161227243.jpg
    156.8 KB · Views: 5
  • IMG_20170529_165150339.jpg
    IMG_20170529_165150339.jpg
    230.4 KB · Views: 5
Status
Not open for further replies.
Top