2017 - Sidecar - DNF

Status
Not open for further replies.

2SlickNick

American Minibikes @ FB
Messages
2,758
Reaction score
2
Location
Mesa, AZ.
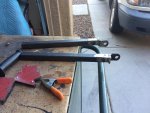
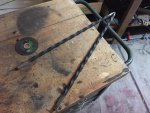
True...it will be detachable by 4 bolts.

So I can make and use multiple ones.

---------- Post added at 04:38 PM ---------- Previous post was at 04:37 PM ----------

I do foresee the bike being a wheelie machine (without sidebar) since I stepped it down to an 8t jack shaft sprocket.
 

2SlickNick

American Minibikes @ FB
Messages
2,758
Reaction score
2
Location
Mesa, AZ.
Not much progress... Took the wire wheel to the tank.
 

Attachments

  • IMG_0310.jpg
    IMG_0310.jpg
    330.7 KB · Views: 5

2SlickNick

American Minibikes @ FB
Messages
2,758
Reaction score
2
Location
Mesa, AZ.
Decided to stick with a traditional sissy bar... Instead of accidentally making a Slick-shibob.
also decided to shorten offender, it looked goofy when it was long.
 

Attachments

  • IMG_0327.jpg
    IMG_0327.jpg
    370 KB · Views: 2
  • IMG_0319.jpg
    IMG_0319.jpg
    303.4 KB · Views: 2

pRoFiT

Can't buy it?, build it!
Messages
1,135
Reaction score
32
Location
California
It looks really good. i need to step up my video recording game. And hire some bikini models to show off my mini bike :)

Cant wait for your side car build. Keep up the great work.

2 Slick on the bike. Nice touch.
 

2SlickNick

American Minibikes @ FB
Messages
2,758
Reaction score
2
Location
Mesa, AZ.
I was saying that I used in eight tooth jack shaft sprocket, and this bike is for pulling the sidecar and for flat track racing. I only top out at 40 miles an hour but I get there fast. If that gear ratio is too much for a two seater sidecar I'll go down to a smaller rear tire.
 

2SlickNick

American Minibikes @ FB
Messages
2,758
Reaction score
2
Location
Mesa, AZ.
Since the sidecar is on hold for right now, I went ahead and made some mounting brackets for the trailer.
now I just have to weld the mounting bracket's onto the trailer and weld the other wheel mount.
 

Attachments

  • IMG_1236.jpg
    IMG_1236.jpg
    342.3 KB · Views: 4
  • IMG_1238.jpg
    IMG_1238.jpg
    303.5 KB · Views: 5

2SlickNick

American Minibikes @ FB
Messages
2,758
Reaction score
2
Location
Mesa, AZ.
Got the other axle welded on.
I would really like to use those 4 inch bolt pattern hubs, but I red the taller 8" trailer wheels.

The other Picture is with the 6 inch wheels, I must decide which ones to use before I weld the tongue.

I have a 5 inch ride height with the 6 inch rims.
Golf cart tires are too wide.
 

Attachments

  • IMG_1262.jpg
    IMG_1262.jpg
    331.3 KB · Views: 2
  • IMG_1263.jpg
    IMG_1263.jpg
    260.3 KB · Views: 2

big-d

New member
Messages
138
Reaction score
1
Location
Mapleton, Utah
Good job! Getting in there and doing it is how you learn. I built a bicycle trailer for my oldest son and used an air hose quick connect fitting as the "hitch" with a short piece of hose so it could flex any direction it needed as well as track behind the bike properly.

One of my old neighbors saw the design and used a cluster of 4 hose fittings to fit a Lawn mower dump trailer to his old enduro. He kept the fittings and hose close together and it worked out well.

He had another dirt bike hitch that he used a rectangle piece of solid aluminum for the pivot (he drilled and tapped threads into the top, bottom and both sides). The tabs that bolted to the top and bottom of the block went to the back of the bike. The tabs on the sides went back to the trailer. That way the trailer could pivot up and down when he went over bumps and dips and it would track behind the bike when he turned. He also had pair of large washers that were bolted together with grease inbetween them at the back of the bike. One washer was welded to a bracket on the bike and the other had the tabs that went to the aluminum block. That trailer always stayed attached to the bike. I probably did not explain it very well. I wish I had a picture of it.

It was a very elaborate setup, but it functioned well...

I think a heim with some misalignment spacers could to the job? I will sketch up what I am picturing in a few minutes.
 

big-d

New member
Messages
138
Reaction score
1
Location
Mapleton, Utah
This is what I was picturing in my mind.

The green bar is the new trailer tongue. The white circle at the front of the green bar is the Heim. The red line is the front half of the hitch that would attach to the bike. Depending on clearence issues or preference, I would weld tabs to the bike where I drew either set of the blue tabs. They could go on the top or bottom of the bar on the bike, so they would be out of the way when not using the trailer. I would probably use pins similar to what they use for the hoods of race cars, which have a spring loaded locking ring so they do not rattle or fall off (I can post a link or pic if needed), to attach the hitch to the blue tabs on the bike. That way it is easily removed from the bike when not needed.

Like many ideas. This sounds good in my head, it might not work as well in a real application... Good luck with the project though. :cheers2:
 

Attachments

  • IMG_3896.jpg
    IMG_3896.jpg
    98.9 KB · Views: 3

2SlickNick

American Minibikes @ FB
Messages
2,758
Reaction score
2
Location
Mesa, AZ.
Wow thanks! Great info, I need to actually absorb this and let you know what I come up with.
Luckily I already have 4 tabs welded on.
Thanks again!
 

2SlickNick

American Minibikes @ FB
Messages
2,758
Reaction score
2
Location
Mesa, AZ.
Doesn't look like this project will be finished in time for the build off. Been pretty busy with some other projects, and had some problems with my welder. I do intend on finishing this one day but going to take my time and do it right.

I'll update as I make some more progress.
 
Status
Not open for further replies.
Top