2017 - Shifter Kart - DNF

Status
Not open for further replies.

Kartorbust

Well-known member
Messages
3,902
Reaction score
194
Location
Utica, NE
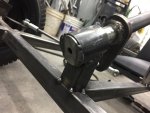
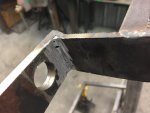
On the top picture on post 30, you have porosity (holes in your welds) either from lack of clean metal, lack of shielding gas (can be caused by a dirty gun nozzle). While the welds may end up working, I would strongly recommend the welds be grounded down and redone. Porosity defects can and will cause a weld to crack and break. I'm just letting you know from the little bit I learned in college for welding, as I don't want a member seriously hurt from a weld that broke because of a defect.

---------- Post added at 05:05 AM ---------- Previous post was at 04:56 AM ----------

https://www.youtube.com/watch?v=9RGf_jcNCMM good video that explains it better than I could.
 

pRoFiT

Can't buy it?, build it!
Messages
1,135
Reaction score
32
Location
California
I only have 4 years of high school welding and yah the spindle brackets look a little sketchy to me. i think i would get a D on those welds. if my teacher was being nice.

Would not want your tire coming off at the first hard bump in the road. post #32 and #35. not sure how good the penetration is on those and then with poros holes...dont want the dreaded lof.

Quick test clamp in vise pound with sledge see how it holds up. maybe weld a couple more pieces together the same way and check. since its kind of already on the frame...

i wont post youtube video. sure you can look up lof if you felt like it.

Be safe out there.
 

Ebrownie

Member
Messages
582
Reaction score
1
Location
Western Montana
I'm not sure why those turned out like that, thanks for noticing that. Really none of my other welds look like that, maybe the metal wasn't clean enough. Next time I take the spindles off I will grind those down and check them out, although they did seem to penetrate fine.

Today I also got some 3" high density foam and some vinyl, so I started making the seat. I drilled the holes in the tubing and plywood, then put the tee nuts in the plywood. When I stapled the vinyl on, I was standing on the plywood to compress the foam as much as I could. It is a tiny bit lumpy on one edge, but it looks ok I think.I only got the bottom part done, the backrest will come soon. Now that I look at it, I think I will definitely add some side pieces.
 

Attachments

  • IMG_4616.jpg
    IMG_4616.jpg
    326.6 KB · Views: 0
  • IMG_4617.jpg
    IMG_4617.jpg
    269.2 KB · Views: 1
  • IMG_4619.jpg
    IMG_4619.jpg
    338.2 KB · Views: 2

Ebrownie

Member
Messages
582
Reaction score
1
Location
Western Montana
My engine has been sitting all apart for like a month, so I figured I should actually get it back together since I have all the parts. So I popped the case halves in the oven and froze the bearings (transmission and crank bearings).

Out of the 6 I replaced, 4 of them slid right into the hot case. One of the crank bearings and one of the transmission bearings got hung up, so I just stuck a bolt through with washers and a bearing driver and screwed the nut down to 'press' them in. So now that they are all ready to go, hopefully I will get the bottom end together this week.
 

Attachments

  • IMG_4622.jpg
    IMG_4622.jpg
    374.6 KB · Views: 3
  • IMG_4623.jpg
    IMG_4623.jpg
    356.3 KB · Views: 2

Ebrownie

Member
Messages
582
Reaction score
1
Location
Western Montana
Got the engine all together, it went good. Mounted it up on the bike, and when I get an exhaust gasket in, I'll put some coolant, trans fluid and fresh mixed gas in and start it up for you guys :thumbsup:

I've been thinking about a gas tank for the kart too. Regardless, i think it will be below or level with the engine, so I'm gonna need a fuel pump. I see people often drill a hole in the reed valve block for a pulse fitting to power a pulse pump. Has anyone done this on a two stroke dirt bike? I also read that you have to rig up a return line so the pressure doesn't bypass the float needle and flood the engine? I've never done this before and I would prefer to not mess my engine up.
 

Ebrownie

Member
Messages
582
Reaction score
1
Location
Western Montana
Steering assembly is done! I welded both the supports onto the frame, both with oilite bushings inside of tubing. To make the shaft, I drilled a big hole in a piece of flat bar and welded it on to a piece of 7/8" tubing for the pitman arm, then drilled 3 holes in a plate and welded it on the other end to bolt onto the steering wheel. The upper shaft support bolts on, so I can take off the whole assembly if needed. On the bottom support, I welded a washer On the end so the shaft just bottoms out on the washer.

In the first couple pics, stuff is just tacked on, I welded it all up since then.

It doesn't look the greatest, but it works well and is pretty tight overall. I will drill and put a pin in the shaft just below the upper support so the shaft can't slide out also.
 

Attachments

  • IMG_4760.jpg
    IMG_4760.jpg
    365.7 KB · Views: 6
  • IMG_4757.jpg
    IMG_4757.jpg
    358.2 KB · Views: 11
  • IMG_4756.jpg
    IMG_4756.jpg
    210.5 KB · Views: 6
  • IMG_4715.jpg
    IMG_4715.jpg
    185.4 KB · Views: 6

Ebrownie

Member
Messages
582
Reaction score
1
Location
Western Montana
Bought a 4'x4' sheet of 1/8" thick aluminum diamond plate for the floor pan. I found it, basically brand new, on Craigslist for $50! I think it was like $150 from a metal supplier, so I got a really good deal on it.
 

Attachments

  • IMG_4766.jpg
    IMG_4766.jpg
    421.6 KB · Views: 9

Functional Artist

Well-known member
Messages
4,434
Reaction score
1,724
Location
Toledo, Ohio
Bought a 4'x4' sheet of 1/8" thick aluminum diamond plate for the floor pan. I found it, basically brand new, on Craigslist for $50! I think it was like $150 from a metal supplier, so I got a really good deal on it.


You got a deal cause of the blemish

...there is a huge pic of a go cart on it :thumbsup:
 

Ebrownie

Member
Messages
582
Reaction score
1
Location
Western Montana
Got my hydraulic brake master cylinder and caliper in, I just got it off eBay. im gonna have to mount the caliper up to the bolts that the bearings mount to, so they will move with the axle when the springs compress.
 

Attachments

  • IMG_4789.jpg
    IMG_4789.jpg
    363.2 KB · Views: 8

Ebrownie

Member
Messages
582
Reaction score
1
Location
Western Montana
The diamondplate floor pan is done. I cut it with my friends plasma cutter and then drilled holes through it and the frame and bolted it on. I also took everything off the frame so I could take a look at the porosity in the spindle brackets that you guys mentioned.

I have been pretty busy lately with a few different things. Obviously at this point I am not going to finish this in time for the competition, but I will continue to work on it this winter and hopefully have it done in a couple months.
 

Attachments

  • IMG_4863.jpg
    IMG_4863.jpg
    317.6 KB · Views: 6
  • IMG_4820.jpg
    IMG_4820.jpg
    184.6 KB · Views: 7

Kartorbust

Well-known member
Messages
3,902
Reaction score
194
Location
Utica, NE
Even if you don't finish this year, since you've kept a good log of everything you've done, you should be able to qualify for next year's competition.

Sent from my SAMSUNG-SM-G935A using Tapatalk
 
Status
Not open for further replies.
Top