2016 - Ouroboros: An inverted trike.

Status
Not open for further replies.

not_a_bot

Tinkerer
Messages
65
Reaction score
0
Location
Guadalajara, Jalisco, Mexico
Errrr... ok then.

So, back to business. More progress today.

Chapter 4: Still not over, still not dead.

Took a picture of that rack and pinion we shortened for comparison purposes. And maybe show off a bit.
48.5 cremallera recortada.jpg

As Murphy would have it, right as we were fitting the engine to it's cage, I noticed a cable got caught between the engine base and it's cage. Turns out it snapped off. And guess which cable got cut? Yeah, mother-effing charge coil cable. Took me an hour to disassemble the thing with no impact tools. That was fun. At least I can sho off the loads of experience I've gathered.
49 retraso coil charge.jpg

After a stressing test, with the engine finally running as it should (I didn't actually test it with a battery but I hope I did fine), it was time to bolt down the engine. 3 out of 4 drilled holes were spot on, one is misaligned, so the engine currently has 3 anchor points. I might be too lazy and leave it that way, most likely my brain will itch for me to fix it. Then, took measures, bolted down the pillow block bearings for the jackshaft, cut the shaft to size, and assembled.
50 motor en jaula.jpg

Yep, hot combustion gasses all over my left pillow block bearing. Looks like I'll modify the exhaust header after all. Or maybe not. Time will tell. Guy at the tool's warehouse was is a good mood and taught me how to break my chain using a hammer, a 1" nut and a couple of pointy pieces of metal. Kudos, he'll get a beer soon. Attached master link in the right direction and called it a day after checking it was aligned (by eye, as exhaustion would have it) and that it spun freely.
51 motor en jaula 2.jpg

Here's a layer of fiberglass applied. Will do nicely once painted and then covered with that paint truck bed liner paint thingy. We are aiming for a red and black with sand accents color scheme, were the tubular frame will be red, fiberglass body black w/texture, and sand will fit in there nicely somehow.
52 carroceria.jpg

Here's how we left it today, at almost 20:00.
53 estado actual.jpg


All we have to do is measure and install the 2nd axle, the one that drives the tire. Install the brake disc caliper will be tricky, I bet. Oh, build some pedals and make them work, and set up the steering wheel assembly. All of this by Monday.
Piece of cake, right?

TBC
 

not_a_bot

Tinkerer
Messages
65
Reaction score
0
Location
Guadalajara, Jalisco, Mexico
We still on chapter 4? When does it end?

Installed driven shaft, mounted pillow block bearing sideways because easier than welding more. Turns out we need a master half link, so jackshaft to wheel chain will become a reality tomorrow, then testing begins. Tabs for our spindles are cut to Ackerman angle, and the rear shock tabs are ready too, but the buzzbox was busy today, we'll do it first thing in the morning. Seat's pretty now. We have the shaft that will connect to the steering wheel, tomorrow that's getting a solution too.
We'll mount the rear shocks in such a position that, we hope, once the driver gets in, will make the thing as lined up as possible.
I'm kinda exhausted so I'll keep it short. Plus have homework that needs attention. Until next time (tomorrow).
 

Attachments

  • 54 eje trasero.jpg
    54 eje trasero.jpg
    352.5 KB · Views: 11
  • 55 eje trasero close up.jpg
    55 eje trasero close up.jpg
    459.3 KB · Views: 13
  • 56 asiento tapiz.jpg
    56 asiento tapiz.jpg
    348.7 KB · Views: 8

not_a_bot

Tinkerer
Messages
65
Reaction score
0
Location
Guadalajara, Jalisco, Mexico
Today we made more progress, no pics tho. Welded the rear shock tabs, seat's now welded in place, made and affixed the brake caliper support, tried the spindles with the rack and pinion, though we have something wrong there, lost too much time with the guy I got the rear wheel from. I have no rear tire as of yet, but the rim + brake disc allowed us to take measures and stuff.

All we have to do is weld a support for the steering column bearing, the bearing itself, figure out/build/buy and adapt pedals and we are set. Grind down the ugly welds, filler, primer and paint.

We have the whole weekend for it.
Thanks y'all for your comments, you as a community have taken a great role unknown to my teammates. I appreciate every single one even if I forget to say so. Tiredness makes me sloppy. And I've been so tired lately, that's what meeting due dates its all about.

Sent from my G760-L03 using Tapatalk
 

not_a_bot

Tinkerer
Messages
65
Reaction score
0
Location
Guadalajara, Jalisco, Mexico
Not dead yet.
All parts have been successfully tested, on their own. Maybe later today we'll test the whole thing.
Pictures show an almost finished assembly test, by the time we were done with the pedals.
Seat is covered because of welding/grinding/cutting metal,sparks hurt the fabric.
Later we realized our rack and pinion was mounted backwards :lolgoku:, wasted some time fixing it as the support had to be welded in a funny angle.
Oh, and my teammate welded, by mistake, our steering arm thingy backwards to the spindle, so we gotta get that fixed. Silly mistake, I couldn't figure out why we weren't getting the steering right.
We'll add some metal mesh to cover the chain/sprockets/dangerous bits, paint it a bright red (currently has only primer on), weld our metal sheet floor and voila. Hopefully.

Pics.
57 montaje.jpeg

58 montaje.jpeg

59 montaje.jpeg

TBC
 

not_a_bot

Tinkerer
Messages
65
Reaction score
0
Location
Guadalajara, Jalisco, Mexico
End of Chapter 4. A milestone has been reached.

So, it finally happened. Didn't post earlier because I'm kinda recovering from this semester's finals.
Worked the weekend, Monday and Thursday, because we had, without further prorogue, to present a functional product, that was to be shown on our Industrial Design student expo, were selected projects are displayed for everyone to see. Fancy stuff.
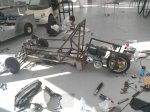
Wednesday morning, at 7:00, hours before the inauguration, we began the final assembly. And the very first test run, all things installed. It went well, everything performed as expected. It's not a perfect product by any means, but what I'm trying to say, is that it worked. In fact, we drove it around the uni, to the place were it was to be shown. Once there, our teacher wanted us to brag a bit (and him, because every teacher takes pride in their student's projects) so every member of the team took a lap around the expo. Heads were turned, specially when every other project in our semester, minus one, were modified bikes and scooters. The other motorized project, great looking btw, had a malfunction a day before, that could not be fixed in time. We won :lolgoku:.

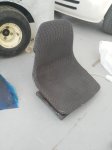
I was not satisfied with our trike's shell, but meh, its not permanent as the pics will show, and I plan to make another one from metal sheet.

All in all, we are very proud of what we managed to make, with no prior knowledge and/or experience, in under 2 and a half months, with mediocre tools and equipment. This might be the most I've learned with a school project.

Have some pics.

"Dimples" made on our shaft so the sprockets/pillow block bearing set screws had a nice gripping point and would not slide.
60 muesca flecha.jpg

Pictures.
61 vista.jpg

62 vista.jpg

63 vista.jpg

64 vista.jpg

A teacher snapped a picture of me explaining the thing. That girl is my other teammate.
me.jpg

Here's a video link of a general overview.

And here's the one video I have of the second time we tested it, right on the school's workshop patio. Told her not to hit the gas too hard because, as I discovered before her, the painted, smooth concrete floor + dust form everyone's work made for a very slippy surface.


TO DO LIST:
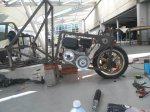
  • Rear shocks are too vertical. Have to reposition em, they lock "backwards" with big enough bumps/jumps.
  • Chain guard/TC cover
  • Kill switch (oopsie, I know its a must)
  • Adjust brake pedal, as it is it constantly rubs.
  • Seat belt
  • New metal sheet body
  • Improve wiring
  • Hold battery in place with something other that zip ties
  • Remove governor
  • Fine tune steering
  • Adjust TC to max low end torque
  • Headlights/brake light/misc. lights
  • Miscellaneous things I'll surely come up with
  • Miscellaneous things you'll surely come up with

Note: Later that day, we had a terrible time trying to get the engine, the only part of the project we felt proven, to start. Or it would start for a couple seconds, sputter and die. Once we took off the air filter, things were better. I should mention we had like 35 °C (95 °F) that day, and that my city is 1700 meters (a little more that 1 mile) above sea level. I recall reading something on the manual about adjusting stuff due to height.
My conclusion is that the stock air filter is too restrictive and the air was too hot, causing the malfunction. Can anyone shed some light on this? What should I do? Could there be any other explanation? The engine had never been tested in such high temperature, as we build stuff indoors/on shadowed areas. Thanks yall, awaiting comments, tips and everything else you feel throwing my way.

Ouroboros is currently sitting at the workshop patio, will (has to, more like) be moved home by Wednesday, at the latest.

TBC, now in a calm, thought out manner, lovingly and not as a chore.
 

bob58o

SuckSqueezeBangBlow
Messages
8,809
Reaction score
885
Location
Chicago-town USA
Thinner Air makes a Rich Mix

If it is Rich, a less restrictive air filter and exhaust should help.

OR

Smaller jets (high altitude jet kit) for the carburetor.

Rich mix leads to dark coloring on spark plugs.
Lean mix makes white looking plugs.
 

not_a_bot

Tinkerer
Messages
65
Reaction score
0
Location
Guadalajara, Jalisco, Mexico
Much appreciated guys. Reminder this is not over.
Say, what kind of jet would yall recommend me? Were I to add a high flow filter, should I change the jet too?
And, for you non USA based people out there, what's the best way/shop to buy from?
I'm eyeballing Air Filter Adapters, but the shipping costs the same or more than the item itself.
Plus, my dying currency makes it harder to buy in dollars.
 

Felineman

Death by misfortune
Messages
840
Reaction score
0
Location
Muskoka Lakes,Ont
Not fan of engine, A quad or motorcycle engine would have looked lot better, but we use what we have sometimes. Otherwise excellent job.
 

Denny

Canned Monster
Messages
8,480
Reaction score
4,714
Location
Mayberry, Indiana
Well done You strong and independent woman! ( Not gonna let that die easily) You need to set your toe to 0 so it does not wear tires. Congratulations on your class win! :wai:

Denny
 

not_a_bot

Tinkerer
Messages
65
Reaction score
0
Location
Guadalajara, Jalisco, Mexico
Well done You strong and independent woman! ( Not gonna let that die easily) You need to set your toe to 0 so it does not wear tires. Congratulations on your class win! :wai:

Denny

Hahaha, I was wondering when would that come up.
And yeah, our alignment is usable, but by no means perfect. Monday come, I'll pick the cart up, and now I'll be able to thinker to my hearths content.
Thanks everyone for their kind words and advice.
 
Status
Not open for further replies.
Top