You are using an out of date browser. It may not display this or other websites correctly.
You should upgrade or use an alternative browser.
You should upgrade or use an alternative browser.
2012 Build off, Kids UTV
- Thread starter DaiSan76
- Start date
- Status
- Not open for further replies.
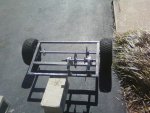
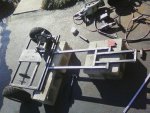
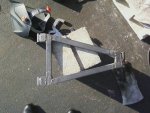
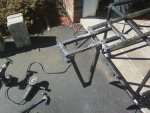
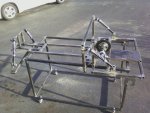
Almost finished with the swingarm. At least until I order some brakes. After I get the motor plate welded on, I'll move on to the main chassis.
Everything worked out so that I did not have to put the tires under the swingarm instead of next to it. whew. Measure twice or regret it for the rest of the build?
Everything worked out so that I did not have to put the tires under the swingarm instead of next to it. whew. Measure twice or regret it for the rest of the build?
Attachments
-
 swingarm2.jpg109.7 KB · Views: 35
 -
 swingarm3.jpg110.6 KB · Views: 41
 -
 swingarm4.jpg45 KB · Views: 85
oldbikerarlo
Old guy
Nice,
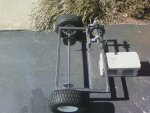
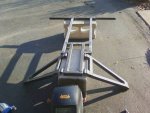
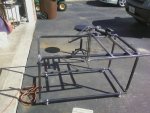
Main chassis started.
With any luck I'll have this part all done this weekend. 4 day weekend with 50s and sunny scheduled for all 4 days.
Time to order some parts from BMI.
With any luck I'll have this part all done this weekend. 4 day weekend with 50s and sunny scheduled for all 4 days.
Time to order some parts from BMI.
Attachments
-
 main frame2.jpg40.7 KB · Views: 31
 -
 main frame and swingarm.jpg44.6 KB · Views: 37
Your build is coming along nicely. You are going to have it finished wayyyy before the cutoff date. It will give you some time to iron out all the bugs
Your build is coming along nicely. You are going to have it finished wayyyy before the cutoff date. It will give you some time to iron out all the bugs
Thanks.

More likely I'll start taking the cutting wheel to my other Kart to add the suspension.

brandongeiger2
New member
Are you using dual a-arms or single?
Are you using dual a-arms or single?
I am still thinking about the top. I was thinking along the lines of an adjustable bar, kind of like my RC cars use, so that I can adjust camber. Whatya think?
Of course, this isn't 4wd, but the idea is the same.
Keegan
New member
Regarding your welding of the sprockets. If you take a propane torch (really cheap at a home improvement store) and heat up the piece you want to weld to say 250 - 400 degrees before welding, you can get some good welds with a smaller welder like you're using. This will help get better penetration from the start of the weld. I do this to cheat on really thick pieces for my 110volt Mig and even thick aluminum for my 200 amp tig welder.
You could put the pieces in the oven at 450 too, but don't let the wife catch you.
You could put the pieces in the oven at 450 too, but don't let the wife catch you.
brandongeiger2
New member
thats what i was thinking about doing with my project but i dont have the money at the moment...what i would do is take some heavy duty adjustable atv or race kart tie rods and lengthen them
Regarding your welding of the sprockets. If you take a propane torch (really cheap at a home improvement store) and heat up the piece you want to weld to say 250 - 400 degrees before welding, you can get some good welds with a smaller welder like you're using. This will help get better penetration from the start of the weld. I do this to cheat on really thick pieces for my 110volt Mig and even thick aluminum for my 200 amp tig welder.
You could put the pieces in the oven at 450 too, but don't let the wife catch you.
I had wondered if that might work, but I was too impatient to try it. ha ha.
Disappointed in the amount of work I got done today. I had to go to the zoo.

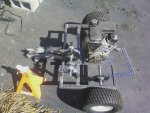
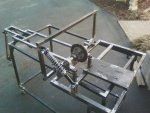
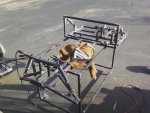
I didn't like the way the front suspension was working out, so I cut it off and re-did it.
Also, attached the swingarm to the main frame.
Also, attached the swingarm to the main frame.
Attachments
-
 new front suspension.jpg43.6 KB · Views: 39
 -
 swingarm mount.jpg52.2 KB · Views: 40
Looking good. Keep us updated.
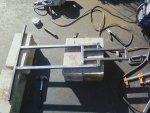
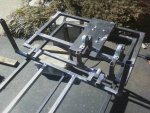
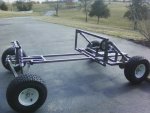
Suspension is mostly done. A few welds to run, but it's about 95%. I gave up trying to make my own spindles. My drill press has trouble with anything over 7.16ths, so my 5/8ths bolts were causing me issues making my own. IF my spindles come in from BMI tomorrow like they say, I'll have a rolling chassis by the end of the weekend!
Attachments
-
 suspension2.jpg98.7 KB · Views: 52
 -
 suspension.jpg93.2 KB · Views: 44
You have a nice clean build so far. Are you sure that the spindles you are getting will have the correct steering geometry build in?
You have a nice clean build so far. Are you sure that the spindles you are getting will have the correct steering geometry build in?
No, but my suspension has multiple points where I can attach the shocks, and the top arm isn't built yet. I should be able to get it close enough for a 10 mph vehicle. Thanks for the thought.
- Status
- Not open for further replies.