Three wheel mini-bike thing.

TNThomas

Well-known member
Messages
488
Reaction score
576
Location
Washington
You are one lucky man! I don’t know if you know the value of those tools but you have been given a great, great gift. The Beverly shear goes for around $1,000 the last time I priced them. You can buy new blades for them and they still make them. Read up on sharpening the blades for the shears and such. Be careful they will remove a finger in the blink of an eye.
Ive looked them up, its pretty humbling for sure. I hide the handles and keep the blades closed so my kids don't mess with them. I plan to cleanup and mount them all at some point, im still debating how best to do it, but I have a few ideas. The Beverly Shear is cool for sure. I would like to paint and clean it up. The Diacro tube bender is beautifully overbuilt. 1000001456.jpg1000001452.jpg

1000001454.jpg
 

panchothedog

Well-known member
Messages
2,788
Reaction score
3,733
You have a lot of stuff that most people don't even know exist. Tools from the way people USED to work. Incredible, how smart the people were that invented and engineered these things. From our Golden age. We really were the industrial revolution. Your elderly friend was good to you. Great score.
 

TNThomas

Well-known member
Messages
488
Reaction score
576
Location
Washington
Nothing big to report, but check these magnets out! I wish I had something like this when building the buggy. Very strong, and you can adjust them to weird angles. The four magnets alone are holding the rack up. Saw them at Harbor Freight and realized this is exactly what I needed for getting everything level, easily at least.

https://www.harborfreight.com/multipurpose-magnetic-v-pad-kit-4-piece-70730.html


1000001480.jpg
 

Attachments

  • 1000001479.jpg
    1000001479.jpg
    2 MB · Views: 154

TNThomas

Well-known member
Messages
488
Reaction score
576
Location
Washington
Ok, not far from being done with the rack. I'll get this stuff zapped on, then do some small small steel rod "rails" that will allow me to attach my Ortleib bike Panniers up front, kinda like saddlebags. The Buggy spends most of its time getting climbed on by kids, but hey, I have fond memories of climbing and sitting on old tractors while playing with the controls when I was their age. Ill be repainting the trike "International Harvester Red" with Rustoleum Tractor paint.1000001513.jpg1000001562.jpg1000001563.jpg
1000001561.jpg
 

Attachments

  • 1000001552.jpg
    1000001552.jpg
    4.2 MB · Views: 108
Last edited:

Kartorbust

Inmate #627
Messages
4,393
Reaction score
826
Location
Utica, NE
Whelp, found out that the forks need to be fixed first. Initial inspection found the Aluminum triple tree looked a little weak/fragile being made of Alumium and tightened with Allen head bolts. Initial test run has confirmed this issue. Will be replacing with steel and welds, as well as wearing Carhatt pants next time (got some road rash). Stay tuned. I think I'll put a small rack up front too, along with a second set of pegs further forward. This thing will wheelie forever, haha.

View attachment 157026

View attachment 157025

View attachment 157024

View attachment 157023
hlmb3vdimew41.png

Yeah that'll leave a mark. Glad you made it out, mostly intact...don't worry about the peeled off skin, thats there to slow you done from going too fast.

Nice to see the upgrades to the triple tree and a front basket. The kid that built it did pretty well all things considered. Probably wasn't expecting it to be ridden by a full grown adult.
 

TNThomas

Well-known member
Messages
488
Reaction score
576
Location
Washington
Almost done with the rack, most everything is tacked on. I love these Ortleib panniers. I have had a larger set for about 13 years, and a few thousand miles on rla rode bike, just super well built, water proof, tough, simple, and quick ti securely attach. In my college days I kept dry cloths in them and had a "wet" set for riding to school about 8 miles round trip.


1000001646.jpg1000001649.jpg1000001647.jpg1000001650.jpg
1000001653.jpg
 

Attachments

  • 1000001652.jpg
    1000001652.jpg
    3 MB · Views: 83

TNThomas

Well-known member
Messages
488
Reaction score
576
Location
Washington
2" Reciever installed under the seat. 1.25" square tube with 45 deg cuts flanking the reciever is intended to pop the seat up a bit to help stop the backwards lean with wheelies. I may put a whip flag on the excess material hanging off; or I may not. Cheers1000001665.jpg1000001666.jpg
 

TNThomas

Well-known member
Messages
488
Reaction score
576
Location
Washington
That wheelie bar is a tour de force of engineering, along with the rest of the trike. Superrrrb.
Yea, kid was 15 who built it, not bad at all! Some welds and angles are off, but well within the realm of functional.
 

TNThomas

Well-known member
Messages
488
Reaction score
576
Location
Washington
Worlds strongest mini bike forks. Finished off the welds and put the little loop rail down low. These double as an attachment point for my bags, and as a vertical mounting spot for tools. 1000001683.jpg1000001684.jpg
 

TNThomas

Well-known member
Messages
488
Reaction score
576
Location
Washington
-Comet belt purchased
-Got a steering stabilizer hooked up
-Paint mostly stripped on frame
-Painted the forks
-I have to redo the engine mount and fis the right peg (bad mounting angles). I will likely make a skid plate and beefvthe frame up a touch.

Liking the International Harvester Red.

1000001919.jpg1000001922.jpg
1000001921.jpg
 

Grizzlymi

Wolverine
Messages
1,122
Reaction score
817
Location
Michigan
Might just be me, but nothing compares to having it all apart, painted and ready for final assembly. Something about that final assembly with everything painted and figured out going back together and seeing it take shape!
 

TNThomas

Well-known member
Messages
488
Reaction score
576
Location
Washington
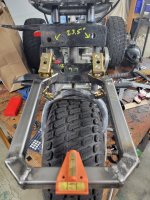
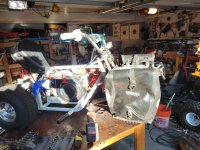
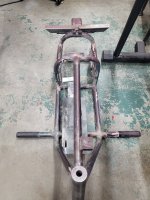
Ok, last big welds finished today, might be done welding overall on it. Engine stuff today. More pics to come:

The original Engine plate/mount was not done properly, looks to have been two mounts of different sizes stacked and welded in each other. The engine was also angled to the left/counterclockwise a few degrees. And, the top bar was welded directly over the spark plug. So to love all these problems I cut the mount out/sliced a bunch of stuff off, and found a new properly sized plate with slots to get chain tension. The new engine mount is about 3/8" lower, rotated clockwise a few degrees (to level it out), moved to the right about 3/4" so I can access the spark plug. I also cut the right footpeg off and rewarded it on. It was not square. Lastly, where the frame scraped on the street, I put some "hard-facing" stitches/X shapes on the frame. Looks cool, and strengthens it up a bit/protects it from scrapes.

1000002003.jpg
1000002006.jpg1000002007.jpg
 

Attachments

  • 1000002004.jpg
    1000002004.jpg
    2.4 MB · Views: 25
Last edited:
Top