Baja 200 Upgrades

joshw0000

Well-known member
Messages
304
Reaction score
346
I decided to scuff up some parts while they're off the motor.

PXL_20251211_014724604.jpg

Paint them as bright as possible with all the crazy colors I have left over from other projects.

PXL_20251211_015551691.jpg


PXL_20251211_022949942.jpg

And add some clear.

PXL_20251211_024104382.jpg

It's not exactly what I had in mind. Oh well, it's just a mini bike. Next time I'll use a different color like red for the base.

PXL_20251210_234544487.jpg

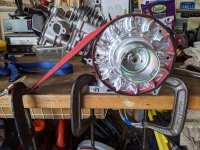
Flywheel is on. I'm not sure how you're supposed to torque that nut, but the only way I could do it was to slide the small piece from the torque converter (with the key) on the shaft and hold it with vice grips. Then I could torque the flywheel bolt with the other arm.
 

Whitetrashrocker

Inmate #952016
Messages
4,577
Reaction score
3,594
Location
Southern New Mexico
Another way is to fill the cylinder with some rope that will fit in the spark plug hole. Then roll the piston up till its bound and crank away. Just make sure to leave the tail of the rope so you can pull it back out.

Or buy or make a piston stop tool.
 

joshw0000

Well-known member
Messages
304
Reaction score
346
I've officially encountered the hardest part of this build....reassembling the pull start recoil assembly. I can't tell you how many times it sprung back on me. I got it together a few times but the pull cord was limp (i.e. 6-12" inches that wouldn't retract on the coil assembly). After many failed attempts, it turns out I was doing it right all along but the handle to the pull cord isn't removable, so I couldn't adjust it there, only on the inside where it knots to the coil assembly.

So I took apart the pull start recoil of a broken motor I have and stole the handle from it. That handle can be disassembled. In order to get it wound tightly all around, I had to carefully wind the spring and hook it in place. Then coil it as far as it would go....still 6-12" hanging out. So I unhooked the handle and wound the spring backwards another full turn until it engaged. Now the end of the cord is inside the assembly. Then I carefully turned the assembly back some and held it with one hand while I fed the cord back through the hole in the recoil assembly, through the handle, and knotted it. Now it holds tightly like it did from the factory.

What a pain! I don't see how anyone could have assembled it originally without a removable handle.
 

Hellion

Moderator
Messages
8,411
Reaction score
3,545
Wow, if you can figure out and fix the clockwork spring on a recoil starter, that's next level. It's a very satisfying fix when you figure out the best way to do it. And do it often you must, it seems, as that rope has a tendency to dangle.

I'm not sure how you're supposed to torque that nut

I have the large 16" channel loc pliers with the super long rubber coated handles, so I would jam one of the soft handles into the cooling fins with the head of the pliers resting on the floor. Use some body english (your body weight) on the engine and torque the nut with your free hand.

Briggs used to sell a flywheel holder for torquing the flywheel nuts on the old flatheads... I wonder if there is something similar for OHV Honda/Predator/clone engines. EDIT: did not get any search results for a Predator flywheel holder for example, only the Briggs one:


Hellion

Moderator
Messages
8,411
Reaction score
3,545
Jewel the fins with a dremel. Like this.

View attachment 158607

That's actually very do-able and easier than polishing everything. Paint just the cylinder cooling fins and then you can highlight the edges with Dr. Emel or use a nice bastard file. Afterwards, if you wanted to polish something, the block is a lot easier to do than the cylinder.
 

Grizzlymi

Wolverine
Messages
1,135
Reaction score
841
Location
Michigan
That's actually very do-able and easier than polishing everything. Paint just the cylinder cooling fins and then you can highlight the edges with Dr. Emel or use a nice bastard file. Afterwards, if you wanted to polish something, the block is a lot easier to do than the cylinder.
Block and side cover for sure, cylinder head will def be a challenge but we shall see. Just dug out a few old Rotaderp Hemi motors in the garage. One is built up already, all ARC billet nick knacks, Isky Mamba cam, 26# springs, yadda yadda yadda. The other I forgot about is a Hemi that I already stripped down, plugged all holes after gov removal and have everything else for it. Maybe had a couple runs on it stock before I disassembled for a project I can't even remember what it was for. :ROFLMAO: This is going to happen. I need a side project as this cold @ss winter is already here!
 

Minimichael

Member
Messages
41
Reaction score
52

panchothedog

Well-known member
Messages
2,788
Reaction score
3,736
The inner sheeve of a 30 driver with two holes drilled to line up with the same holes that you bolt the converter to the engine. Get a couple of 2" 5/16x24 bolts,
slip it on the shaft, run the bolts in and she's locked up real good. I think I got this from one of Red Beards Garage video's.
 

joshw0000

Well-known member
Messages
304
Reaction score
346
So, my Baja has a headlight (swapped with LED) and I didn't originally consider that when I built this Predator. Can I simply steal the charging coil from the old motor or buy a new one?

This is the aluminum flywheel I bought - https://a.co/d/048GCgJ.

From what I'm reading, I just need to pull the flywheel back off and bolt the charging coil behind it. I'm not sure if I need a specific aluminum flywheel to work (or many only the stock type work) with a charging coil or if they all do.
 

Hellion

Moderator
Messages
8,411
Reaction score
3,545
From what I'm reading, I just need to pull the flywheel back off and bolt the charging coil behind it. I'm not sure if I need a specific aluminum flywheel to work (or many only the stock type work) with a charging coil or if they all do.

If I understand correctly, the lighted flywheels have a magnet on the inside that passes over the lighting coil that is mounted behind the flywheel. Basically two coils, two magnets per flywheel. EDIT: like WTR just said.
 

joshw0000

Well-known member
Messages
304
Reaction score
346
Will the old flywheel fit the rotoderp?
You're referring to the flywheel from the Baja? I'm not sure.

I guess for mini bikes, when you go aluminum, you just take the headlight off or get a battery and tender? I can't find any aluminum flywheels with magnets on the inside for a charging coil.

Speaking of flywheels, that aluminum one came with a key but I used the factory one because it looks different. Should I have used the one that came with it?
 

Hellion

Moderator
Messages
8,411
Reaction score
3,545
...when you go aluminum, you just take the headlight off or get a battery and tender? I can't find any aluminum flywheels with magnets on the inside for a charging coil.

Well part of the charm of these Baja/Massimo/Coleman bikes with the headlights are the headlights. Very useful but they do go a bit dim at idle, meaning they are not perfect, but that's okay. I'd rig up a tail light too, whether you retain the alternator/lighting coil or not.

I wonder if a suitable LiPo battery could be retrofitted inside that rather massive headlight bucket? :unsure: I'd put a charge port on the side of the bucket too....
 

joshw0000

Well-known member
Messages
304
Reaction score
346
Well part of the charm of these Baja/Massimo/Coleman bikes with the headlights are the headlights. Very useful but they do go a bit dim at idle, meaning they are not perfect, but that's okay. I'd rig up a tail light too, whether you retain the alternator/lighting coil or not.

I wonder if a suitable LiPo battery could be retrofitted inside that rather massive headlight bucket? :unsure: I'd put a charge port on the side of the bucket too....

The previous owner already rigged up a running light on the back. I could probably mount one of these in the faux gas tank.

 
Top