Brake cable travel not long enough

Dinogrant21

New member
Messages
15
Reaction score
9
I recently installed a mechanical caliper and disk and I noticed the brake is very finicky. Ive tried adjusting things on my pedal and caliper and ive ran into two main issues. Either my disc rubs and when the pedal is pressed it brakes fully or when the disk doesn't rub the it only brakes half way. I feel like I need more travel in my cable so my brakes dont rub and so that they fully brake. Any sugestions?View attachment 155731View attachment 155730View attachment 155729View attachment 155729View attachment 155729View attachment 155731View attachment 155729View attachment 155730View attachment 155731
 

Hellion

Moderator
Messages
8,815
Reaction score
3,835
Ahh, much better. Our talented team of experts will be with you momentarily. Please continue to hold on.


panchothedog

Well-known member
Messages
2,830
Reaction score
3,818
You say it's either too much, or not enough. I assume you know how to adjust the brake pad clearance by using the lock nut and the smaller bolt on the outside of the caliper housing. You need to find the sweet spot. Some trial and error for sure. Most kart brakes need to be adjusted with the moveable pad just barely rubbing. FWIW, up front, your cable isn't going to last very long rubbing the end of the housing like that. It should be pointed towards the pedal attachment point.
Also, it looks like it is drooped over a piece of metal about half way up. Both of these things will make short work of your cable. You've got some cleaning up to do.
 

Hellion

Moderator
Messages
8,815
Reaction score
3,835
By your username, your kart is a Manco Dingo, is that right? Anyway, if you look at a Manco Dingo, the brake setup on a factory OEM Dingo is pretty much perfect and effective. Manco and most go karts that have a mechanical disc brake or mechanical drum brake used a metal rod as the brake actuator and not cable. You also need to activate or pull the brake in a straight line or as much as possible.

Steel braided cable, at least the diameter you are using, is better suited for hand operated brakes on a mini bike for example because the cable will stretch under extreme foot pressure and/or absolutely *standing on the brake* which people tend to do. Steel rod is much better.

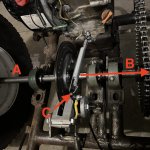
Your engine and brake setup seems very unusual. Most people put the brake and caliper near the wheels, (direction A or B) but usually at the left rear wheel (B) so the brake rod can connect with the left (brake) pedal in a straight line shot front to rear.

Image 25.jpeg

You should put the brake cable (or rod) into the top hole at C and not the spring. You will have much less brake leverage with the cable or rod mounted in the bottom hole. There is no need for a return spring as the brake pads should be lightly "dragging" on (or in light contact with) the brake disc at all times, just like automobile brakes.

You really need to have the caliper loose mounted so it can "float" on the disc. There is a "C" channel mount for that caliper that welds or bolts to the frame and the caliper fits loosely into it.


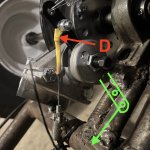
D: How is the brake cable connected to the caliper lever? Ideally, the cable should have a solid eyelet molded or cast onto the end so that it can pivot freely. Why is there yellow shrink wrap on this connection, to prevent fraying?

The cable should be pulling brake lever in as straight a line as possible and running it through a tube welded to the frame is not ideal. You have a friction point there that is not good.

Pulling the brake lever (in green) from the bottom of the kart might be better, and I would strongly advise moving the brake to the left side near the left wheel.

Image 26.jpeg


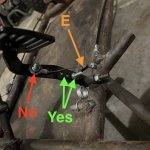
For the last photo, the brake cable (in Red) is mounted way too high on the pedal and it makes the cable exit the ferrule at an extreme angle. This is not good. Make it as straight a line as possible and if possible, replace the cable with a solid steel rod, 1/4" diameter.

The tab on the brake pedal (orange E) is a pedal stop to prevent it from moving too far back. The tab should be resting on the frame and the brake pedal should pivot on a hole usually drilled through the frame or below it perhaps. That is just the way that pedal is designed.

Image 27.jpeg


How many axle bearings are there? Two is enough but you may indeed have four. Show us more photos of the kart.
That is some Rube Goldberg engineering... Sorry bro 😬 but it can be fixed with the help of our team of experts.....:wai:
 

Dinogrant21

New member
Messages
15
Reaction score
9
By your username, your kart is a Manco Dingo, is that right? Anyway, if you look at a Manco Dingo, the brake setup on a factory OEM Dingo is pretty much perfect and effective. Manco and most go karts that have a mechanical disc brake or mechanical drum brake used a metal rod as the brake actuator and not cable. You also need to activate or pull the brake in a straight line or as much as possible.

Steel braided cable, at least the diameter you are using, is better suited for hand operated brakes on a mini bike for example because the cable will stretch under extreme foot pressure and/or absolutely *standing on the brake* which people tend to do. Steel rod is much better.

Your engine and brake setup seems very unusual. Most people put the brake and caliper near the wheels, (direction A or B) but usually at the left rear wheel (B) so the brake rod can connect with the left (brake) pedal in a straight line shot front to rear.

View attachment 155740

You should put the brake cable (or rod) into the top hole at C and not the spring. You will have much less brake leverage with the cable or rod mounted in the bottom hole. There is no need for a return spring as the brake pads should be lightly "dragging" on (or in light contact with) the brake disc at all times, just like automobile brakes.

You really need to have the caliper loose mounted so it can "float" on the disc. There is a "C" channel mount for that caliper that welds or bolts to the frame and the caliper fits loosely into it.


D: How is the brake cable connected to the caliper lever? Ideally, the cable should have a solid eyelet molded or cast onto the end so that it can pivot freely. Why is there yellow shrink wrap on this connection, to prevent fraying?

The cable should be pulling brake lever in as straight a line as possible and running it through a tube welded to the frame is not ideal. You have a friction point there that is not good.

Pulling the brake lever (in green) from the bottom of the kart might be better, and I would strongly advise moving the brake to the left side near the left wheel.

View attachment 155741


For the last photo, the brake cable (in Red) is mounted way too high on the pedal and it makes the cable exit the ferrule at an extreme angle. This is not good. Make it as straight a line as possible and if possible, replace the cable with a solid steel rod, 1/4" diameter.

The tab on the brake pedal (orange E) is a pedal stop to prevent it from moving too far back. The tab should be resting on the frame and the brake pedal should pivot on a hole usually drilled through the frame or below it perhaps. That is just the way that pedal is designed.

View attachment 155742


How many axle bearings are there? Two is enough but you may indeed have four. Show us more photos of the kart.
That is some Rube Goldberg engineering... Sorry bro 😬 but it can be fixed with the help of our team of experts.....:wai:
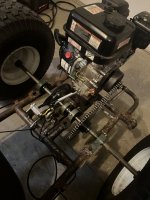
Haha yeah its definitely not the best set up. So a little back story of how this monstrosity of a kart was built, is that my buddy gave me a frame and I just started throwing things on it and tried to make everything work. So thats why everthing is a little jank and I call it the scrap kart. But the reason the axel looks weird is because I never could mount my sproket correctly to the wheel so I decided to get a live axel. After doing so I hated the way it turned so I cut the axel in half and added more bearings so that I'd still have my perfect allignment and my one wheel peel. As for the cable situation, The reason why there is yellow shrink wrap is because I crimped an electrical eyelet to it so I could bolt it to the lever. Alos the reason for the wird brake placement was simply for symmetry. I have tons of room on the left side outside of the frame so I do have room to run a rod but im not sure how to do it. I know this wasnt stated but I know the weld look terrible 😭 but its bc im using a $150 3-1 welder. So from what im hearing what I need to do is move my disk and caiper to the outside of the frame on the left wheel and setup a rod setup.

thumbnail_IMG_9795.jpgthumbnail_IMG_9794.jpgthumbnail_IMG_9796.jpg
 
Last edited by a moderator:

Hellion

Moderator
Messages
8,815
Reaction score
3,835
:smiley_omg: :roflol:


Welp, that's {part of} your problem. 😂 All that excess brake cable all looped around, that's some funny stuff right there. The cable conduit or sheath needs to run along the frame and be zip-tied to it. With all that slack, the cable conduit will want to coil up, kink and move before any braking happens if you understand my meaning. That is wasted movement. Get rid of it and use a nice steel rod!

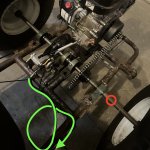
Put the brake disc outboard of the frame at the red circle and weld or bolt the brake caliper bracket to the frame in the vicinity nearby. Run the brake and rod close to the frame so you don't have the brake rod hanging out far away from the frame where it will be vulnerable to damage....

Image 29.jpeg

The steering tie rod angles look wack too, but if it works, it works.

Idk why when I reply its like making three

Site issues; it happens to everyone. Just click out of the "Oops! we ran into some problems" message, refresh the page, and your message will be there.
 

Hellion

Moderator
Messages
8,815
Reaction score
3,835
Don't do any wild jumps in that thing, hoping for some "big air". The landing will likely bend your axle into a banana! :cheers2:
But you can tell all your buddies it was worth it!

Looks like you need a CVT/Torq-A-Verter/Torque converter. What is the height of your rear tires and the tooth count on the clutch and axle sprocket?
 

Hellion

Moderator
Messages
8,815
Reaction score
3,835
Haha yeah its definitely not the best set up. So a little back story of how this monstrosity of a kart was built, is that my buddy gave me a frame and I just started throwing things on it and tried to make everything work. So thats why everthing is a little jank and I call it the scrap kart. But the reason the axel looks weird is because I never could mount my sproket correctly to the wheel so I decided to get a live axel. After doing so I hated the way it turned so I cut the axel in half and added more bearings so that I'd still have my perfect allignment and my one wheel peel. As for the cable situation, The reason why there is yellow shrink wrap is because I crimped an electrical eyelet to it so I could bolt it to the lever. Alos the reason for the wird brake placement was simply for symmetry. I have tons of room on the left side outside of the frame so I do have room to run a rod but im not sure how to do it. I know this wasnt stated but I know the weld look terrible 😭 but its bc im using a $150 3-1 welder. So from what im hearing what I need to do is move my disk and caiper to the outside of the frame on the left wheel and setup a rod setup.

Scrap Kart it is!

I understand. You created an independent rear axle. Kinda neat. One-wheel-peels can turn really well but they have poor traction in the dirt. You have a mixture of features. If I were you, I might turn it into a parking lot or pavement pounder and mount smaller tires and wheels.

Wow, an electrical eyelet. Yeah that will never hold even if you welded/soldered it.

Symmetry is your enemy here in the kart world, but I love that you are an "artist" wanting it to look right.

It's not the welding machine but the welder (you). Practice, practice, practice and Get Good!

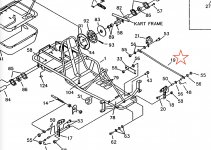
If you need help with a rod operated brake, we can advise. I'll just go ahead and say that most hardware stores have steel rod in various diameters. You can either pound the ends flat with a hammer and anvil [possibly heating it to red hot in the process] or weld a washer to each end in a vertical orientation. Basically you are copying the rod, part #19 in this parts manual (pic is attached):


Screenshot 2025-08-11 at 1.47.59 PM.jpeg
 

Dinogrant21

New member
Messages
15
Reaction score
9
Idk why when I reply its like making three
Don't do any wild jumps in that thing, hoping for some "big air". The landing will likely bend your axle into a banana! :cheers2:
But you can tell all your buddies it was worth it!

Looks like you need a CVT/Torq-A-Verter/Torque converter. What is the height of your rear tires and the tooth count on the clutch and axle sprocket?
Im running a 12T max-tourque clucth with a 60T sproket. I mainly just ride around on the road so it does the job and gets me up to 34 mph 🤷‍♂. But yeah I know its jank buts its learning and I just want something functional. So I will be heading to the harware store for the rod. You think I would just weld nuts on the ends for the bolts?
 

Dinogrant21

New member
Messages
15
Reaction score
9
It definently would bend my axel 🤣. That was my biggest mistake was when I bought axel it was for my old mower wheels that were 3/4" and i regret not just stwitching a 1".
 

Hellion

Moderator
Messages
8,815
Reaction score
3,835
So I will be heading to the harware store for the rod. You think I would just weld nuts on the ends for the bolts?

WASHERS would be better to serve as a pivot point, but it is one way of doing it. Wait around for all the old forum guys to weigh in on the subject, there might be a better way but it's not after 5pm EST yet. 🕔
 

Hellion

Moderator
Messages
8,815
Reaction score
3,835
WASHERS would be better to serve as a pivot point, but it is one way of doing it. Wait around for all the old forum guys to weigh in on the subject, there might be a better way but it's not after 5pm EST yet. 🕔

A nut 🔩 would work too, but make sure the fastening screw isn't the same thread as the nut, but if it is, don't crank down on it, you want it to freely pivot -- and put a nut on the other end too.
 
Top