First build, Grand Daddy

MTScott

Active member
Messages
146
Reaction score
128
Location
Montana
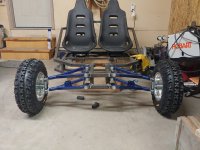
I made the box 2" wider, and 1" longer (so 7"x13"). No way I could have fit these with bolts at 12" long. The extra width was partially to help with the angle of the steering rods with the 11" steering rack.
0318222032_copy_873x1164.jpg

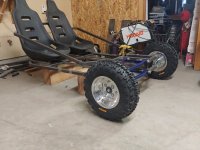
All assembled. I used 3/4" thin wall (.083 I think) tube to make small spacers in order to space the joints properly at the spindle, as well as give the hiem ball joint room for all the travel possible

0322221935_copy_1164x873.jpg

0322221936_copy_1164x873.jpg
 

MTScott

Active member
Messages
146
Reaction score
128
Location
Montana
After all the effort put towards these A-arms to get them as perfect as possible, well, they're not perfect. A good fixture welding table would help a lot, but mostly better welding skills as well. The steering box also had to be redone a couple times. Didn't matter how square I had it tacked, it ended up twisted and out of square after welding. I think one of the mistakes I've been making is finish welding over the top of my tacks. it doesn't matter how well you have it clamped, once you put down a hot molten it shrinks and pulls and puts that tension into the steel. As soon as I pull the clamps it goes where it wants to. My theory about welding over the tacks, is that the became part of the puddle, and didn't do their job to keep the joint in place... seems obvious now. Maybe by the end of this I'll be getting better, or maybe I'll actually take a welding class.

The hinge points actually did turn out really well. The combination of the bushing flange, and 10awg 5/8 stell machine bushings filled teh spindle bracket perfect. The move freely and smooth. I just used the 5/8 bolts to attach the spindles then tack them to the steering box. I still have yet to finish weld that, but I'll do things a bit different this time.
 

Mvp6905

New member
Messages
8
Reaction score
6
Location
South Carolina
MTScott I just started my build and my seats were on back order. I want to wait until I get the seats to figure out if I am going to have to stretch the frame. Did you have to widen the frame any for the seats? Look forward to watching this build for inspiration for my own build.
 

MTScott

Active member
Messages
146
Reaction score
128
Location
Montana
MTScott I just started my build and my seats were on back order. I want to wait until I get the seats to figure out if I am going to have to stretch the frame. Did you have to widen the frame any for the seats? Look forward to watching this build for inspiration for my own build.

If you got the same seats from jegs, you shouldn't need to widen (I didn't)... They just barely fit. Not that widening is a bad idea, but you'll have to adjust everything else as need along the way.

Whatever you decide, I'd wait for the seats and sliders to drill and weld the seat support rails... The width and bolt locations weren't exact to the plans for me.
 

madprofessor

"Loose Cannon Creations"
Messages
2,899
Reaction score
888
Location
Jacksonville, Florida
I think one of the mistakes I've been making is finish welding over the top of my tacks.
Just watched a guy on Graveyard Carz doing what he called "stitch welding" to finish a sheetmetal floorpan he'd just tacked down, to prevent putting that heat into it. Wasn't quite what I thought stitch welding was, but you just reminded me of what he said about it. The tacks he had were only 1-2 inches apart, but he didn't try to close the gaps. Said he was touching a tack to start the arc, but then basically lifted again right away, leaving a "stitch". Then he hopped over the next ready tack and repeated. Came back at the end with smaller spaces by then, and repeated same procedure until all the gaps were closed.
Brain-logged that for my own sheetmetal welding in future, but wondering now if it's not also a good idea for keeping excessive heat out of thicker metal like you've been having getting twisted on you.
 

MTScott

Active member
Messages
146
Reaction score
128
Location
Montana
I could probably build another go kart with the amount of wire I've wasted by forgetting to attach the ground.
 

MTScott

Active member
Messages
146
Reaction score
128
Location
Montana
Just watched a guy on Graveyard Carz doing what he called "stitch welding" to finish a sheetmetal floorpan he'd just tacked down, to prevent putting that heat into it. Wasn't quite what I thought stitch welding was, but you just reminded me of what he said about it. The tacks he had were only 1-2 inches apart, but he didn't try to close the gaps. Said he was touching a tack to start the arc, but then basically lifted again right away, leaving a "stitch". Then he hopped over the next ready tack and repeated. Came back at the end with smaller spaces by then, and repeated same procedure until all the gaps were closed.
Brain-logged that for my own sheetmetal welding in future, but wondering now if it's not also a good idea for keeping excessive heat out of thicker metal like you've been having getting twisted on you.

Yeah, this hobby requires constant learning it seems. What I've arrived at is to tack more locations, check square, double check square, tack again.... make sure that it is lined up with lots of tacks before I start burning it all together. It seems to be helping. I'm also not welding it ALL ... if a 1" weld is all the strength it'll need, that's what I do to keep from putting so much heat in it. As you pointed out, heat is the issue it seems. I'm also not increasing heat all the way for the thicker bits if I don't have to.

I've watched a few videos on welding miter joints, and there technique/order for tacks and welds. The most consistent process seems to be to weld the outside corner first, as it doesn't really have the leverage to pull much, then weld the 45* miter cuts from the inside corner -> outside corner one after another, then weld the inside corner last. I've been allowing it to cool before I do the inside corner to double check square and make sure it is where I want it. I follow this same process for tacks as well.
 

MTScott

Active member
Messages
146
Reaction score
128
Location
Montana
MTScott I just started my build and my seats were on back order. I want to wait until I get the seats to figure out if I am going to have to stretch the frame. Did you have to widen the frame any for the seats? Look forward to watching this build for inspiration for my own build.

One more point to your question... widening might not be a bad idea if you lengthen. I sometimes wonder if I should have done this. Another inch of space between the seats, and between the seats and the outside rail wouldn't hurt (it is a pretty close fit). Its an odd number but you could go 3" wider to do this. Maybe even go 4" wider with two extra in the middle. Might give more space for something like a parking brake lever.

Not sure if you'd want to widen the rear subframe the same as well, but I think there is plenty of axle length to not be a problem. Having more space on that subframe might make it easier to fit more on there (battery, jackshaft, reverse transmission, etc...).

Just pay attention to the plans... i.e. if you want your subframe to be wider, you have to widen the supports on the rear of the main frame that the upper rail, because your shocks mount to them from the subframe
 

MTScott

Active member
Messages
146
Reaction score
128
Location
Montana
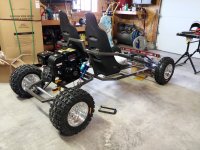
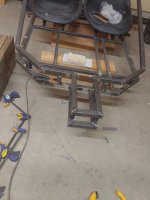
Rear subframe is on, and mocked up engine location. I ended up making the subframe 2" longer because the 420 is a good bit bigger than the plans were designed for. I also kinda wish I'd made it a couple inches wider too, but the upper shock mount location was already part of the mainframe. The 420 with TC clutch on pretty much fills the space between the shocks. There isn't much room left for a battery tray, so I'll have to figure out another location for that. I built the hinge points the same way I built them for the A-arms using the 2" x 3/4" (ID) steel bushings, then 5/8" ID flanged brass bushings. Should be much quieter than what the plans called for just using a spindle bracket on both ends.

0425221716_copy_1164x873.jpg
 

Mvp6905

New member
Messages
8
Reaction score
6
Location
South Carolina
One more point to your question... widening might not be a bad idea if you lengthen. I sometimes wonder if I should have done this. Another inch of space between the seats, and between the seats and the outside rail wouldn't hurt (it is a pretty close fit). Its an odd number but you could go 3" wider to do this. Maybe even go 4" wider with two extra in the middle. Might give more space for something like a parking brake lever.

Not sure if you'd want to widen the rear subframe the same as well, but I think there is plenty of axle length to not be a problem. Having more space on that subframe might make it easier to fit more on there (battery, jackshaft, reverse transmission, etc...).

Just pay attention to the plans... i.e. if you want your subframe to be wider, you have to widen the supports on the rear of the main frame that the upper rail, because your shocks mount to them from the subframe
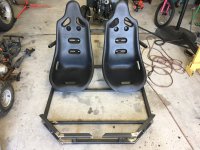
I got my seats earlier than expected. I widened the frame 3" and this pic just shows the seats loosely sitting in the frame. I feel like I should lengthen the main frame as well. My foot hits the front of the frame where I would expect the peddle to be if I were to "floor it." Also no point in having adjustable seat rails if they are always going to be at the furthest point to the rear. How far total did you extend the main frame? I think I saw 6"? And do you like that way better? Thanks!


Gokartseats.jpg
 

redflash

Well-known member
Messages
650
Reaction score
619
I went 10 inches longer with the arachnid...I'm 6 foot even, and that was perfect, yes I had to add another crossbar or two .

Da Flash
 

MTScott

Active member
Messages
146
Reaction score
128
Location
Montana
I think I saw 6"? And do you like that way better? Thanks!

I extended 6", and I think that is about right for me (5'11"). You could possibly stretch further, but I could fit reasonable with the seats all the way a back, and my 9 year old can still reach everything comfortably with the seats all the way forward (granted, he is tall for a 9yo). I think the sliders are worth having in my situation, but if you're the only one who will ever ride it, then maybe not. I really just sat in the seat mocked in, determined where the pedals will be, and made my choice based on that.

6' is probably the max comfortable height for 6" of stretch, but this design really is for kids. When I build my own buggy, it'll be a different ball game (and different plans).
 

Mvp6905

New member
Messages
8
Reaction score
6
Location
South Carolina
What spindles did you go with? Did you get them from BMI Karts? I looked through the plans and found nothing for dimensions. I see they offer a few different options. Got the PN of what you used by any chance?
 

MTScott

Active member
Messages
146
Reaction score
128
Location
Montana
What spindles did you go with? Did you get them from BMI Karts? I looked through the plans and found nothing for dimensions. I see they offer a few different options. Got the PN of what you used by any chance?

I went with the standard 3/4" spindles. They are on BMI karts but can also be found on amazon, which is where I got mine, but it is no longer listed now. I ended up with the 3/4" by 4.5" spindles, much like this:

The 4.5" ended up being slightly too short though for the hubs if using the nylon spacer/bearing the spindles come with. I'm making it work by just using a machine bushing to rest the inner bearing against. Either way, it might be worth considering the 6" length to be more flexible.... I really only needed another 1/2" to make it work, so 6 might be too long, I dunno. I've already gotten pretty wide with the spacer adapters for my wheels, so I don't mind bringing the hub in a little closer.

I got the hubs from bmi karts - the with the 3/4" sealed taper bearings, which aren't really "sealed bearings" as you'd traditionally think of. They are standard taper bearings that need to be packed and maintained, they just have a rubber boot/seals on the outside of the bearing intended to keep dirt out of the hub. I'm not sure if I'm a fan yet or not.

I ended up going with 3/4" because, well why not I thought - go as heavy duty as possible; however, there does seem to be more hub options for 5/8" spindles. I went with 21" tires up front, and may end up going to 23 or 24 eventually, so I wanted the heavier duty spindle.
 

MTScott

Active member
Messages
146
Reaction score
128
Location
Montana
Something else, I use the parts list on the BMI kit as a bit of a guide sometimes to see what BMI puts together for their kit and go from there:

I don't think they made all the best choices in some cases, but it is a decent starting point.

This build has cost me way more than I ever imagined. Hope you don't struggle with buyers remorse :).
 

madprofessor

"Loose Cannon Creations"
Messages
2,899
Reaction score
888
Location
Jacksonville, Florida
I ended up with the 3/4" by 4.5" spindles, much like this:
Exactly the same 2 spindles I last bought from BMI, left and right sides w/brackets. Same reason, wanted the strongest available so wheelies wouldn't bend them out of whack.
Found out the hard way afterward (was plainly visible, but I wasn't thinking) that those welded spindle arms come at 90-degrees, have to remake them completely for setting up Ackermann angle, long travel suspension, and enough arm strength to match the axles.
6" wheels with 3/4" bearings cost the same as 5/8" bearing wheels, no dollar problems there at all.
 

MTScott

Active member
Messages
146
Reaction score
128
Location
Montana
Exactly the same 2 spindles I last bought from BMI, left and right sides w/brackets. Same reason, wanted the strongest available so wheelies wouldn't bend them out of whack.
Found out the hard way afterward (was plainly visible, but I wasn't thinking) that those welded spindle arms come at 90-degrees, have to remake them completely for setting up Ackermann angle, long travel suspension, and enough arm strength to match the axles.
6" wheels with 3/4" bearings cost the same as 5/8" bearing wheels, no dollar problems there at all.

Well I learn something new on this build at every corner... didn't know anything about ackermann angle, so thanks for that rabbit hole. I may have to build some sort of "L" bracket off the spindle arms to achieve this. Not quite sure how to get the geometry right yet, but, "close enough" might have to do for an offroad kart.
 

madprofessor

"Loose Cannon Creations"
Messages
2,899
Reaction score
888
Location
Jacksonville, Florida
Linked below is a guy's video explaining Ackermann in the clearest and simplest way I have found, definitely watch it if you want to be able to steer your kart without the front wheels scrubbing and sliding. When you reach the 5:00 minute mark, he explains how you can use those 90-degree spindles just as they are, by bolting the pitman arm ends of the tierods separately instead of on the same bolt. The ends reach an inch or two further, going past themselves to reach their bolt holes. Gives same exact Ackermann for either leading arm or trailing arm setups, without having to change the angle of the spindle arms.
GoKart steering explained,including Ackermann Theory.WATCH BEFORE YOU WELD! - YouTube
 
Top